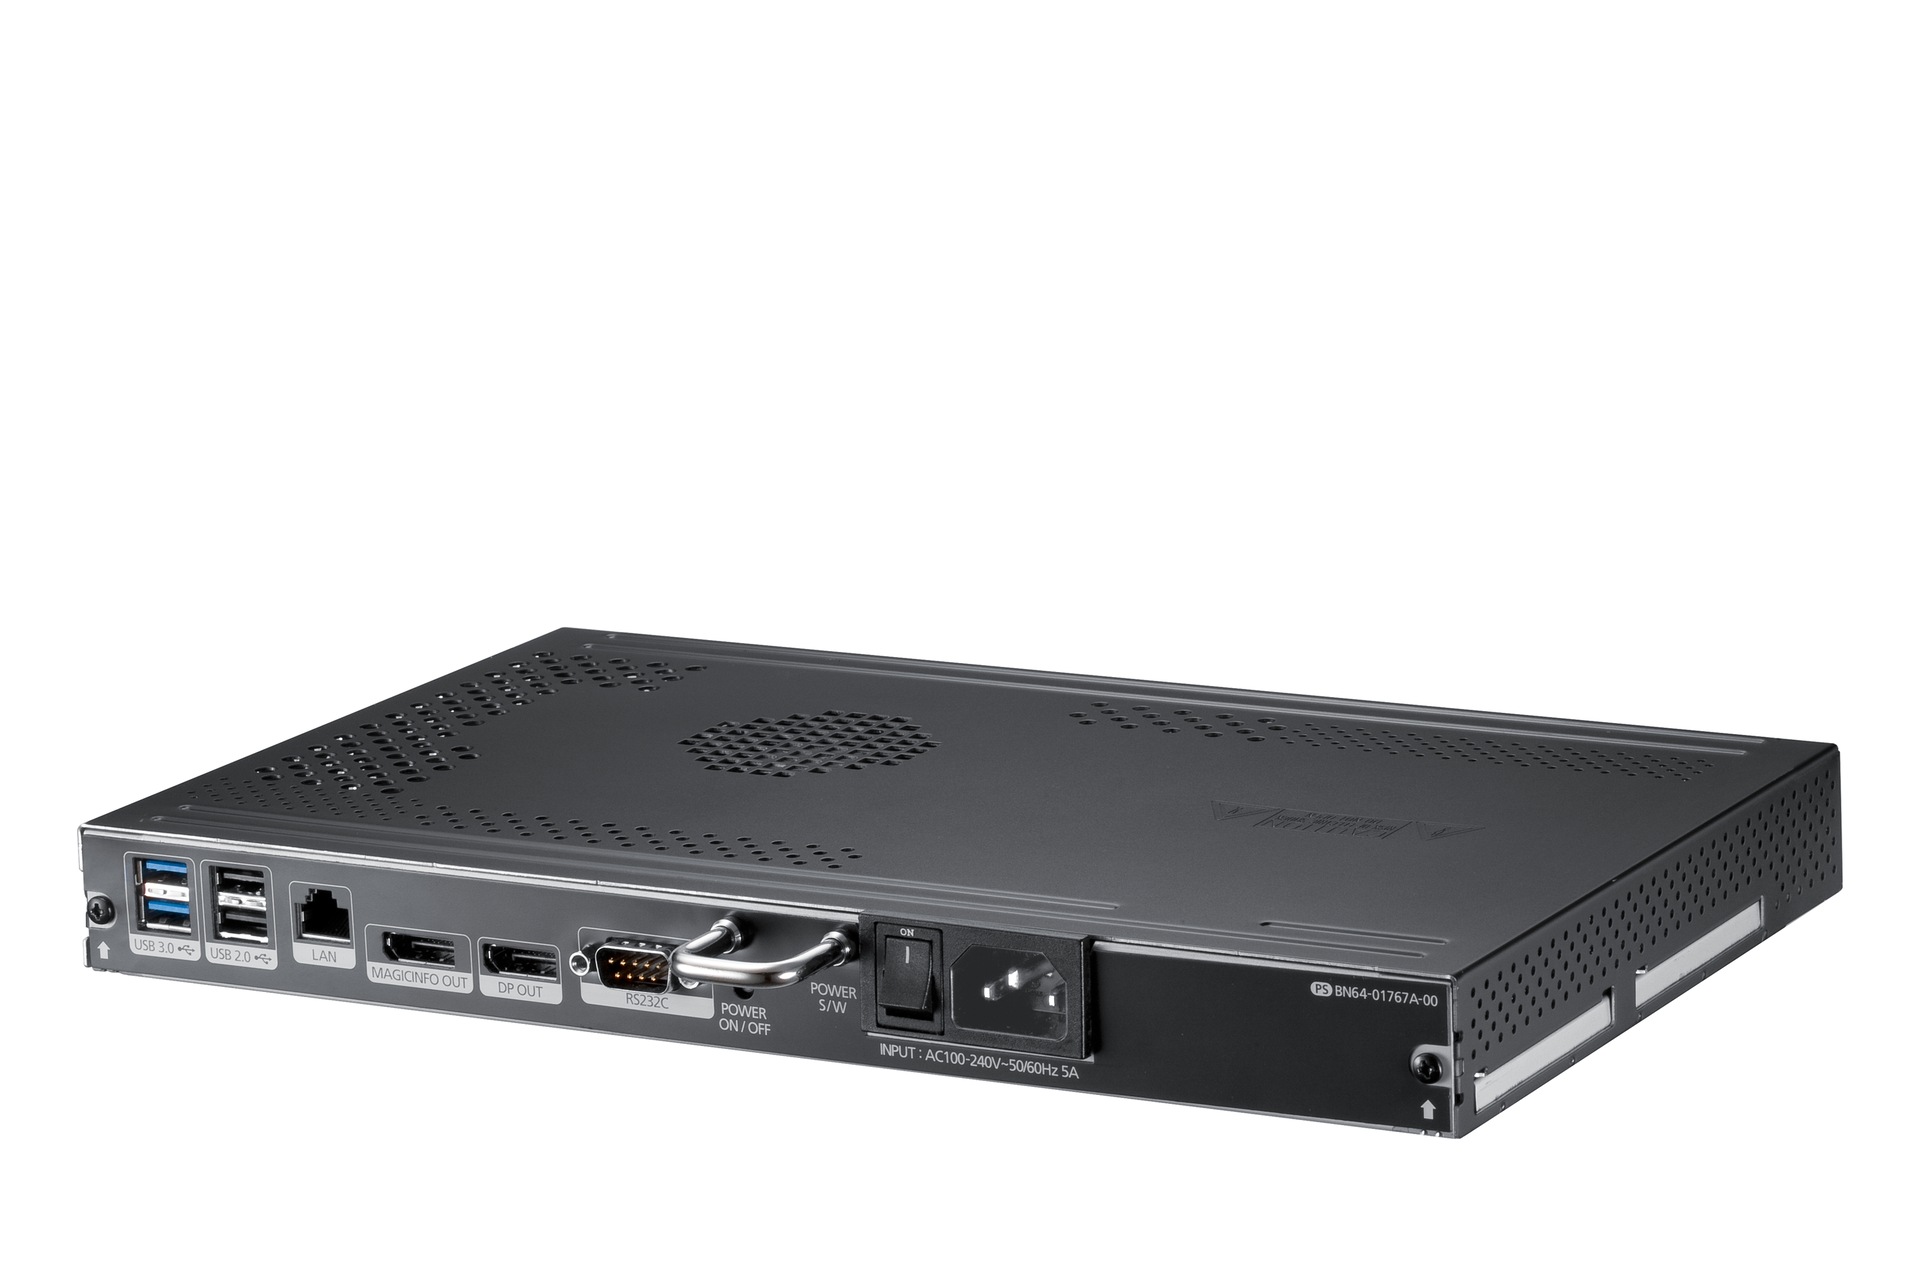
Affichage Dynamique Accessoires SBB-A Impression SBB-A4G - Manuels - Samsung
SAMSUNG sur fnac.com - Liste des manuels utilisateur Samsung - Revenir à l'accueil
|
Description |
Langue | ||
|---|---|---|---|
| Manuel de l'utilisateur | 2013.12.09 | KOREAN, ENGLISH, CHINESE, CHINESE, FRENCH, GERMAN, HUNGARIAN, ITALIAN, JAPANESE, KAZAKH, POLISH, PORTUGUESE, RUSSIAN, SPANISH, SWEDISH, TURKISH | 3.41 MB |
Recherche par catégories : Vidéos :


 Samsung-GALAXY-S4-Air-View-Tutoriel-Video
 Samsung- GALAXY S4 - Air Gesture - Tutoriel - Video
 Samsung- GALAXY S4 - Lecteur optique - Tutoriel - Video
 Samsung - GALAXY S4 - Smart Scroll - Tutoriel - Video
 Samsung GALAXY S4 - ChatOn - Tutoriel - Video
 Samsung GALAXY S4 - S Translator - Tutoriel - Video


 Samsung Unleash Your Fingers - Video
 Samsung Unleash Your Fingers : Next Generation Vidéo
 Samsung Vous allez aimer la vitesse Vidéo
 Samsung GALAXY S4 presents Hi Hey Hello, a musical short film
 GALAXY S4 - The Great Gatsby Premiere, Cannes


 Smart Switch PC-mobile
 Samsung Spot TV Samsung GALAXY S4 - version 60' - Video
 Samsung Safari Imaginaire - Video
 Samsung Spot Samsung Galaxy Note 8.0 - Video
Demarrer-avec-le-Galaxy-S4-GT-I9505-02.07.2013
Autres Manuels Utilisateurs ou documentation Samsung :
Telephone-Mobile-Smartphones-GT-B7330-Manuels
Telephone-Mobile-Smartphones-Galaxy-Trend-GT-S7560-Manuels
Telephone-Mobile Smartphones SM-G3815-Manuels
Telephone-Mobile-Smartphones-GT-S7275R-Manuels
GSM Tablet Galaxy Note 10.1 2014 Edition Wi-Fi P6000 Android SM-P600 - Manuels
Téléphone Mobile Tablette Galaxy Note 10.1 Edition 2014SM-P600 - Manuels
Téléphone Mobile Tablette Galaxy Tab 3 (10.1) - 4GGT-P5220 - Manuels
Téléphone Mobile Smartphones Galaxy Note 3SM-N9005 - Octobre 2013 - Manuels
Mobilité Tablette Galaxy Tab 3 (10.1) - 4G Impression GT-P5220 - Manuels
Mobilité Téléphone Intelligent Galaxy Note 3SM-N900W8 - Manuels
Informatique Ordinateur Portable NP275E5E NP275E5E-K02FR
TV Audio / Vidéo 3D UE40F6510, TV LED 40'', Full HD, Smart TV, 3D UE40F6510SS
TV Audio / Vidéo 3D UE40F6640SS
TV Audio / Vidéo 3D UE46F6670SS - Manuels
Electroménager Climatiser Plusieurs Pièces AM017FNLDEH - Manuels
Informatique Multifonction Monochrome 18 cpm Fax laser mono SF-650 - Manuels
Informatique Multifonction Monochrome Multifonction monochrome SCX-3400SCX-3400 - Manuels
TV Audio / Vidéo Home Cinéma Home cinéma DVD, 5.1, HT-D350WXZF, série 3HT-D350 - Manuels
Téléphone Mobile Tablette Galaxy Tab 10.1GT-P7500/M16 - Manuels
Imprimantes & Multifonctions Imprimantes Laser Monochrome Imprimante monochrome SL-M4020ND - Manuels
Imprimantes & Multifonctions Imprimantes Laser Monochrome Imprimante monochrome ML-3310ND - Manuels
Informatique Imprimante Monochrome Imprimante monochrome ML-3710DW - Septembre 2013 - Manuels
Informatique Imprimante Monochrome Imprimante monochrome ML-3710ND - Septembre 2013 - Manuels
Informatique Imprimante Monochrome Imprimante monochrome ML-3710ND - Manuels
TV Audio / Vidéo Home Cinéma HT-D4500 - Manuels
Informatique Imprimante Monochrome Imprimante monochrome ML-3710DW Manuels
Informatique Ordinateur Portable NP900X3E NP900X3E-K01FR Windows 8 MAnuels
Informatique-Multifonction-Couleur-Multifonction-couleur-CLX-3305FW-Manuels
Imprimantes-Multifonctions-Imprimantes-Laser-Monochrome-Imprimante-Monochrome-SL-M3820DW-Manuels
Informatique-Imprimante-Monochrome-ML-2164-Manuels
Imprimantes-Multifonctions-Imprimantes-Laser-Monochrome-Imprimante-Laser-Monochrome-ML-4050ND-38ppm
Imprimantes & Multifonctions Imprimantes Laser Monochrome Imprimante monochrome ML-3710D
Imprimantes-Multifonctions-Imprimantes-Laser-Monochrome-Imprimante-Monochrome-SL-M3320ND
Imprimantes-Multifonctions-Imprimantes-Laser-Monochrome-Imprimante-monochrome-SL-M3820ND
Imprimantes-Multifonctions-Imprimantes-Laser-Monochrome-Imprimante-monochrome-ML-3310D
Samsung-Informatique-Ordinateur-Portable-NP900X3E-NP900X3E-K02UK
Mobilité Tablette Galaxy Tab 3 8
Informatique Ordinateur Portable Série 9 NP900X4D-A03FR 03/09/2013
Informatique Ordinateur Portable XE500T1C-A01FR
Informatique Imprimante Monochrome Imprimante monochrome SL-M3820ND
Informatique-Multifonction-Monochrome-Multifonction-monochrome-SL-M2875FW-MAJ-14-08-2013
Informatique Ordinateur Portable ATIV Smart PC XE500T1C-H02FR Windows 8
Téléphone Mobile Tablette Galaxy Tab 3 (8.0) SM-T310
Informatique Imprimante Monochrome Imprimante monochrome ML-2955DW
Informatique Imprimante Monochrome Imprimante monochrome SL-M4020ND
Informatique Ordinateur Portable XE500T1CXE500T1C-G02FR Windows 8
Informatique Ordinateur Portable NP270E5E NP270E5E-K08FR Windows 8
Photo Caméscope Définition Standard SMX-F50BP
Téléphone Mobile GSM Samsung Player 5 noir - Open market GT-S5560
Téléphone Mobile Smartphones Galaxy SIII mini GT-I8190
TV /Audio / Vidéo 3D LED Smart TV LED 3D UA65ES8000R série 8
Samsung-Telephone-Mobile-Smartphones-GT-S5839I-Manuels
/SAMSUNG/16-4ppm-Imprimante-laser-couleur-CLP-310-Manuels.htm
/SAMSUNG/16-4ppm-Multifonction-lasercouleur-CLX-3170FN-Samsung.htm
/SAMSUNG/16-4ppm-Multifonction-lasercouleur-CLX-3170FN-Samsung-Manuels.htm
/SAMSUNG/16-4ppm-Multifonction-laser-couleur-CLX-3175FW-Samsung-Manuels.htm
/SAMSUNG/16-4ppm-Multifonction-lasercouleur-CLX-3185FW-Manuels-Samsung.htm
/SAMSUNG/16-4ppm-Multifonction-laser-couleur-CLX-3185-Samsung.htm
/SAMSUNG/16-4ppm-Multifonction-laser-couleur-CLX-3185-Samsung-Manuels.htm
/SAMSUNG/17-3-Serie-3-300E7A-NP300E7A-S01FR-Manuels.htm
/SAMSUNG/19-Serie-3-Moniteur-LED-S19A300N-Samsung-Manuels.htm
/SAMSUNG/20ppm-Multifonction-laser-couleur-CLX-6220FX-Samsung-Manuels.htm
/SAMSUNG/24ppm-Multifonction-laser-couleur-CLX-6250FX-Samsung-Manuels.htm
/SAMSUNG/27-Serie7-Moniteur-station-d-accueil-C27A750-C27A750X-Samsung-Manuels.htm
/SAMSUNG/32-UE32D6200WXZF-serie-6-SMART-TV-3D-FULL-HD-LED-TV-UE32D6200TS-Samsung-Manuels.htm
/SAMSUNG/35-35ppm-Copieur-couleur-CLX-9350ND-Samsung-Manuels.htm
/SAMSUNG/40-UE40D6500WXZF-serie-6-SMART-TV-3D-FULL-HD-LED-TV-UE40D6500VS-Manuels.htm
/SAMSUNG/46-LE46D550WXZF-serie-5-HD-TV-LCD-TV-LE46D550K1W-Samsung-Manuels.htm
/SAMSUNG/GalaxyAceGT-S5830.htm
/SAMSUNG/Galaxy-S-Advance-GT-I9070P-Samsung-Manuels.htm
/SAMSUNG/GalaxySIIGT-I9100.htm
/SAMSUNG/GalaxyTab10.1GT-P7500M16.htm
/SAMSUNG/GalaxyTab8.9GT-P7310M16.htm
/SAMSUNG/Galaxy-Y-S5360-AndroidGT-S5360-Manuels-Utilisateur-et-Guides-Rapide-Samsung.htm
/SAMSUNG/LE32C350LE32C350D1W.htm
/SAMSUNG/LE40C630LE40C630K1W.htm
/SAMSUNG/LE55C650-LE55C650L1W-Samsung-Manuels.htm
/SAMSUNG/Liste-Manuels-Utilisateur-Samsung.htm
/SAMSUNG/Liste-Produits-Manuels-Utilisateur-Samsung.htm
/SAMSUNG/Manuels-de-l-Utilisateur-19-UE19D4000WXZF-serie-4-HD-TV-LED-TV-UE19D4000NW-Samsung.htm
/SAMSUNG/Manuels-de-l-Utilisateur-19-UE19D4010WXZF-serie-4-HD-TV-LED-TV-UE19D4010NW-Samsung.htm
/SAMSUNG/Manuels-de-l-Utilisateur-Galaxy-Mini-2-GT-S6500-Samsung.htm
/SAMSUNG/Manuels-de-l-Utilisateur-Galaxy-Y-GT-S5360-Samsung.htm
/SAMSUNG/Manuels-de-l-Utilisateur-GT-B5510-Samsung.htm
/SAMSUNG/Manuels-de-l-Utilisateur-GT-B7300-Samsung.htm
/SAMSUNG/Manuels-Utilisateur-et-Guides-Rapide-Samsung-Galaxy-S-II-noir-Open-market-GT-I9100.htm
/SAMSUNG/Micro-chaine-MM-D330DWXZF-serie-3-MM-D330-Manuels.htm
/SAMSUNG/N145Plus-NP-N145P-Manuels.htm
/SAMSUNG/N150-NP-N150-Manuels.htm
/SAMSUNG/Nexus-S-noir-Open-market-GT-I9023-GT-B5310-Manuels.htm
/SAMSUNG/Samsung-16-MP-Ecran-LCD-3-Compact-Performant-WB700-SAMSUNG-WB700-Manuels.htm
/SAMSUNG/Samsung-18-XTDVBEUE-SWE-0327.pdf-Suede-Manuels.htm
/SAMSUNG/Samsung-2012_Skype_Eng-0316-1-Manuels.htm
/SAMSUNG/Samsung-20120405165711377-2012_Skype_Eng-0316-1.pdf-Manuels.htm
/SAMSUNG/Samsung-20-XTDVBEUE-NOR-0327.pdf-E-Manual-Norvege-Manuels.htm
/SAMSUNG/Samsung-2243QW-Japon-Manuels.htm
/SAMSUNG/Samsung-22-LE22D450WXZF-serie-4-Full-HD-LCD-TV-LE22D450G1W-Manuels.htm
/SAMSUNG/Samsung-305U1A-A02-NP305U1A-A02HK-Manuels.htm
/SAMSUNG/Samsung-320MXN-3-SSD-Japon-Manuels.htm
/SAMSUNG/Samsung-320TSN-3D-SSD-Japon-Manuels.htm
/SAMSUNG/Samsung-32-LE32D450WXZF-serie-4-HD-TV-LCD-TV-Manuels.htm
/SAMSUNG/Samsung-32-UE32D4000WXZF-serie-4-HD-TV-LED-TV-UE32D4000NW-Manuels.htm
/SAMSUNG/Samsung-400EXN-Japon-Manuels.htm
/SAMSUNG/Samsung-400TS-3-400TS-3-SIM-Japon-Manuels.htm
/SAMSUNG/Samsung-400TS-3D-400TS-3D-SIM-SSD-Japon-Manuels.htm
/SAMSUNG/Samsung-400UXN-3-Japon-Manuels.htm
/SAMSUNG/Samsung-400UXN-3-SSD-Japon-Manuels.htm
/SAMSUNG/Samsung-40-LE40D550WXZF-serie-5-HD-TV-LCD-TV-LE40D550K1W-Manuels.htm
/SAMSUNG/Samsung-40-Smart-3D-LED-TV-ES6565-UE40ES6565U-Norvege-Manuels.htm
/SAMSUNG/Samsung-40-UE40D5700WXZF-serie-5-SMART-TV-FULL-HD-LED-TV-UE40D5700RS-Manuels.htm
/SAMSUNG/Samsung-40-UE40D6500WXZF-serie-6-SMART-TV-3D-FULL-HD-LED-TV-UE40D6500VS-Manuels.htm
/SAMSUNG/Samsung-40-UE40D8000WXZF-serie-8-SMART-TV-3D-FULL-HD-LED-TV-UE40D8000YS-Manuels.htm
/SAMSUNG/Samsung-460UT-B-Japon-Manuels.htm
/SAMSUNG/Samsung-46-Smart-3D-LED-TV-ES6535-UE46ES6535U-Norvege-Manuels.htm
/SAMSUNG/Samsung-46-Smart-3D-LED-TV-ES6565-UE46ES6565U-2012_Skype_FIN-0424.pdf-Finlande-Manuels.htm
/SAMSUNG/Samsung-46-Smart-3D-LED-TV-ES6565-UE46ES6565U-2012_Skype_SWE-0424.pdf-Suede-Manuels.htm
/SAMSUNG/Samsung-46-Smart-3D-LED-TV-ES6565-UE46ES6565U-Danemark-Manuels.htm
/SAMSUNG/Samsung-46-Smart-3D-LED-TV-ES7005-UE46ES7005U-Norvege-Manuels.htm
/SAMSUNG/Samsung-46-UE46D5700WXZF-serie-5-SMART-TV-FULL-HD-LED-TV-UE46D5700RS-Manuels.htm
/SAMSUNG/Samsung-46-UE46D7000WXZF-serie-7
/SAMSUNG/Samsung-51-PS51E490WXZF-serie-4-3D-HD-TV-PDP-TV-PS51E490B1W-Manuels.htm
/SAMSUNG/Samsung-51-Smart-3D-Plasma-E555-PS51E555D1K-Norvege-Manuels.htm
/SAMSUNG/Samsung-51-Smart-3D-Plasma-E8005-PS51E8005GU-Norvege-Manuels.htm
/SAMSUNG/Samsung-55-Smart-3D-LED-TV-ES6805-UE55ES6805U-Norvege-Manuels.htm
/SAMSUNG/Samsung-700TSn-2-SSD-Japon-Manuels.htm
/SAMSUNG/Samsung-708SC-Japon-Manuels.htm
/SAMSUNG/Samsung-740SC-JP-Manuels.htm
/SAMSUNG/Samsung-821SC-JP-Manuels.htm
/SAMSUNG/Samsung-910MP-Manuels.htm
/SAMSUNG/Samsung-940SC-JP-Manuels.htm
/SAMSUNG/Samsung-941SC-JP-Manuels.htm
/SAMSUNG/Samsung-Appareil-photo-numerique-Samsung-ES90-Manuels.htm
/SAMSUNG/Samsung-Appareils-mobiles-Smartphone-Manuels.htm
/SAMSUNG/Samsung-AQ09UGBN-Manuels.htm
/SAMSUNG/Samsung-AQ18UGFN-Manuels.htm
/SAMSUNG/Samsung-AQV12KBBN-Pologne-Manuels.htm
/SAMSUNG/Samsung-AQV18UGAX-Manuels.htm
/SAMSUNG/Samsung-BN68-04109G-00L05-0228.pdf-LED-TV-Serie-6-user-manual-Anglais-Manuels.htm
/SAMSUNG/Samsung-Camaras-Alta-definicion-Videocamara-HD-F80HMX-F80SP-Espagne-Manuels.htm
/SAMSUNG/Samsung-Camera-Camcorder-Compact-ST66-SAMSUNG-ST66-Manuels.htm
/SAMSUNG/Samsung-Camera-et-Camcorder-NX-NX11-Appareil-photo-compact-Manuels.htm
/SAMSUNG/Samsung-Camera-et-Camcorder-NX-NX5-Appareil-photo-compact-Manuels.htm
/SAMSUNG/Samsung-Cell-Phones-AT-T-SGH-I547-Samsung-Galaxy-Rugby-Pro-AT-T-Manuels.htm
/SAMSUNG/Samsung-Cell-Phones-AT-T-SGH-I577-Samsung-Galaxy-Exhilarate-Android-Smartphone-Manuels.htm
/SAMSUNG/Samsung-Cell-Phones-Sprint-SPH-L300-Samsung-Galaxy-Victory-4G-LTE-Sprint-Manuels.htm
/SAMSUNG/Samsung-Cell-Phones-VIEW-ALL-SPH-M930-Manuels.htm
/SAMSUNG/Samsung-CLP-367W-Manuels.htm
/SAMSUNG/Samsung-Congelateur-1porteA-277-L-Blanc-RZ80FHSW-Manuels.htm
/SAMSUNG/Samsung-Cuisson-Four-Four-compact-Twin-30-L-FQV113T002-Manuels.htm
/SAMSUNG/Samsung-CW21Z503N-Manuels.htm
/SAMSUNG/Samsung-CW21Z573N-Manuels.htm
/SAMSUNG/Samsung-DA68-01829P.pdf-Manuels.htm
/SAMSUNG/Samsung-DA68-01829P.pdf-SEC-Manuels.htm
/SAMSUNG/Samsung-DA-E550-CN-Manuels.htm
/SAMSUNG/SAMSUNG-DV90-Manuels.htm
/SAMSUNG/Samsung-E1720NR-Japon-Manuels.htm
/SAMSUNG/Samsung-Electrom%C3%A9nager-Lave-vaisselle-DW5363PGBWQ-Manuels.htm
/SAMSUNG/Samsung-Electromenager-Climatiser-Plusieurs-Pieces-Cassette-1-voie-MH026FSEA-Manuels.htm
/SAMSUNG/Samsung-Electromenager-Climatiser-Plusieurs-Pieces-Cassette-4-voies-MH035FMEA-Manuels.htm
/SAMSUNG/Samsung-Electromenager-Climatiser-Plusieurs-Pieces-MH020FNEA-Manuels.htm
/SAMSUNG/Samsung-Electromenager-Climatiser-Plusieurs-Pieces-MH026FWEA-Manuels.htm
/SAMSUNG/Samsung-Electromenager-Climatiser-Plusieurs-Pieces-MH035FEEA-Manuels.htm
/SAMSUNG/Samsung-Electromenager-Climatiser-Plusieurs-Pieces-MH035FJEA-Manuels.htm
/SAMSUNG/Samsung-Electromenager-Climatiser-Plusieurs-Pieces-MH052FJEA-Manuels.htm
/SAMSUNG/Samsung-Electromenager-Climatiser-Plusieurs-Pieces-MH052FWEA-Manuels.htm
/SAMSUNG/Samsung-Electromenager-Climatiser-Plusieurs-Pieces-MH060FXEA3A-Manuels.htm
/SAMSUNG/Samsung-Electromenager-Climatiser-Plusieurs-Pieces-MH068FXEA4-Manuels.htm
/SAMSUNG/Samsung-Electromenager-Climatiser-Plusieurs-Pieces-MH18AP2X-Manuels.htm
/SAMSUNG/Samsung-Electromenager-Climatiser-Une-Piece-AQ09UGFN-Manuels.htm
/SAMSUNG/Samsung-Electromenager-Climatiser-Une-Piece-AQ12TSBN.manuels.htm
/SAMSUNG/Samsung-Electromenager-Climatiser-Une-Piece-AQ12UGBN-Manuels.htm
/SAMSUNG/Samsung-Electromenager-Climatiser-Une-Piece-AQ18FAN-Manuels.htm
/SAMSUNG/Samsung-Electromenager-Climatiser-Une-Piece-AQ18UGAN-Manuels.htm
/SAMSUNG/Samsung-Electromenager-Climatiser-Une-Piece-AQV07PSBN-Manuels.htm
/SAMSUNG/Samsung-Electromenager-Climatiser-Une-Piece-AQV09KBBN.manuels.htm
/SAMSUNG/Samsung-Electromenager-Climatiser-Une-Piece-AQV09PSBX-Manuels.htm
/SAMSUNG/Samsung-Electromenager-Climatiser-Une-Piece-AQV09UGAX-Manuels.htm
/SAMSUNG/Samsung-Electromenager-Climatiser-Une-Piece-AQV12KBAN-Manuels.htm
/SAMSUNG/Samsung-Electromenager-Climatiser-Une-Piece-AQV12NSBN-Manuels.htm
/SAMSUNG/Samsung-Electromenager-Climatiser-Une-Piece-AQV12PSBN-Manuels.htm
/SAMSUNG/Samsung-Electromenager-Climatiser-Une-Piece-AQV12PWAN-Manuels.htm
/SAMSUNG/Samsung-Electromenager-Climatiser-Une-Piece-AQV12UGAN-Manuels.htm
/SAMSUNG/Samsung-Electromenager-Climatiser-Une-Piece-AQV12UGAX-Manuels.htm
/SAMSUNG/Samsung-Electromenager-Climatiser-Une-Piece-AQV18KBAX-Manuels.htm
/SAMSUNG/Samsung-Electromenager-Climatiser-Une-Piece-AQV18PSBX-Manuels.htm
/SAMSUNG/Samsung-Electromenager-Climatiser-Une-Piece-AQV18UGAN-Manuels.htm
/SAMSUNG/Samsung-Electromenager-Climatiser-Une-Piece-AQV24PSBN-Manuels.htm
/SAMSUNG/Samsung-Electromenager-Climatiser-Une-Piece-Mistral-AQV09PSBN-Manuels.htm
/SAMSUNG/Samsung-Electromenager-Climatiser-Une-Piece-Mistral-AQV09PSBN-User-Manuals-Manuels.htm
/SAMSUNG/Samsung-Electromenager-Climatiser-Une-Piece-SH24TA6D-Manuels.htm
/SAMSUNG/Samsung-Electromenager-Combines-Refrigerateur-Combine-RB29FEJNDWW-Manuels.htm
/SAMSUNG/Samsung-Electromenager-Combines-RL34HGMG-Manuels.htm
/SAMSUNG/Samsung-Electromenager-Double-portes-Refrigerateur-DP-A306-L-Silver-RT37GBSS-Manuels.htm
/SAMSUNG/Samsung-Electromenager-Double-portes-RT41MASW-Manuels.htm
/SAMSUNG/Samsung-Electromenager-Double-portes-RT45JSTS-Manuels.htm
/SAMSUNG/Samsung-Electromenager-Double-portes-RT45JSTS-manuels.htm
/SAMSUNG/Samsung-Electromenager-Double-portes-RT50QMSW-Manuels.htm
/SAMSUNG/Samsung-Electromenager-Double-portes-RT59NBPN-Manuels.htm
/SAMSUNG/Samsung-Electromenager-Double-portes-RT59PMSW-Manuels.htm
/SAMSUNG/Samsung-Electromenager-Double-portes-RT63VBPN-Manuels.htm
/SAMSUNG/Samsung-Electromenager-Four-Four-compact-Twin-30-L-FQV113T002-Manuels.htm
/SAMSUNG/Samsung-Electromenager-Lavage-Lave-Linge-WF70F5E3U4W-Manuels.htm
/SAMSUNG/Samsung-Electromenager-Lave-linge-frontal-WF0702NBE-Manuels.htm
/SAMSUNG/Samsung-Electromenager-Lave-linge-frontal-WF1702NHWG-YLE-Manuels.htm
/SAMSUNG/Samsung-Electromenager-Lave-linge-frontal-WF70F5E3U4W-Manuels.htm
/SAMSUNG/Samsung-Electromenager-Lave-vaisselle-DW5363PGBSL-Manuels.htm
/SAMSUNG/Samsung-Electromenager-Micro-ondes-Micro-ondes-mono-23L-SILVER-ME82V-Manuels.htm
/SAMSUNG/Samsung-Electromenager-Plaque-de-cuisson-CTN431SC0R-Manuels.htm
/SAMSUNG/Samsung-Electromenager-Plaque-de-cuisson-CTN431SC0S-Manuels.htm
/SAMSUNG/Samsung-Electromenager-Pompe-a-chaleur-Air-Eau-AVXC4H140EE-Manuels.htm
/SAMSUNG/Samsung-Electromenager-Pompe-a-chaleur-Air-Eau-AVXDUH112EE-Manuels.htm
/SAMSUNG/Samsung-Electromenager-Pompe-a-chaleur-Air-Eau-AVXTJH036EE-Manuels.htm
/SAMSUNG/Samsung-Electromenager-Pompe-a-chaleur-Air-Eau-AVXWNH022EE-Manuels.htm
/SAMSUNG/Samsung-Electromenager-Pompe-a-chaleur-Air-Eau-Neo-Forte-EHS-Hybride-NH022NHXEA-Manuels.htm
/SAMSUNG/Samsung-Electromenager-Pompe-a-chaleur-Air-Eau-NH160PHXEA-Manuels.htm
/SAMSUNG/Samsung-Electromenager-Pompe-a-chaleur-Air-Eau-NH200WHXES-Manuels.htm
/SAMSUNG/Samsung-Electromenager-Pompe-a-chaleur-Air-Eau-NH300WHXES-Manuels.htm
/SAMSUNG/Samsung-Electromenager-Pompe-a-chaleur-Air-Eau-NS0351DXEA-Manuels.htm
/SAMSUNG/Samsung-Electromenager-Pompe-a-chaleur-Air-Eau-NS071SDXEA-manuels.htm
/SAMSUNG/Samsung-Electromenager-Pompe-a-chaleur-Air-Eau-RVXMHF050EA-manuels.htm
/SAMSUNG/Samsung-Electromenager-Refrigerateur-une-porte-RZ90HAWW-Manuels.htm
/SAMSUNG/Samsung-Electromenager-Refrigerateur-une-porte-RZ90HAWW-Samsung-Manuels.htm
/SAMSUNG/Samsung-Electromenager-Robot-Aspirateur-Robot-2-murs-Virtuel-Noir-SR8895-Manuels.htm
/SAMSUNG/Samsung-Electromenager-Robot-SR8750-Manuels.htm
/SAMSUNG/Samsung-Electromenager-Sans-sac-SC86H0-Manuels.htm
/SAMSUNG/Samsung-Electromenager-Sans-sac-SC8850-Manuels.htm
/SAMSUNG/Samsung-Electromenager-Sechoir-seche-linge-condensation-8kg-SDC3C801-Manuels.htm
/SAMSUNG/Samsung-electromenagers-Front-Loader-WF710Y4BKWQ-EN-Belgique-Manuels.htm
/SAMSUNG/Samsung-Electromenagers-Front-Loader-WF710Y4BKWQ-EN-Manuels.htm
/SAMSUNG/Samsung-Electromenager-Side-By-Side-Refrigerateur-SBS-A-507-L-Blanc-RSA1TWP-Manuels.htm
/SAMSUNG/Samsung-Electromenager-Side-By-Side-Refrigerateur-Side-By-Side-RS6178UGDSR-Manuels.htm
/SAMSUNG/Samsung-Electromenager-Side-By-Side-RSA1DTMG-Manuels.htm
/SAMSUNG/Samsung-Electrom-nager-Double-portes-Refrigerateur-DP-A306-L-Silver-RT37GBSS-Manuels.htm
/SAMSUNG/Samsung-E-MANUAL-X9DVBEU4E-ENG-Manuel.htm
/SAMSUNG/Samsung-Entro-SPH-m350-SPH-M350-Manuels.htm
/SAMSUNG/Samsung-Exhibit-4G-Android-Smartphone-SGH-T759-USA-Etats-Unis-Manuels.htm
/SAMSUNG/Samsung-Gainable-Slim-MH026FEEA-Manuels.htm
/SAMSUNG/Samsung-Galaxy-Ace-noir-Open-market-GT-S5830-Manuels.htm
/SAMSUNG/Samsung-Galaxy-Gio-noir-SFR-GT-S5660-Manuels.htm
/SAMSUNG/Samsung-Galaxy-mini-gris-Open-market-GT-S5570-Manuels.htm
/SAMSUNG/Samsung-GALAXY-NEXUS-SC-04D-JP-Manuels.htm
/SAMSUNG/Samsung-Galaxy-noir-Bouygues-GT-I7500-Manuels.htm
/SAMSUNG/Samsung-Galaxy-Note-10-1-GT-N8000-Manuels.htm
/SAMSUNG/SamsungGalaxyNoteGT-N7000.htm
/SAMSUNG/Samsung-Galaxy-Note-II-GT-N7100-Manuels.htm
/SAMSUNG/Samsung-GALAXY-Note-SC-05D-JP-Manuels.htm
/SAMSUNG/Samsung-Galaxy-S2-GT-I9100-Manuels.htm
/SAMSUNG/Samsung-Galaxy-S3-GT-I9300-Manuels.htm
/SAMSUNG/SamsungGalaxySGT-I9000.htm
/SAMSUNG/Samsung-GALAXY-S-II-GT-I9100-SINGAPOUR-Manuels.htm
/SAMSUNG/Samsung-Galaxy-S-III-GT-I9300-Manuels.htm
/SAMSUNG/Samsung-Galaxy-S-III-Pub-TV.htm
/SAMSUNG/Samsung-GALAXY-S-II-LTE-SC-03D-JP-Manuels.htm
/SAMSUNG/Samsung-Galaxy-S-II-noir-Open-market-Manuels-Samsung.htm
/SAMSUNG/Samsung-Galaxy-S-noir-Open-market-GT-I9000-Manuels.htm
/SAMSUNG/Samsung-Galaxy-Spica-noir-Bouygues-GT-I5700-Manuels.htm
/SAMSUNG/Samsung-Galaxy-S-Plus-blanc-Orange-GT-I9001-manuel.htm
/SAMSUNG/Samsung-Galaxy-S-SCL-noir-Open%20market-GT-I9003-M4-Manuels.htm
/SAMSUNG/Samsung-Galaxy-S-SCL-noir-Open-market-GT-I9003-M4-Manuels.htm
/SAMSUNG/Samsung-Galaxy-Tab-10.1v-P7100-Android-GT-P7100-M16-Manuels.htm
/SAMSUNG/Samsung-Galaxy-Tab-10-1-GT-P7500-M16-Manuel.htm
/SAMSUNG/Samsung-Galaxy-Tab-10-1-GT-P7500-M16-Manuels.htm
/SAMSUNG/Samsung-GALAXY-Tab-10-1-LTE-SC-01D-JP-Manuels.htm
/SAMSUNG/Samsung-Galaxy-Tab-2-10.1-GT-P5100-Manuels.htm
/SAMSUNG/Samsung-Galaxy-Tab-2-10-1-Wi-Fi-GT-P5110-Samsung-Manuels.htm
/SAMSUNG/Samsung-Galaxy-Tab-2-7.0-GT-P3100-Manuels.htm
/SAMSUNG/Samsung-Galaxy-Tab-2-7.0-GT-P3100-Manuels-Mode-d-emploi.htm
/SAMSUNG/Samsung-GALAXY-Tab-7.0-Plus-SC-02D-JP-Manuels.htm
/SAMSUNG/Samsung-Galaxy-Tab-7-0-Wi-Fi-GT-P3110-Samsung-Manuels.htm
/SAMSUNG/Samsung-GALAXY-Tab-GT-P1000-GT-P1000-M16-Manuels.htm
/SAMSUNG/Samsung-GALAXY-Tab-SC-01C-JP-Manuels.htm
/SAMSUNG/Samsung-Galaxy-Teos-noir-Bouygues-GT-I5800-Manuels.htm
/SAMSUNG/Samsung-Galaxy-Xcover-orange-Open-market-GT-S5690-Manuels.htm
/SAMSUNG/Samsung-Galaxy-Y-DUOS-GT-S6102-Manuels.htm
/SAMSUNG/Samsung-GALAXY-Y-Pro-Duos-GT-B5512-RUSSE-Manuels.htm
/SAMSUNG/Samsung-GALAXY-Y-Pro-GT-B5510-Manuels.htm
/SAMSUNG/Samsung-GSM-GSM-Champ-Duos-E2652-GT-E2652W-Manuels.htm
/SAMSUNG/Samsung-GSM-GSM-E1050-Manuels.htm
/SAMSUNG/Samsung-GSM-GSM-E1180-Manuels.htm
/SAMSUNG/Samsung-GSM-GSM-E2202GT-E2202-2-Manuels.htm
/SAMSUNG/Samsung-GSM-GSM-E2202GT-E2202-Manuels.htm
/SAMSUNG/Samsung-GSM-Smartphone-Galaxy-Camera-EK-GC100-Android-Manuels.htm
/SAMSUNG/Samsung-GSM-Smartphone-Galaxy-Gio-S5660-Android-GT-S5660-Manuels.htm
/SAMSUNG/Samsung-GSM-Smartphone-Galaxy-Note-N7000-AndroidGT-N7000-Belgique-Manuels.htm
/SAMSUNG/Samsung-GSM-Smartphone-Galaxy-Pocket-S5300-Android-GT-S5300-Android-Manuels.htm
/SAMSUNG/Samsung-GSM-Smartphone-Galaxy-S4-I9505-Android-Manuels.htm
/SAMSUNG/Samsung-GSM-Smartphone-Galaxy-S-Advance-i9070-Android-Manuels.htm
/SAMSUNG/Samsung-GSM-Smartphone-Galaxy-SIII-4G-i9305-AndroidGT-I9305-Manuels.htm
/SAMSUNG/Samsung-GSM-Smartphone-Galaxy-S-II-Plus-I9105-Android-GT-I9105P-Manuels.htm
/SAMSUNG/Samsung-GSM-Smartphone-Galaxy-S-Plus-i9001-Android-GT-I9001-M8-Belgique-Manuels.htm
/SAMSUNG/Samsung-GSM-Smartphone-Galaxy-Y-S5360-AndroidGT-S5360-Manuels.htm
/SAMSUNG/Samsung-GSM-Smartphone-GT-B5510-Manuels.htm
/SAMSUNG/Samsung-GSM-Smartphone-Wave-Y-S5380-Bada-GT-S5380D-Manuels.htm
/SAMSUNG/Samsung-GT-B5310-Manuels.htm
/SAMSUNG/Samsung-GT-I9070P_UM_Open_Gingerbread_Fre_Rev.1.0_120710_Screen.pdf-Manuels.htm
/SAMSUNG/Samsung-GT-I9250-Manuels.htm
/SAMSUNG/Samsung-GT-I9300_UM_Open_Icecream_Fre_Rev.1.2_120725_Screen.pdf-Manuels.htm
/SAMSUNG/Samsung-GT-I9300-Manuels.htm
/SAMSUNG/Samsung-GT-N8000-CN-Manuels.htm
/SAMSUNG/Samsung-GT-N8000-Manuels.htm
/SAMSUNG/Samsung-GT-P5110-Japon-Manuels.htm
/SAMSUNG/Samsung-GT-P6200-Manuels.htm
/SAMSUNG/Samsung-GT-S5360_UM_Open_Gingerbread_Fre_Rev.1.0_111130_Screen-Manuel.htm
/SAMSUNG/Samsung-GT-S5360-Manuels.htm
/SAMSUNG/Samsung-GT-S5570_UM_Open_Gingerbread_Fre_Rev.1.0_110726_Screen.pdf-Manuels.htm
/SAMSUNG/Samsung-GT-S5830_UM_Orange_Gingerbread_Fre_Rev.1.0_110825_Screen-Manuels.htm
/SAMSUNG/Samsung-Home-Appliance-Side-by-Side-RSA1STMG-Arabe-Manuels.htm
/SAMSUNG/Samsung-Home-Appliance-Top-Loader-Top-Load-Washing-Machine-WA10W9-Singapour-Manuels.htm
/SAMSUNG/Samsung-Home-Appliance-Top-Mounted-Fridge-Freezer-SR365TSS-Nouvelle-Zelande-Manuels.htm
/SAMSUNG/Samsung-I9300-GT-I9300-Afrique-du-Nord-Manuels.htm
/SAMSUNG/Samsung-Imprimantes-et-imprimantes-multifonctions-Laser-couleur-CLP-365W-Manuels.htm
/SAMSUNG/Samsung-Imprimantes-et-imprimantes-multifonctions-Laser-monochrome-ML-2955ND-Manuels.htm
/SAMSUNG/Samsung-Imprimantes-laser-couleur-multifonctions-A3-Manuels.htm
/SAMSUNG/Samsung-Imprimantes-Multifonctions-Copieurs-A3-Multifonctions-CLX-9201NA-Manuels.htm
/SAMSUNG/Samsung-Imprimantes-Multifonctions-Copieurs-A4-A3-Copieur-monochrome-SCX-6555N-Manuels.htm
/SAMSUNG/Samsung-Imprimantes-Multifonctions-Imprimantes-Laser-Monochrome-ML-6510ND-Manuels.htm
/SAMSUNG/Samsung-Informatica-LCD-2043SW-Portugues-Portugais-Bresil-Manuels.htm
/SAMSUNG/Samsung-Informatique-Electromenager-Micro-ondes-CE117PPT-Manuels.htm
/SAMSUNG/Samsung-Informatique-Imprimante-couleur-CLP-360-Manuels.htm
/SAMSUNG/Samsung-Informatique-Imprimante-Couleur-Imprimante-couleur-CLP-365-Manuels.htm
/SAMSUNG/Samsung-Informatique-Imprimante-Couleur-Imprimante-couleur-CLP-620ND-Manuels.htm
/SAMSUNG/Samsung-Informatique-Imprimante-Couleur-Imprimante-couleur-CLP-775ND-Manuels.htm
/SAMSUNG/Samsung-Informatique-Imprimante-Monochrome-16ppm-Imprimante-laser-mono-ML-1630-Manuels.htm
/SAMSUNG/Samsung-Informatique-Imprimante-Monochrome-16ppm-Imprimante-laser-mono-ML-1660-Manuels.htm
/SAMSUNG/Samsung-Informatique-Imprimante-Monochrome-18ppm-Imprimante-laser-mono-ML-1865-Manuels.htm
/SAMSUNG/Samsung-Informatique-Imprimante-Monochrome-18ppm-Imprimante-laser-mono-ML-1865W-Manuels.htm
/SAMSUNG/Samsung-Informatique-Imprimante-Monochrome-24ppm-Imprimante-laser-mono-ML-2580N-Manuels.htm
/SAMSUNG/Samsung-Informatique-Imprimante-Monochrome-Imprimante-monochrome-ML-2160-Manuels.htm
/SAMSUNG/Samsung-Informatique-Imprimante-Monochrome-Imprimante-monochrome-ML-2165-Manuels.htm
/SAMSUNG/Samsung-Informatique-Imprimante-Monochrome-Imprimante-monochrome-ML-2545-Manuels.htm
/SAMSUNG/Samsung-Informatique-Imprimante-Monochrome-Imprimante-monochrome-ML-3710ND-Manuels.htm
/SAMSUNG/Samsung-Informatique-Imprimante-Monochrome-Imprimante-monochrome-ML-3750ND-Manuels.htm
/SAMSUNG/Samsung-Informatique-Imprimante-Monochrome-Imprimante-monochrome-ML-4510ND-Manuels.htm
/SAMSUNG/Samsung-Informatique-Imprimante-Monochrome-Imprimante-Monochrome-SL-M2825ND-Manuels.htm
/SAMSUNG/Samsung-Informatique-Imprimante-Monochrome-Manuels.htm
/SAMSUNG/Samsung-Informatique-Imprimante-Monochrome-ML-1674-Manuels.htm
/SAMSUNG/Samsung-Informatique-Imprimante-monochrome-ML-2165W-Manuels.htm
/SAMSUNG/Samsung-Informatique-Imprimante-monochrome-ML-2540R-Manuels.htm
/SAMSUNG/Samsung-Informatique-Imprimante-Monochrome-ML-6510ND-Manuels.htm
/SAMSUNG/Samsung-Informatique-Imprimantes-Photos-SPP-2040-Manuels.htm
/SAMSUNG/Samsung-Informatique-Inkjet-Imprimante-jet-d-encre-CJX-1050W-Manuels.htm
/SAMSUNG/Samsung-Informatique-Moniteur-LCD%20770TFT-Manuels.htm
/SAMSUNG/Samsung-Informatique-Moniteur-LCD-151P-Manuels.htm
/SAMSUNG/Samsung-Informatique-Moniteur-LCD-152B-Manuels.htm
/SAMSUNG/Samsung-Informatique-Moniteur-LCD-170T-Manuels.htm
/SAMSUNG/Samsung-Informatique-Moniteur-LCD-191T-Manuels.htm
/SAMSUNG/Samsung-Informatique-Moniteur-LCD-226BW-2-Manuels.htm
/SAMSUNG/Samsung-Informatique-Moniteur-LCD-226BW-Manuels.htm
/SAMSUNG/Samsung-Informatique-Moniteur-LCD-22-Serie-3-Moniteur-LED-TV-T22A300-Manuels.htm
/SAMSUNG/Samsung-Informatique-Moniteur-LCD-23-Serie-3-Moniteur-LED-S23A350H-Manuels.htm
/SAMSUNG/Samsung-Informatique-Moniteur-LCD-23-Serie-3-Moniteur-LED-TV-T23A350-Manuels.htm
/SAMSUNG/Samsung-Informatique-Moniteur-LCD-24-Serie-3-Moniteur-LED-TV-T24A350-Manuels.htm
/SAMSUNG/Samsung-Informatique-Moniteur-LCD-27-Serie-3-Moniteur-LED-TV-T27A300-Manuels.htm
/SAMSUNG/Samsung-Informatique-Moniteur-LCD-460DR-Manuels.htm
/SAMSUNG/Samsung-Informatique-Moniteur-LCD-B1930N-Manuels.htm
/SAMSUNG/Samsung-Informatique-Moniteur-LCD-BX2231-Manuels.htm
/SAMSUNG/Samsung-Informatique-Moniteur-LCD-BX2240W-Manuels.htm
/SAMSUNG/Samsung-Informatique-Moniteur-LCD-C24B550U-Manuels.htm
/SAMSUNG/Samsung-Informatique-Moniteur-LCD-C27B750X-Manuels.htm
/SAMSUNG/Samsung-Informatique-Moniteur-LCD-P2470HD-Manuels.htm
/SAMSUNG/Samsung-Informatique-Moniteur-LCD-S19B350N-Manuels.htm
/SAMSUNG/Samsung-Informatique-Moniteur-LCD-S19C200NW-Manuels.htm
/SAMSUNG/Samsung-Informatique-Moniteur-LCD-S19C450MR-Manuels.htm
/SAMSUNG/Samsung-InformatiqueMoniteur-LCD-S19C450MW-Manuels.htm
/SAMSUNG/Samsung-Informatique-Moniteur-LCD-S22A300H-Manuels.htm
/SAMSUNG/Samsung-Informatique-Moniteur-LCD-S22B150N-Manuels.htm
/SAMSUNG/Samsung-Informatique-Moniteur-LCD-S22C300H-Manuels.htm
/SAMSUNG/Samsung-Informatique-Moniteur-LCD-S24A650D-Manuels.htm
/SAMSUNG/Samsung-Informatique-Moniteur-LCD-S24A650S-manuels.htm
/SAMSUNG/Samsung-Informatique-Moniteur-LCD-S24B300BL-Manuels.htm
/SAMSUNG/Samsung-Informatique-Moniteur-LCD-S24B350H-Manuels.htm
/SAMSUNG/Samsung-Informatique-Moniteur-LCD-S27B750V-Manuels.htm
/SAMSUNG/Samsung-Informatique-Moniteur-LCD-S27B970D-manuels.htm
/SAMSUNG/Samsung-Informatique-Moniteur-LCD-S27C650D-manuels.htm
/SAMSUNG/Samsung-Informatique-Moniteur-LCD-T22B300-T22B300EW-Manuels.htm
/SAMSUNG/Samsung-Informatique-Moniteur-LCD-T23A750-Manuels.htm
/SAMSUNG/Samsung-Informatique-Moniteur-LCD-T24B300-T24B300EW-Manuels.htm
/SAMSUNG/Samsung-Informatique-Moniteur-LCD-T27B750EW-Manuels.htm
/SAMSUNG/Samsung-Informatique-Moniteurs-moniteur-LCD-32-et-plus-ME40B-Manuels.htm
/SAMSUNG/Samsung-Informatique-Multifonction-Couleur-CLX-3170FN-Manuels.htm
/SAMSUNG/Samsung-Informatique-Multifonction-Couleur-CLX-3175FN-2-Manuels.htm
/SAMSUNG/Samsung-Informatique-Multifonction-Couleur-CLX-3175FN-Manuels.htm
/SAMSUNG/Samsung-Informatique-Multifonction-Couleur-CLX-6200FX-Manuels.htm
/SAMSUNG/Samsung-Informatique-Multifonction-Couleur-CLX-9201NA-Manuels.htm
/SAMSUNG/Samsung-Informatique-Multifonction-Couleur-CLX-9301NA-Manuels.htm
/SAMSUNG/Samsung-Informatique-Multifonction-Couleur-Copieur-couleur-CLX-9350ND-Manuels.htm
/SAMSUNG/Samsung-Informatique-Multifonction-Couleur-Multifonction-Couleur-A4-CLX-8650ND-Manuels.htm
/SAMSUNG/Samsung-Informatique-Multifonction-Couleur-Multifonction-couleur-CLX-4195FW-Manuels.htm
/SAMSUNG/Samsung-Informatique-Multifonction-Couleur-Multifonction-couleur-CLX-6260ND-Manuels.htm
/SAMSUNG/Samsung-Informatique-Multifonction-Monochrome-Copieur-monochrome-SCX-6555N-Manuels.htm
/SAMSUNG/Samsung-Informatique-Multifonction-Monochrome-Fax-monochrome-SF-760P-Manuels.htm
/SAMSUNG/Samsung-Informatique-Multifonction-Monochrome-SCX-3200-Manuels.htm
/SAMSUNG/Samsung-Informatique-Multifonction-Monochrome-SCX-4100-Manuels.htm
/SAMSUNG/Samsung-Informatique-Multifonction-Monochrome-SCX-4824FN-Manuels.htm
/SAMSUNG/Samsung-Informatique-Multifonction-Monochrome-SCX-4828FN-Manuels.htm
/SAMSUNG/Samsung-Informatique-Multifonction-monochrome-SCX-5637FR-SCX-5637FR-Manuels.htm
/SAMSUNG/Samsung-Informatique-Multifonction-Monochrome-SCX-5737FW-Manuels.htm
/SAMSUNG/Samsung-Informatique-Multifonction-Monochrome-SCX-8123NA-Manuels.htm
/SAMSUNG/Samsung-Informatique-Multifonction-Monochrome-SCX-8240NA-Manuels.htm
/SAMSUNG/Samsung-Informatique-Multifonction-Monochrome-SF-5100P-Manuels.htm
/SAMSUNG/Samsung-Informatique-Multifonction-Monochrome-SF-5800P-Francais-Manuels.htm
/SAMSUNG/Samsung-Informatique-Multifonction-Monochrome-SF-5800P-Manuels.htm
/SAMSUNG/Samsung-Informatique-Multifonction-Monochrome-SF-6900-Manuels.htm
/SAMSUNG/Samsung-Informatique-Ordinateur-de-bureau-DP500A2D-S02FR-2-manuels.htm
/SAMSUNG/Samsung-Informatique-Ordinateur-de-bureau-DP700A3D-A01FR-Manuels.htm
/SAMSUNG/Samsung-Informatique-Ordinateur-de-bureau-DP700A3D-S01FR-Manuels.htm
/SAMSUNG/Samsung-Informatique-Ordinateur-Portable-11-6-Serie%209-900X1A-NP900X1A-A01FR-manuels.htm
/SAMSUNG/Samsung-Informatique-Ordinateur-Portable-12-1-Serie-5-Chromebook-XE500C21-A01FR-Manuels.htm
/SAMSUNG/Samsung-Informatique-Ordinateur-Portable-13-3Serie-9-900X3A-NP900X3A-A01FR-Manuels.htm
/SAMSUNG/Samsung-Informatique-Ordinateur-Portable-14-Serie-5-ULTRA-530U4B-NP530U4B-S01FR-Manuels.htm
/SAMSUNG/Samsung-Informatique-Ordinateur-Portable-15-6-Serie-3-300E5A-NP300E5A-S04FR-manuels.htm
/SAMSUNG/Samsung-Informatique-Ordinateur-Portable-15-6-Serie-3-300E5ANP-300E5A-S06FR-Manuels.htm
/SAMSUNG/Samsung-Informatique-Ordinateur-Portable-15-6-Serie-3-300E5-ANP300E5A-S08FR-Manuels.htm
/SAMSUNG/Samsung-Informatique-Ordinateur-Portable-15-6-Serie-3-300V5A-NP300V5A-S01FR-Manuels.htm
/SAMSUNG/Samsung-Informatique-Ordinateur-Portable-15-6-Serie-RC-RC530-NP-RC530-S03FR-Manuels.htm
/SAMSUNG/Samsung-Informatique-Ordinateur-Portable-17-3-Serie-3-300E7A-NP300E7A-A01FR-Manuels.htm
/SAMSUNG/Samsung-Informatique-Ordinateur-Portable-17-3-Serie-3-300E7A-NP300E7A-S06FR-manuels.htm
/SAMSUNG/Samsung-Informatique-Ordinateur-Portable-17-3-Serie-3-300E7A-NP300E7A-S07FR-Manuels.htm
/SAMSUNG/Samsung-Informatique-Ordinateur-Portable-17-3Serie-3-300E7A-NP300E7A-S08FR-Manuels.htm
/SAMSUNG/Samsung-Informatique-Ordinateur-Portable-17-3-Serie-RC-RC730-NP-RC730-S05FR-Manuels.htm
/SAMSUNG/Samsung-Informatique-Ordinateur-Portable-300V3A-NP300V3A-A01FR-Manuels.htm
/SAMSUNG/Samsung-Informatique-Ordinateur-Portable-ATIV-Smart-PC-Pro-XE700T1C-A01FR-Manuels.htm
/SAMSUNG/Samsung-Informatique-Ordinateur-Portable-Manuels.htm
/SAMSUNG/Samsung-Informatique-Ordinateur-Portable-Nouveau-Serie-9-900X3C-NP900X3C-A01FR-Manuels.htm
/SAMSUNG/Samsung-Informatique-Ordinateur-Portable-Nouveau-Serie-9-900X4C-NP900X4C-A01FR-manuels.htm
/SAMSUNG/Samsung-Informatique-Ordinateur-Portable-NP300E5AH-NP300E5A-S05FR-Manuels.htm
/SAMSUNG/Samsung-Informatique-Ordinateur-Portable-NP300E5AH-NP300E5A-S0CFR.manuels.htm
/SAMSUNG/Samsung-Informatique-Ordinateur-Portable-NP300E5AH-NP300E5A-S0GFR-Manuels.htm
/SAMSUNG/Samsung-Informatique-Ordinateur-Portable-NP300E5C-NP300E5C-AF2FR-Manuels.htm
/SAMSUNG/Samsung-Informatique-Ordinateur-Portable-NP300E5C-NP300E5C-AF5FR-Manuels.htm
/SAMSUNG/Samsung-Informatique-Ordinateur-Portable-NP300E5C-NP300E5C-S04FR-Manuels.htm
/SAMSUNG/Samsung-Informatique-Ordinateur-Portable-NP300E5C-S08FR-manuels.htm
/SAMSUNG/Samsung-Informatique-Ordinateur-Portable-NP300E5C-T03FR-Manuels.htm
/SAMSUNG/Samsung-Informatique-Ordinateur-Portable-NP300E5C-T05FR-manuels.htm
/SAMSUNG/Samsung-Informatique-Ordinateur-Portable-NP300E5C-T06FR-manuels.htm
/SAMSUNG/Samsung-Informatique-Ordinateur-Portable-NP300E7AH-NP300E7A-S04FR-Manuels.htm
/SAMSUNG/Samsung-Informatique-Ordinateur-Portable-NP300E7AH-NP300E7A-S0DFR-manuels.htm
/SAMSUNG/Samsung-Informatique-Ordinateur-Portable-NP300E7AI-NP300E7A-A04FR-Manuels.htm
/SAMSUNG/Samsung-Informatique-Ordinateur-Portable-NP300V3AH-NP300V3A-S02FR-manuels.htm
/SAMSUNG/Samsung-Informatique-Ordinateur-Portable-NP305V5AD-NP305V5A-S02FR-Manuels.htm
/SAMSUNG/Samsung-Informatique-Ordinateur-Portable-NP305V5AD-NP305V5A-T01FR-Manuels.htm
/SAMSUNG/Samsung-Informatique-Ordinateur-Portable-NP350E7C-NP350E7C-S07FR-Manuels.htm
/SAMSUNG/Samsung-Informatique-Ordinateur-Portable-NP350E7C-NP350E7C-S0BFR-Manuels.htm
/SAMSUNG/Samsung-Informatique-Ordinateur-Portable-NP350V5C-NP350V5C-S03FR-Manuels.htm
/SAMSUNG/Samsung-Informatique-Ordinateur-Portable-NP350V5C-S06FR-Manuels.htm
/SAMSUNG/Samsung-Informatique-Ordinateur-Portable-NP355V5C-NP355V5C-S01FR-Manuels.htm
/SAMSUNG/Samsung-Informatique-Ordinateur-Portable-NP355V5C-NP355V5C-S02FR-Manuels.htm
/SAMSUNG/Samsung-Informatique-Ordinateur-Portable-NP355V5C-NP355V5C-S03FR-Manuels.htm
/SAMSUNG/Samsung-Informatique-Ordinateur-Portable-NP370R5E-S04FR-Manuels.htm
/SAMSUNG/Samsung-Informatique-Ordinateur-Portable-NP400B5BI-NP400B5B-AG3FR-Manuels.htm
/SAMSUNG/Samsung-Informatique-Ordinateur-Portable-NP400B5B-Manuels.htm
/SAMSUNG/Samsung-Informatique-Ordinateur-Portable-NP530U3C-A05FR-manuels.htm
/SAMSUNG/Samsung-Informatique-Ordinateur-Portable-NP530U3C-NP530U3C-A01FR-manuels.htm
/SAMSUNG/Samsung-Informatique-Ordinateur-Portable-NP530U3C-NP530U3C-A04FR-Manuels.htm
/SAMSUNG/Samsung-Informatique-Ordinateur-Portable-NP530U3C-NP530U3C-A06FR-Manuels.htm
/SAMSUNG/Samsung-Informatique-Ordinateur-Portable-NP550P5C-NP550P5C-T04FR-Manuels.htm
/SAMSUNG/Samsung-Informatique-Ordinateur-Portable-NP700Z5AH-NP700Z5A-S02FR-Manuels.htm
/SAMSUNG/Samsung-Informatique-Ordinateur-Portable-NP700Z5AH-NP700Z5A-S03FR.manuels.htm
/SAMSUNG/Samsung-Informatique-Ordinateur-Portable-NP700Z5C-NP700Z5C-S02FR-Manuels.htm
/SAMSUNG/Samsung-Informatique-Ordinateur-Portable-NP700Z7CH-NP700Z7C-S01FR-Manuels.htm
/SAMSUNG/Samsung-Informatique-Ordinateur-Portable-NP700Z7C-NP700Z7C-S02FR-Manuels.htm
/SAMSUNG/Samsung-Informatique-Ordinateur-Portable-NP900X1B-NP900X1B-A01FR-Manuels.htm
/SAMSUNG/Samsung-Informatique-Ordinateur-Portable-NP900X3C-NP900X3C-A03FR-manuels.htm
/SAMSUNG/Samsung-Informatique-Ordinateur-Portable-NP900X3D-A01FR-Manuels.htm
/SAMSUNG/Samsung-Informatique-Ordinateur-Portable-NP900X4B-NP900X4B-A01FR-manuels.htm
/SAMSUNG/Samsung-Informatique-Ordinateur-Portable-NP900X4C-NP900X4C-A02FR-Manuels.htm
/SAMSUNG/Samsung-Informatique-Ordinateur-Portable-NP900X4D-A02FR-Manuels.htm
/SAMSUNG/Samsung-Informatique-Ordinateur-Portable-NP900X4D-NP900X4D-A01FR-Manuels.htm
/SAMSUNG/Samsung-Informatique-Ordinateur-Portable-NP-Q320E-NP-Q320-AS02FR-Manuels.htm
/SAMSUNG/Samsung-Informatique-Ordinateur-Portable-NP-Q35-NP-Q35T007-SEF-Manuels.htm
/SAMSUNG/Samsung-Informatique-Ordinateur-Portable-NP-R510%20NP-R510-XA02FR-Manuels.htm
/SAMSUNG/Samsung-Informatique-Ordinateur-Portable-NP-R530E-NP-R530-JT50FR-Manuels.htm
/SAMSUNG/Samsung-Informatique-Ordinateur-Portable-NP-R610-NP-R610-AS01FR-Manuels.htm
/SAMSUNG/Samsung-Informatique-Ordinateur-Portable-NP-R610NP-R610-AS03FR-Manuels.htm
/SAMSUNG/Samsung-Informatique-Ordinateur-Portable-NP-R610-NP-R610-AS05FR-Manuels.htm
/SAMSUNG/Samsung-Informatique-Ordinateur-Portable-NP-R610-NP-R610-AS06FR-Francais-Manuels.htm
/SAMSUNG/Samsung-Informatique-Ordinateur-Portable-NP-R610-NP-R610-AS06FR-Manuels.htm
/SAMSUNG/Samsung-Informatique-Ordinateur-Portable-NP-R610-NP-R610-AS08FR-Manuels.htm
/SAMSUNG/Samsung-Informatique-Ordinateur-Portable-NP-R610-NP-R610-FS02FR-francais-Manuels.htm
/SAMSUNG/Samsung-Informatique-Ordinateur-Portable-NP-R610-NP-R610-FS02FR-Manuels.htm
/SAMSUNG/Samsung-Informatique-Ordinateur-Portable-NP-R620E-NP-R620-FS01FR-Manuels.htm
/SAMSUNG/Samsung-Informatique-Ordinateur-Portable-NP-R620E-NP-R620-JS02FR-Manuels.htm
/SAMSUNG/Samsung-Informatique-Ordinateur-Portable-NP-R710-NP-R710-ASS1FR-Manuels.htm
/SAMSUNG/Samsung-Informatique-Ordinateur-Portable-NP-R719NP-R719-XA01FR-Manuels.htm
/SAMSUNG/Samsung-Informatique-Ordinateur-Portable-NP-R720E-NP-R720-JS03FR-Manuels.htm
/SAMSUNG/Samsung-Informatique-Ordinateur-Portable-NP-R730CE-NP-R730-JT07FR-Manuels.htm
/SAMSUNG/Samsung-Informatique-Ordinateur-Portable-NP-R730CE-NP-R730-JT08FR-Manuels.htm
/SAMSUNG/Samsung-Informatique-Ordinateur-Portable-NP-R730CE-NP-R730-JT0BFR-Manuels.htm
/SAMSUNG/Samsung-Informatique-Ordinateur-Portable-NP-R730C-NP-R730-JB03FR-Manuels.htm
/SAMSUNG/Samsung-Informatique-Ordinateur-Portable-NP-R730-NP-R730-JA05FR-Manuels.htm
/SAMSUNG/Samsung-Informatique-Ordinateur-Portable-NP-RC710E-NP-RC710-S02FR-Francais-Manuels.htm
/SAMSUNG/Samsung-Informatique-Ordinateur-Portable-NP-RC710E-NP-RC710-S02FR-Manuels.htm
/SAMSUNG/Samsung-Informatique-Ordinateur-Portable-NP-RV510I-NP-RV510-A01FR-Manuels.htm
/SAMSUNG/Samsung-Informatique-Ordinateur-Portable-NP-X420I-NP-X420-JA05FR-Francais-Manuels.htm
/SAMSUNG/Samsung-Informatique-Ordinateur-Portable-NP-X420I-NP-X420-JA05FR-France-Manuels.htm
/SAMSUNG/Samsung-Informatique-Ordinateur-Portable-NP-X420I-NP-X420-JA05FR-Manuels.htm
/SAMSUNG/Samsung-Informatique-Ordinateur-Portable-NQ20-NQ20RP3GH8-SEF-Manuels.htm
/SAMSUNG/Samsung-Informatique-Ordinateur-Portable-QX510-NP-QX510-S01FR-Manuels.htm
/SAMSUNG/Samsung-Informatique-Ordinateur-Portable-R590-Crystal-NP-R590-JS01FR-Manuels.htm
/SAMSUNG/Samsung-Informatique-Ordinateur-Portable-R730-Red-Gloss-NP-R730-JS01FRManuels.htm
/SAMSUNG/Samsung-Informatique-Ordinateur-Portable-Samsung-Chromebook-XE303C12-A02FR-Manuels.htm
/SAMSUNG/Samsung-Informatique-Ordinateur-Portable-Serie-3-300E5A-NP300E5A-A02FR-Manuels.htm
/SAMSUNG/Samsung-Informatique-Ordinateur-Portable-Serie-3-300E5A-NP300E5A-S0AFR-manuels.htm
/SAMSUNG/Samsung-Informatique-Ordinateur-Portable-Serie-3-300E5C-NP300E5C-T02FR-manuels.htm
/SAMSUNG/Samsung-Informatique-Ordinateur-Portable-Serie-3-300E7ANP300E7A-A02FR-Manuels.htm
/SAMSUNG/Samsung-Informatique-Ordinateur-Portable-Serie-3-300E7A-NP300E7A-S0BFR-Manuels.htm
/SAMSUNG/Samsung-Informatique-Ordinateur-Portable-Serie-3-300E7A-NP300E7A-S0CFR-Manuels.htm
/SAMSUNG/Samsung-Informatique-Ordinateur-Portable-Serie-3-305E5A-NP305E5A-A01FR-Manuels.htm
/SAMSUNG/Samsung-Informatique-Ordinateur-Portable-Serie-4-NP400B2B-A03FR-Manuels.htm
/SAMSUNG/Samsung-Informatique-Ordinateur-Portable-Serie-5-550P7C-NP550P7C-T02FR-Manuels.htm
/SAMSUNG/Samsung-Informatique-Ordinateur-Portable-Serie-5-550P7C-NP550P7C-T03FR-manuels.htm
/SAMSUNG/Samsung-Informatique-Ordinateur-Portable-Serie-9-900X3C-A05FR-NP900X3C-A05FR-manuels.htm
/SAMSUNG/Samsung-Informatique-Ordinateur-Portable-Serie-9-900X4C-NP900X4C-A01FR-Manuels.htm
/SAMSUNG/Samsung-Informatique-Ordinateur-Portable-Serie-9-NP900X3D-A04FR.htm
/SAMSUNG/Samsung-Informatique-Ordinateur-Portable-Serie-9-NP900X3D-A05FR-NP900X3D-A05FR-manuels.htm
/SAMSUNG/Samsung-Informatique-Ordinateur-Portable-Serie-9-NP900X4D-A03FR-Manuels.htm
/SAMSUNG/Samsung-Informatique-Ordinateur-Portable-Serie-RV-RV510-NP-RV510-S01FR-Manuels.htm
/SAMSUNG/Samsung-Informatique-Ordinateur-Portable-Serie-RV-RV515-NP-RV515-S04FR-Manuels.htm
/SAMSUNG/Samsung-Informatique-Ordinateur-Portable-SF310-NP-SF310-S01FR-Manuels.htm
/SAMSUNG/Samsung-Informatique-Ordinateur-Portable-XE500C21-XE500C21-AZ2FR-manuels.htm
/SAMSUNG/Samsung-Informatique-Ordinateur-Portable-XE500T1C-A01FR-Manuels.htm
/SAMSUNG/Samsung-Informatique-Ordinateur-Portable-XE500T1C-H02FR-manuels.htm
/SAMSUNG/Samsung-Informatique-Ordinateur-Portable-XE500T1C-XE500T1C-A04FR-manuels.htm
/SAMSUNG/Samsung-Informatique-Ordinateur-Portable-XE700T1A-XE700T1A-HF1FR-manuels.htm
/SAMSUNG/Samsung-Informatique-Ultra-Mobilite-N150Plus-NP-N150P-2-Manuels.htm
/SAMSUNG/Samsung-Informatique-Ultra-Mobilite-N150Plus-NP-N150P-Manuels.htm
/SAMSUNG/Samsung-Informatique-Ultra-Mobilite-NC110-Manuels.htm
/SAMSUNG/Samsung-Informatique-Ultra-Mobilite-NP-N140-Manuels.htm
/SAMSUNG/Samsung-Informatique-Ultra-Mobilite-NP-NC10-Manuels.htm
/SAMSUNG/Samsung-Informatique-Ultra-Mobilite-NP-NC110-Manuels.htm
/SAMSUNG/Samsung-Kit-Pieton-Bluetooth-HM1200-Noir-HM1200-Manuels.htm
/SAMSUNG/Samsung-LA46C550J1F-CN-Manuels.htm
/SAMSUNG/Samsung-lcd_business_q2.pdf-Manuels.htm
/SAMSUNG/Samsung-LE19C350-LE19C350D1W-Manuels.htm
/SAMSUNG/Samsung-LE22C452C4H-Manuels.htm
/SAMSUNG/Samsung-LE26B450-LE26B450C4W-Manuels.htm
/SAMSUNG/Samsung-LE26D450G1W-Manuels.htm
/SAMSUNG/Samsung-LE32A466-Manuels.htm
/SAMSUNG/Samsung-LE32A568-LE32A568P3M-Manuels.htm
/SAMSUNG/Samsung-LE32B450C4W-Manuels.htm
/SAMSUNG/Samsung-LE32C650-LE32C650L1W-Manuels.htm
/SAMSUNG/Samsung-LE32D400E1W-Manuels.htm
/SAMSUNG/Samsung-LE32D460C9H-Manuels.htm
/SAMSUNG/Samsung-LE32E420E2W-Manuels.htm
/SAMSUNG/Samsung-LE37A466-LE37A466C2M-Manuels.htm
/SAMSUNG/Samsung-LE40A577P2M-Manuels.htm
/SAMSUNG/Samsung-LE40B551A6W-Manuels.htm
/SAMSUNG/Samsung-LE40S71B-Manuels.htm
/SAMSUNG/Samsung-LE46A676-LE46A676A1M-Manuels.htm
/SAMSUNG/Samsung-LE46C630-LE46C630K1W-Manuels.htm
/SAMSUNG/Samsung-LE52A676-LE52A676A1M-Manuels.htm
/SAMSUNG/Samsung-Lecteur-Multimedia-Galaxy-Player-50-Blanc-8Go-YP-G50CW-Manuels.htm
/SAMSUNG/Samsung-Lecteur-Multimedia-Galaxy-S-WiFi-4-0-Blanc-8Go-YP-G1CW-Manuels.htm
/SAMSUNG/Samsung-Livres-blancs.htm
/SAMSUNG/Samsung-Livres-blancs-Technologie-ReCP-Manuels.htm
/SAMSUNG/Samsung-M_YUKON_2K_WD175ARYKSU_DC68-02631L-05-120810.pdf-SEC-Manuels.htm
/SAMSUNG/Samsung-ME40A-TP40-Japon-Manuels.htm
/SAMSUNG/Samsung-ME46A-Japon-Manuels.htm
/SAMSUNG/Samsung-ME65B-Japon-Manuels.htm
/SAMSUNG/Samsung-MH050FXEA2B-Manuels.htm
/SAMSUNG/Samsung-ML-2160-Imprimante-Monochrome-Manuels.htm
/SAMSUNG/Samsung-ML-2165W-Roumanie-Manuels.htm
/SAMSUNG/Samsung-Mobile-Phone-Feature-Phone-GT-E1175T-Anglais-Manuels.htm
/SAMSUNG/Samsung-Mobile-Phone-Others-HM3700-Manuels.htm
/SAMSUNG/Samsung-Mobile-Phone-Smart-Phone-Galaxy-Camera-EK-GC100-Emirats-Arabes-Unis-Manuels.htm
/SAMSUNG/Samsung-Mobile-Phone-Smart-Phone-Galaxy-Camera-EK-GC100-Inde-Manuels.htm
/SAMSUNG/Samsung-Mobile-Phone-Smart-Phone-Galaxy-Music-GT-S6010-Royaume-Uni-Manuels.htm
/SAMSUNG/Samsung-Mobile-Phone-Smart-Phone-Galaxy-Nexus-GT-I9250-Royaume-Uni-Manuels.htm
/SAMSUNG/Samsung-Mobile-Smart-Phone-GT-I9505-Suisse-Manuels.htm
/SAMSUNG/Samsung-Mobile-Tablet-Samsung-Galaxy-Tab-2-10.1-Wi-Fi-GT-P5110-Manuels.htm
/SAMSUNG/Samsung-Mobilite-Smartphone-Samsung-Galaxy-S4-Impression-GT-I9505-Manuels.htm
/SAMSUNG/Samsung-Mobilite-Telephone-a-fonction-Rugby-II-de-Samsung-SGH-a847M-SGH-A847M-Manuels.htm
/SAMSUNG/Samsung-Mobilite-Telephone-Intelligent-Galaxy-Q-de-Samsung-SGH-T589R-Manuels.htm
/SAMSUNG/Samsung-Moniteur-grande-taille-Ecrans-grand-format-UD55A-Manuels.htm
/SAMSUNG/Samsung-Monitors-2493HM-USA-Etats-Unis-Manuels.htm
/SAMSUNG/Samsung-N145Plus-NP-N145P-Manuels.htm
/SAMSUNG/Samsung-N150-NP-N150-Manuels.htm
/SAMSUNG/Samsung-NC190-Japon-Manuels.htm
/SAMSUNG/Samsung-Nexus-S-noir-Open-market-GT-I9023-Manuels.htm
/SAMSUNG/Samsung-Notebook-Serie-7-Chronos-700Z5C-S01-NP700Z5C-S01DE-Manuels.htm
/SAMSUNG/Samsung-NP20-NP20FK02BG-SEF-Manuels.htm
/SAMSUNG/Samsung-NP300E5C-NP300E5C-T01FR-Manuels.htm
/SAMSUNG/Samsung-NP300E5ZI-NP300E5Z-A09MA-Manuels.htm
/SAMSUNG/Samsung-NP300V5AH-Manuels.htm
/SAMSUNG/Samsung-NP530U3C-A01ES-NP530U3C-A01ES-Espagnol-Manuels.htm
/SAMSUNG/Samsung-NP-R530-NP-R530-JA02FR-Manuels.htm
/SAMSUNG/Samsung-NS140SDXEA-Manuels.htm
/SAMSUNG/Samsung-Omnia-7-noir-Open-market-GT-I8700-Manuels.htm
/SAMSUNG/Samsung-Omnia-II-noir-SFRGT-I8000-Manuels.htm
/SAMSUNG/Samsung-Omnia-II-noir-SFR-GT-I8000-Manuels.htm
/SAMSUNG/Samsung-Omnia-Lite-noir-Orange-GT-B7300-Manuels.htm
/SAMSUNG/Samsung-Omnia-Pro-B7330-noir-Open-market-GT-B7330-Manuels.htm
/SAMSUNG/Samsung-Omnia-Pro-B7610-noir-Open-market-GT-B7610-Manuels.htm
/SAMSUNG/Samsung-Omnia-W-noir-Open-market-GT-I8350-Manuels.htm
/SAMSUNG/Samsung-pascal_owners_manual.pdf-Manuels.htm
/SAMSUNG/Samsung-PC-OFFICE-Coree-NT-RF711NT-RF711-PS02G-Manuels.htm
/SAMSUNG/Samsung-PC-Office-LCD-LED-S22C200BW-Hong-Kong-Manuels.htm
/SAMSUNG/Samsung-PC-Office-Mono-Multi-function-SCX-3405FW-Hong-Kong-Manuels.htm
/SAMSUNG/Samsung-PC-Office-Netbook-NP-N220-Royaume-Uni-Manuels.htm
/SAMSUNG/Samsung-PC-Office-Notebook-ATIV-Smart-PC-XE500T1C-3G-XE500T1C-H01SG-Singapour-Manuels.htm
/SAMSUNG/Samsung-PC-Office-Notebook-R519-Royaume-Uni-Manuels.htm
/SAMSUNG/Samsung-Peripheriques-pour-PC-Multifonctions-couleur-CLX-3305FW-Canada-Manuels.htm
/SAMSUNG/Samsung-Peripheriques-pour-PC-Multifonctions-monochromes-SCX-3200-Manuels.htm
/SAMSUNG/Samsung-Peripheriques-pour-PC-Multifonctions-monochromes-SCX-3405FW-Manuels.htm
/SAMSUNG/Samsung-Peripheriques-pour-PC-Multifonctions-monochromes-SCX-3405W-Manuels.htm
/SAMSUNG/Samsung-Peripheriques-pour-PC-Multifonctions-monochromes-SCX-4727FD-Manuels.htm
/SAMSUNG/Samsung-Photo-Camescope-Appareils-photo-Gamme-Compact-Samsung-ST66-Manuels.htm
/SAMSUNG/Samsung-Photo-Camescope-Compact-14-MP-Ecran-LCD-3-compact-style-Samsung-PL210-Manuels.htm
/SAMSUNG/Samsung-Photo-Camescope-Compact-16-MP-Ecran-LCD-2-7-compact-Style-Samsung-ST77s.htm
/SAMSUNG/Samsung-Photo-Camescope-Compact-16-MP-Ecran-LCD-2-7-compact-Style-Samsung-ST90-Manuels.htm
/SAMSUNG/Samsung-Photo-Camescope-Compact-Afrique-du-Nord-Manuels.htm
/SAMSUNG/Samsung-Photo-Camescope-Compact-Appareil-photo-numerique-SAMSUNG-WB150F-Manuels.htm
/SAMSUNG/Samsung-Photo-Camescope-Compact-ES60-SAMSUNG-ES60.manuels.htm
/SAMSUNG/Samsung-Photo-Camescope-Compact-Manuels.htm
/SAMSUNG/Samsung-Photo-Camescope-Compact-NV24HD-SAMSUNG-NV24-HD-Manuels.htm
/SAMSUNG/Samsung-Photo-Camescope-Compact-Samsung-DV90-Manuels.htm
/SAMSUNG/Samsung-Photo-Camescope-Compact-SAMSUNG-PL100-Manuels.htm
/SAMSUNG/Samsung-Photo-Camescope-Compact-SAMSUNG-PL101-Manuels.htm
/SAMSUNG/Samsung-Photo-Camescope-Compact-SAMSUNG-PL170-Manuels.htm
/SAMSUNG/Samsung-Photo-Camescope-Compact-SAMSUNG-PL210-Manuels.htm
/SAMSUNG/Samsung-Photo-Camescope-Compact-SAMSUNG-PL70-Manuels.htm
/SAMSUNG/Samsung-Photo-Camescope-Compact-Samsung-PL90-Manuels.htm
/SAMSUNG/Samsung-Photo-Camescope-Compact-SAMSUNG-S850-Manuels.htm
/SAMSUNG/Samsung-Photo-Camescope-Compact-Samsung-SMART-Camera-DV150F-SAMSUNG-DV150F-Manuels.htm
/SAMSUNG/Samsung-Photo-Camescope-Compact-Samsung-SMART-Camera-EX2F-SAMSUNG-EX2F-Manuels.htm
/SAMSUNG/Samsung-Photo-Camescope-Compact-Samsung-SMART-CAMERA-ST200F-SAMSUNG-ST200F-Manuels.htm
/SAMSUNG/Samsung-Photo-Camescope-Compact-Samsung-SMART-Camera-WB250F-SAMSUNG-WB250F-Manuels.htm
/SAMSUNG/Samsung-Photo-Camescope-Compact-Samsung-Smart-Camera-WB850F-Manuels.htm
/SAMSUNG/Samsung-Photo-Camescope-Compact-SAMSUNG-ST560-Manuels.htm
/SAMSUNG/Samsung-Photo-Camescope-Compact-SAMSUNG-ST65-Manuels.htm
/SAMSUNG/Samsung-Photo-Camescope-Compact-SAMSUNG-ST95-Manuels.htm
/SAMSUNG/Samsung-Photo-Camescope-Compact-Samsung-WB100-Manuels.htm
/SAMSUNG/Samsung-Photo-Camescope-Compact-SAMSUNG-WB210-Manuels.htm
/SAMSUNG/Samsung-Photo-Camescope-Compact-SAMSUNG-WB560-Manuels.htm
/SAMSUNG/Samsung-Photo-Camescope-Compact-ST45-SAMSUNG-ST45-Manuels.htm
/SAMSUNG/Samsung-Photo-Camescope-Compact-ST500-SAMSUNG-ST500-Manuels.htm
/SAMSUNG/Samsung-Photo-Camescope-Haute-Definition-Camera-HD-HMX-Q200BP-2-Manuels.htm
/SAMSUNG/Samsung-Photo-Camescope-Haute-Definition-HMX-F800BP-manuels.htm
/SAMSUNG/Samsung-Photo-Camescope-Haute-Definition-HMX-F80BP-Manuels.htm
/SAMSUNG/Samsung-Photo-Camescope-Haute-Definition-HMX-F90WP-Manuels.htm
/SAMSUNG/Samsung-Photo-Camescope-Haute-Definition-HMX-QF20BP-Manuels.htm
/SAMSUNG/Samsung-Photo-Camescope-NX-Appareil-photo-numerique-NX-NX-210-Afrique-Manuels.htm
/SAMSUNG/Samsung-Photo-Camescope-NX-NX10-3-Manuels.htm
/SAMSUNG/Samsung-Photo-Camescope-NX-NX10-Manuels.htm
/SAMSUNG/Samsung-Photo-Camescope-NX-NX5-Manuels.htm
/SAMSUNG/Samsung-Photo-Camescope-NX-Systeme-NX-NX100-14-6-MP-Ecran-7-6cm-Manuels.htm
/SAMSUNG/Samsung-Photo-Camescope-NX-Systeme-NX-NX11-14-6-MP-Ecran-7-6cm-Manuels.htm
/SAMSUNG/Samsung-Player-Addict-noir-Open-market-SGH-I900-Manuels.htm
/SAMSUNG/Samsung-Player-Duo-noir-Open-market-SGH-D980-Manuels.htm
/SAMSUNG/Samsung-Player-HD-noir-Open-market-GT-I8910-Manuels.htm
/SAMSUNG/Samsung-Player-One-noir-Open-market-GT-S5230-Manuels.htm
/SAMSUNG/Samsung-Portables-et-periph%C3%A9riques-Mini-ordinateur-portable-N102-NP-N102-Manuels.htm
/SAMSUNG/Samsung-Portables-et-peripheriques-Couleur-Laser-CLP-680ND-Colour-Laser-Printer-Manuels.htm
/SAMSUNG/Samsung-Portables-et-peripheriques-LCD-Moniteur-LED-3D-serie-9-S27A950D-de-27-Manuels.htm
/SAMSUNG/Samsung-Portables-et-peripheriques-Ordinateur-portable-NP300E5V-NP300E5V-A01MA-Manuels.htm
/SAMSUNG/Samsung-Portables-et-peripheriques-Ordinateur-portable-NP300E5V-NP300E5V-A08MA-Manuels.htm
/SAMSUNG/Samsung-Portables-et-peripheriques-Ordinateur-portable-NP300V5AH-NP300V5A-S03MA-Manuels.htm
/SAMSUNG/Samsung-Portables-et-peripheriques-Ordinateur-portable-NP300V5AI-NP300V5A-A03MA-Manuels.htm
/SAMSUNG/Samsung-Portables-et-peripheriques-Ordinateur-portable-NP530U3BI-NP530U3B-A01ZA-Manuels.htm
/SAMSUNG/Samsung-Presentation-du-Samsung-GALAXY-S-4-Video.htm
/SAMSUNG/Samsung-Printers-Multifunction-Mono-Laser-Printer-ML-5010ND-Manuels.htm
/SAMSUNG/Samsung-PS42C450-PS42C450B1W-Manuels.htm
/SAMSUNG/Samsung-PS50A566-PS50A566S2M-Manuels.htm
/SAMSUNG/Samsung-PS50C450-PS50C450B1W-Manuels.htm
/SAMSUNG/Samsung-PS50C535-PS50C535C1W-Norvege-Manuels.htm
/SAMSUNG/Samsung-PS51D490A1W-Manuels.htm
/SAMSUNG/Samsung-PS51E530-ZF-PLASMA-51-FULL-HD%20-PS51E530A3W-Manuels.htm
/SAMSUNG/Samsung-RE-C21VMS-Manuels.htm
/SAMSUNG/Samsung-Refrigerateur-1porteA-350-L-Blanc-RR82FHSW-Manuels.htm
/SAMSUNG/Samsung-Refrigerateur-DP-A275-L-Blanc-RT34GBSW-Manuels.htm
/SAMSUNG/Samsung-Refrigerators-26-CU-FT-FRENCH-DOOR-REFRIGERATOR-Manuels.htm
/SAMSUNG/Samsung-RR92HASX-Manuels.htm
/SAMSUNG/Samsung-RR92HAWW-Manuels.htm
/SAMSUNG/Samsung-RR92HAWW-Refrigerateur-une-porte-Monochrome-Manuels.htm
/SAMSUNG/Samsung-RV511-NP-RV511-A06MA-Manuels.htm
/SAMSUNG/Samsung-S22B350B-Manuels.htm
/SAMSUNG/Samsung-S23A550H-Japon-Manuels.htm
/SAMSUNG/Samsung-S5610-GT-S5610-Manuels.htm
/SAMSUNG/Samsung-Samsung-Galaxy-551-noir-Open-marketGT-I5510-Manuels.htm
/SAMSUNG/Samsung-Samsung-Galaxy-Ace-noir-Open-market-GT-S5830-Manuels.htm
/SAMSUNG/Samsung-Samsung-Galaxy-Pro-gris-Open-market-GT-B7510-Manuels.htm
/SAMSUNG/Samsung-SCH-W999-CN-Manuels.htm
/SAMSUNG/Samsung-SCX-3200-Manuels.htm
/SAMSUNG/Samsung-SCX-3400-Pakistan-Manuels.htm
/SAMSUNG/Samsung-SCX-4x28-Series-Manuels.htm
/SAMSUNG/Samsung-SGH-D500-Telephone-Mobile-GSM-Manuels.htm
/SAMSUNG/Samsung-SHV-E210S-S-III-Manuels.htm
/SAMSUNG/Samsung-SHV-E300L-Coree-Manuels.htm
/SAMSUNG/Samsung-SHW-M220L-Coree-Manuels.htm
/SAMSUNG/Samsung-S-II-HDSHV-E120S-Coree-Manuels.htm
/SAMSUNG/Samsung-SNE-60K_UM_Embedded_KOR_100526-SEC-Manuels.htm
/SAMSUNG/Samsung-Sprzet-komputerowy-i-Drukarki-Notebooki-NP-R710-AS04PL-Pologne-Manuels.htm
/SAMSUNG/Samsung-Stockage-informatique-Graveur-DVD-Slim-External-8X-DVD-Writer-SE-208AB-Manuels.htm
/SAMSUNG/Samsung-Stockage-informatique-SSD-Basic-Kit-64-GoMZ-7PC064B-Manuels.htm
/SAMSUNG/Samsung-Stockage-informatique-SSD-MZ-7TD120-manuels.htm
/SAMSUNG/Samsung-Stockage-informatique-SSD-SSD-840-Pro-128Go-MZ-7PD128-Manuels.htm
/SAMSUNG/Samsung-Stockage-informatique-SSD-SSD-840-Pro-256Go-MZ-7PD256-Manuels.htm
/SAMSUNG/Samsung-Stockage-informatique-SSD-SSD-840-Pro-512GoMZ-7PD512-Manuels.htm
/SAMSUNG/Samsung-T22B300EW-Manuels.htm
/SAMSUNG/Samsung-T240-JP-Manuels.htm
/SAMSUNG/Samsung-T260-Japon-Manuels.htm
/SAMSUNG/Samsung-Table-induction-3-foyers-7-2-KW-CTN463NC01-CTN463NC01-XEF-Manuels.htm
/SAMSUNG/Samsung-Telephone-Mobile-Autres-GT-C3310-Manuels.htm
/SAMSUNG/Samsung-Telephone-Mobile-Autres-Samsung-Player-mini-2GT-C3310-Manuels.htm
/SAMSUNG/Samsung-Telephone-Mobile-Autres-Samsung-S5220GT-S5220-Manuels.htm
/SAMSUNG/Samsung-Telephone-Mobile-Galaxy-Camera-Samsung-GALAXY-Camera-EK-GC100-Manuels.htm
/SAMSUNG/Samsung-Telephone-Mobile-GSM-GT-C3750.manuels.htm
/SAMSUNG/Samsung-Telephone-Mobile-GSM-GT-E1130-B.manuels.htm
/SAMSUNG/Samsung-Telephone-Mobile-GSM-GT-E1151-Manuels.htm
/SAMSUNG/Samsung-Telephone-Mobile-GSM-GT-E1170-Manuels.htm
/SAMSUNG/Samsung-Telephone-Mobile-GSM-GT-E2220.manuels.htm
/SAMSUNG/Samsung-Telephone-Mobile-GSM-GT-E2550D.manuels.htm
/SAMSUNG/Samsung-Telephone-Mobile-GSM-GT-S5230-Manuels.htm
/SAMSUNG/Samsung-Telephone-Mobile-GSM-GT-S5610-Manuels.htm
/SAMSUNG/Samsung-Telephone-Mobile-GSM-GT-S5620.manuels.htm
/SAMSUNG/Samsung-Telephone-Mobile-GSM-Manuels.htm
/SAMSUNG/Samsung-Telephone-Mobile-GSM-Samsung-B3310bleu-Open-market-GT-B3310-Manuels.htm
/SAMSUNG/Samsung-Telephone-Mobile-GSM-Samsung-B5722-noir-Open-marketGT-B5722-Manuels.htm
/SAMSUNG/Samsung-Telephone-Mobile-GSM-Samsung-Blue-Earth-bleu-Open-market-GT-S7550-Manuels.htm
/SAMSUNG/Samsung-Telephone-Mobile-GSM-Samsung-C3050-noir-Virgin-Mobile-Manuels.htm
/SAMSUNG/Samsung-Telephone-Mobile-GSM-Samsung-C3520-GT-C3520-Manuels.htm
/SAMSUNG/Samsung-Telephone-Mobile-GSM-Samsung-C520-Hello-Kitty-Open-marketS-GH-C520-Manuels.htm
/SAMSUNG/Samsung-Telephone-Mobile-GSM-Samsung-Chat-335-gris-Open-market-GT-S3350-Manuels.htm
/SAMSUNG/Samsung-Telephone-Mobile-GSM-Samsung-Corby-Pro-rouge-Open-market-GT-B5310-Manuels.htm
/SAMSUNG/Samsung-Telephone-Mobile-GSM-Samsung-E1050-noir-Open-market-GT-E1050-Manuels.htm
/SAMSUNG/Samsung-Telephone-Mobile-GSM-Samsung-E1150-rouge-Open-market-GT-E1150-Manuels.htm
/SAMSUNG/Samsung-Telephone-Mobile-GSM-Samsung-E1310-NRJ-Mobile-GT-E1310B.manuels.htm
/SAMSUNG/Samsung-Telephone-Mobile-GSM-Samsung-E2330-noir-Open-market-GT-E2330B-Manuels.htm
/SAMSUNG/Samsung-Telephone-Mobile-GSM-Samsung-E250-Open-market-SGH-E250-Manuels.htm
/SAMSUNG/Samsung-Telephone-Mobile-GSM-Samsung-E2530-Open-market-GT-E2530-Manuels.htm
/SAMSUNG/Samsung-Telephone-Mobile-GSM-Samsung-F250-Open-market-SGH-F250-Manuels.htm
/SAMSUNG/Samsung-Telephone-Mobile-GSM-Samsung-G600-Open-market-SGH-G600-Manuels.htm
/SAMSUNG/Samsung-Telephone-Mobile-GSM-Samsung-J700-SGH-J700G-Manuels.htm
/SAMSUNG/Samsung-Telephone-Mobile-GSM-Samsung-J770-Open-market-SGH-J770-Manuels.htm
/SAMSUNG/Samsung-Telephone-Mobile-GSM-Samsung-Jetnoir-Open-market-GT-S8000-Manuels.htm
/SAMSUNG/Samsung-Telephone-Mobile-GSM-Samsung-Player-5-noir-Open-market-GT-S5560-Manuels.htm
/SAMSUNG/Samsung-Telephone-Mobile-GSM-Samsung-Player-City-blanc-Orange-GT-S5260P-Manuels.htm
/SAMSUNG/Samsung-Telephone-Mobile-GSM-Samsung-Player-Light-noir-Open-market-GT-C3510-Manuels.htm
/SAMSUNG/Samsung-Telephone-Mobile-GSM-Samsung-Player-mini-noir-Open-market-GT-C3300K-Manuels.htm
/SAMSUNG/Samsung-Telephone-Mobile-GSM-Samsung-Player-Pixon-noir-Open-market-GT-M8800-Manuels.htm
/SAMSUNG/Samsung-Telephone-Mobile-GSM-Samsung-Player-Star-2-noir-Open-market-GT-S5620-manuels.htm
/SAMSUNG/Samsung-Telephone-Mobile-GSM-Samsung-Player-Star-noir-Open-market-GT-S5600-Manuels.htm
/SAMSUNG/Samsung-Telephone-Mobile-GSM-Samsung-Player-Style-Open-market-SGH-F480-Manuels.htm
/SAMSUNG/Samsung-Telephone-Mobile-GSM-Samsung-Player-Ultra-rouge-open-market-GT-S8300-Manuels.htm
/SAMSUNG/Samsung-Telephone-Mobile-GSM-Samsung-S3100-gris-Open-market-GT-S3100-Manuels.htm
/SAMSUNG/Samsung-Telephone-Mobile-GSM-Samsung-S3500-noir-Open-market-GT-S3500-manuels.htm
/SAMSUNG/Samsung-Telephone-Mobile-GSM-Samsung-S5150-gold-Open-market-GT-S5150-Manuels.htm
/SAMSUNG/Samsung-Telephone-Mobile-GSM-Samsung-S5233W-GT-S5233W-Manuels.htm
/SAMSUNG/Samsung-Telephone-Mobile-GSM-Samsung-S5610-GT-S5610-Manuels.htm
/SAMSUNG/Samsung-Telephone-Mobile-GSM-Samsung-Solid-B2100-rouge-Open-market-GT-B2100-Manuels.htm
/SAMSUNG/Samsung-Telephone-Mobile-GSM-Samsung-U600-Open-market-SGH-U600B-Manuels.htm
/SAMSUNG/Samsung-Telephone-Mobile-GSM-Samsung-U600-Open-market-SGH-U600-Manuels.htm
/SAMSUNG/Samsung-Telephone-Mobile-GSM-SGH-C180-Manuels.htm
/SAMSUNG/Samsung-Telephone-Mobile-GSM-SGH-E200-Manuels.htm
/SAMSUNG/Samsung-Telephone-Mobile-GSM-SGH-E570-Manuels.htm
/SAMSUNG/Samsung-Telephone-Mobile-GSM-SGH-E590-Manuels.htm
/SAMSUNG/Samsung-Telephone-Mobile-GSM-SGH-E840-Manuels.htm
/SAMSUNG/Samsung-Telephone-Mobile-GSM-SGH-F480G.manuels.htm
/SAMSUNG/Samsung-Telephone-Mobile-GSM-SGH-N620-Manuels.htm
/SAMSUNG/Samsung-Telephone-Mobile-GSM-SGH-R200-Manuels.htm
/SAMSUNG/Samsung-Telephone-Mobile-GSM-SGH-S730-Manuels.htm
/SAMSUNG/Samsung-Telephone-Mobile-GSM-SGH-U100-Manuels.htm
/SAMSUNG/Samsung-Telephone-Mobile-GSM-SGH-Z360-Manuels.htm
/SAMSUNG/Samsung-Telephone-Mobile-Mobiles-Style-Samsung-S5610-GT-S5610-Manuels.htm
/SAMSUNG/Samsung-Telephone-Mobile-Oreillette-bluetooth-Kit-Pieton-Bluetooth-HM1700-Manuels.htm
/SAMSUNG/Samsung-Telephone-Mobile-Smartphones-Galaxy-Ace-Plus-GT-S7500-Manuels.htm
/SAMSUNG/Samsung-Telephone-Mobile-Smartphones-Galaxy-Camera-EK-GC100-Manuels.htm
/SAMSUNG/Samsung-Telephone-Mobile-Smartphones-Galaxy-S-Advance-GT-I9070P-Manuels.htm
/SAMSUNG/Samsung-Telephone-Mobile-Smartphones-Galaxy-SIII-mini-GT-I8190-Manuels.htm
/SAMSUNG/Samsung-Telephone-Mobile-Smartphones-GALAXY-Y-ProGT-B5510-Manuels.htm
/SAMSUNG/Samsung-Telephone-Mobile-Smartphones-GT-B5510-Manuels.htm
/SAMSUNG/Samsung-Telephone-Mobile-Smartphones-GT-I5800-Manuels.htm
/SAMSUNG/Samsung-Telephone-Mobile-Smartphones-GT-I8190-Manuels.htm
/SAMSUNG/Samsung-Telephone-Mobile-Smartphones-GT-I9000-RW8-Manuels.htm
/SAMSUNG/Samsung-Telephone-Mobile-Smartphones-GT-I9001-M8-Manuels.htm
/SAMSUNG/Samsung-Telephone-Mobile-Smartphones-GT-I9003-RM4-Manuels.htm
/SAMSUNG/Samsung-Telephone-Mobile-Smartphones-GT-I9100G-francais-Manuels.htm
/SAMSUNG/Samsung-Telephone-Mobile-Smartphones-GT-I9100G-Manuels.htm
/SAMSUNG/Samsung-Telephone-Mobile-Smartphones-GT-I9100-manuels.htm
/SAMSUNG/Samsung-Telephone-Mobile-Smartphones-GT-I9100P-Manuels.htm
/SAMSUNG/Samsung-Telephone-Mobile-Smartphones-GT-I9300-Manuels.htm
/SAMSUNG/Samsung-Telephone-Mobile-Smartphones-GT-I9305-Manuels.htm
/SAMSUNG/Samsung-Telephone-Mobile-Smartphones-GT-I9305-Phone-Manuels.htm
/SAMSUNG/Samsung-Telephone-Mobile-Smartphones-GT-N7100-Afrique-du-nord-Manuels.htm
/SAMSUNG/Samsung-Telephone-Mobile-Smartphones-GT-N7100-manuels.htm
/SAMSUNG/Samsung-Telephone-Mobile-Smartphones-GT-S5230-Manuels.htm
/SAMSUNG/Samsung-Telephone-Mobile-Smartphones-GT-S5300-Manuels.htm
/SAMSUNG/Samsung-Telephone-Mobile-Smartphones-GT-S5369-manuels.htm
/SAMSUNG/Samsung-Telephone-Mobile-Smartphones-GT-S5380-Manuels.htm
/SAMSUNG/Samsung-Telephone-Mobile-Smartphones-GT-S5570-Manuels.htm
/SAMSUNG/Samsung-Telephone-Mobile-Smartphones-GT-S5750E-Manuels.htm
/SAMSUNG/Samsung-Telephone-Mobile-Smartphones-GT-S5839I-2-Manuels.htm
/SAMSUNG/Samsung-Telephone-Mobile-Smartphones-GT-S5839I-3-Manuels.htm
/SAMSUNG/Samsung-Telephone-Mobile-Smartphones-GT-S5839I-Manuels.htm
/SAMSUNG/Samsung-Telephone-Mobile-Smartphones-Samsung-C6625-gris-Open-market-GT-C6625-Manuels.htm
/SAMSUNG/Samsung-Telephone-Mobile-Smartphones-Samsung-GALAXY-Camera%20EK-GC100-Manuels.htm
/SAMSUNG/Samsung-Telephone-Mobile-Smartphones-Samsung-Galaxy-Express-GT-I8730-Manuels.htm
/SAMSUNG/Samsung-Telephone-Mobile-Smartphones-Samsung-Galaxy-Note-blanc-SFR-GT-N7000-Manuels.htm
/SAMSUNG/Samsung-Telephone-Mobile-Smartphones-Samsung-Galaxy-Note-GT-N7000-Manuels.htm
/SAMSUNG/Samsung-Telephone-Mobile-Smartphones-Samsung-Galaxy-Note-noir-SFRGT-N7000-Manuels.htm
/SAMSUNG/Samsung-Telephone-Mobile-Smartphones-Samsung-Galaxy-S4GT-I9505-Manuels.htm
/SAMSUNG/Samsung-Telephone-Mobile-Smartphones-Samsung-Galaxy-S-IIIGT-I9300-Manuels.htm
/SAMSUNG/Samsung-Telephone-Mobile-Smartphones-Samsung-Galaxy-S-noir-Open-market-GT-I9000-Manuels.htm
/SAMSUNG/Samsung-Telephone-Mobile-Smartphones-Samsung-Galaxy-Teos-noir-Bouygues-GT-I5800-Manuels.htm
/SAMSUNG/Samsung-Telephone-Mobile-Smartphones-Samsung-Galaxy-Xcover-GT-S5690-2-Manuels.htm
/SAMSUNG/Samsung-Telephone-Mobile-Smartphones-Samsung-Galaxy-Xcover-GT-S5690-Manuels.htm
/SAMSUNG/Samsung-Telephone-Mobile-Smartphones-Samsung-I9500-GT-I9500-Manuels.htm
/SAMSUNG/Samsung-Telephone-Mobile-Smartphones-Samsung-S6312-GT-S6312-Manuels.htm
/SAMSUNG/Samsung-Telephone-Mobile-Smartphones-Samsung-Wave-533-noir-Open-marketGT-S5330-Manuels.htm
/SAMSUNG/Samsung-Telephone-Mobile-Smartphones-Samsung-Wave-723-gris-Open-marketGT-S7230E-Manuels.htm
/SAMSUNG/Samsung-Telephone-Mobile-Smartphones-Samsung-Wave-noir-Open-market-GT-S8500-Manuels.htm
/SAMSUNG/Samsung-Telephone-Mobile-Smartphones-SGH-I320-Manuels.htm
/SAMSUNG/Samsung-Telephone-Mobile-Tablette-Galaxy-Tab-GT-P1000-Manuels.htm
/SAMSUNG/Samsung-Telephone-Mobile-Tablette-GT-P3100-Manuels.htm
/SAMSUNG/Samsung-Telephone-Mobile-Tablette-GT-P3110-Manuels.htm
/SAMSUNG/Samsung-Telephone-Mobile-Tablette-GT-P5100-2-Manuels.htm
/SAMSUNG/Samsung-Telephone-Mobile-Tablette-GT-P5100-3-Manuels.htm
/SAMSUNG/Samsung-Telephone-Mobile-Tablette-GT-P5100-Manuels.htm
/SAMSUNG/Samsung-Telephone-Mobile-Tablette-GT-P6800-Manuels.htm
/SAMSUNG/Samsung-Telephone-Mobile-Tablette-GT-P7300-M16-Manuels.htm
/SAMSUNG/Samsung-Telephone-Mobile-Tablette-GT-P7500-M32-Manuels.htm
/SAMSUNG/Samsung-Telephone-Mobile-Tablette-GT-P7510-M16-Manuels.htm
/SAMSUNG/Samsung-Telephone-Mobile-Tablette-Samsung-Galaxy-Tab-2-10.1-GT-P5100-Manuels.htm
/SAMSUNG/Samsung-Telephone-Mobile-Tablette-Samsung-Galaxy-Tab-2-10.1-Wi-Fi-GT-P5110-Manuels.htm
/SAMSUNG/Samsung-Telephone-Mobile-Tablette-Samsung-Galaxy-Tab-7.0-Wi-FiGT-P3110-Manuels.htm
/SAMSUNG/Samsung-Telephone-Mobile-Tablettes-Tablettes-Samsung-Galaxy-Tab-2-10.1-Wi-Fi-Manuels.htm
/SAMSUNG/Samsung-Telephone-Mobile-Telephone-coulissant-Samsung-S5200-bleu-SFRGT-S5200-Manuels.htm
/SAMSUNG/Samsung-TV%20Audio-Video-TV-LCD-LE40A465C1M-Manuels.htm
/SAMSUNG/Samsung-TV%20Audio-Video-TV-LCD-LE46C630K1W-Manuels.htm
/SAMSUNG/Samsung-TV%20Audio-Video-TV-PDP-PS50A676-PS50A676T1M-Manuels.htm
/SAMSUNG/Samsung-TV-Audio-LCD-Series-5-550-32inch-LE32D550-LE32D550K1W-Belgique-Manuels.htm
/SAMSUNG/Samsung-TV-Audio-Vid%C3%A9o-Video-projecteur-SP-P310ME-Manuels.htm
/SAMSUNG/Samsung-TV-Audio-Video-3D-51-PS51D550WXZF-serie-5-3D-HD-TV-PDP-TV-PS51D550C1W.manuels.htm
/SAMSUNG/Samsung-TV-Audio-Video-3D-51-PS51D550WXZF-serie-5-3D-HD-TV-PDP-TV-PS51D550C1W-Manuels.htm
/SAMSUNG/Samsung-TV-Audio-Video-3D-LE40C750-LE40C750R2W-Manuels.htm
/SAMSUNG/Samsung-TV-Audio-Video-3D-LE46C750-LE46C750R2W-Manuels.htm
/SAMSUNG/Samsung-TV-Audio-Video-3D-LED-Smart-TV-LED-3D-UA65ES8000R-serie-8-Manuels.htm
/SAMSUNG/Samsung-TV-Audio-Video-3D-PS43D490A1W-Manuels.htm
/SAMSUNG/Samsung-TV-Audio-Video-3D-PS50C490-PS50C490B3W-Manuels.htm
/SAMSUNG/Samsung-TV-Audio-Video-3D-PS50C6970-PS50C6970YS-Manuels.htm
/SAMSUNG/Samsung-TV-Audio-Video-3D-PS50C7000YW-Manuels.htm
/SAMSUNG/Samsung-TV-Audio-Video-3D-PS59D6900DS-Manuels.htm
/SAMSUNG/Samsung-TV-Audio-Video-3D-PS63C7700-PS63C7700YS-Manuels.htm
/SAMSUNG/Samsung-TV-Audio-Video-3D-UE32D6500VQ-Manuels.htm
/SAMSUNG/Samsung-TV-Audio-Video-3D-UE32D6510WS-Manuels.htm
/SAMSUNG/Samsung-TV-Audio-Video-3D-UE32ES6100W-Manuels.htm
/SAMSUNG/Samsung-TV-Audio-Video-3D-UE32ES6300-ZF-Slim-LED-32-SMART-TV-3D-UE32ES6300S-Manuels.htm
/SAMSUNG/Samsung-TV-Audio-Video-3D-UE40C7700WS-Manuels.htm
/SAMSUNG/Samsung-TV-Audio-Video-3D-UE40D6570WS-Manuels.htm
/SAMSUNG/Samsung-TV-Audio-Video-3D-UE40D6750WS-Manuels.htm
/SAMSUNG/Samsung-TV-Audio-Video-3D-UE40D8000YQ-Manuels.htm
/SAMSUNG/Samsung-TV-Audio-Video-3D-UE40EH6030W-TV-Audio-Video-TV-LCD-LE32A437T2D-Manuels.htm
/SAMSUNG/Samsung-TV-Audio-Video-3D-UE40ES6100W-Manuels.htm
/SAMSUNG/Samsung-TV-Audio-Video-3D-UE40ES6300-ZF-Slim-LED-40-SMART-TV-3DUE40ES6300S-Manuels.htm
/SAMSUNG/Samsung-TV-Audio-Video-3D-UE40ES6560S-Manuels.htm
/SAMSUNG/Samsung-TV-Audio-Video-3D-UE40ES6710-ZF-Slim-LED-40-SMART-TV-3DUE40ES6710S-Manuels.htm
/SAMSUNG/Samsung-TV-Audio-Video-3D-UE40ES6900-ZF-Slim-LED-40-SMART-TV-3DUE40ES6900S-Manuels.htm
/SAMSUNG/Samsung-TV-Audio-Video-3D-UE40F6500-TV-LED-40-Full-HD-Smart-TV-3D-UE40F6500SS-Manuels.htm
/SAMSUNG/Samsung-TV-Audio-Video-3D-UE40F7000-TV-LED-40-Full-HD-Smart-TV-3D-UE40F7000SL-Manuels.htm
/SAMSUNG/Samsung-TV-Audio-Video-3D-UE40F8000-TV-LED-46-Full-HD-Smart-TV-3D-UE40F8000SL-Manuels.htm
/SAMSUNG/Samsung-TV-Audio-Video-3D-UE46C7700-UE46C7700WS-Manuels.htm
/SAMSUNG/Samsung-TV-Audio-Video-3D-UE46C8700-UE46C8790XS-Manuels.htm
/SAMSUNG/Samsung-TV-Audio-Video-3D-UE46D6200TS-manuels.htm
/SAMSUNG/Samsung-TV-Audio-Video-3D-UE46D6500VH-Manuels.htm
/SAMSUNG/Samsung-TV-Audio-Video-3D-UE46D6570WS-Manuels.htm
/SAMSUNG/Samsung-TV-Audio-Video-3D-UE46D6750WS-Manuels.htm
/SAMSUNG/Samsung-TV-Audio-Video-3D-UE46EH6030W-Manuels.htm
/SAMSUNG/Samsung-TV-Audio-Video-3D-UE46ES6530S-Manuels.htm
/SAMSUNG/Samsung-TV-Audio-Video-3D-UE46ES6540S-Manuels.htm
/SAMSUNG/Samsung-TV-Audio-Video-3D-UE46ES6560S-Manuels.htm
/SAMSUNG/Samsung-TV-Audio-Video-3D-UE46ES6570S-Manuels.htm
/SAMSUNG/Samsung-TV-Audio-Video-3D-UE46ES6710-ZF-Slim-LED-46-SMART-TV-3DUE46ES6710S-Manuels.htm
/SAMSUNG/Samsung-TV-Audio-Video-3D-UE46F6510-TV-LED-46-Full-HD-Smart-TV-3D-UE46F6510SS-Manuels.htm
/SAMSUNG/Samsung-TV-Audio-Video-3D-UE46F8000-TV-LED-46-Full-HD-Smart-TV-3D-UE46F8000SL-Manuels.htm
/SAMSUNG/Samsung-TV-Audio-Video-3D-UE50ES6100W-Manuels.htm
/SAMSUNG/Samsung-TV-Audio-Video-3D-UE50ES6900S-ZF-Slim-LED-50-SMART-TV-3D-Manuels.htm
/SAMSUNG/Samsung-TV-Audio-Video-3D-UE55C7700-UE55C7700WS-Manuels.htm
/SAMSUNG/Samsung-TV-Audio-Video-3D-UE55C8700-UE55C8790XS-Manuels.htm
/SAMSUNG/Samsung-TV-Audio-Video-3D-UE55C8700XS-Manuels.htm
/SAMSUNG/Samsung-TV-Audio-Video-3D-UE55D6300SS-Manuels.htm
/SAMSUNG/Samsung-TV-Audio-Video-3D-UE55ES6100W-AQV09PSBN-Manuels.htm
/SAMSUNG/Samsung-TV-Audio-Video-3D-UE55ES6530S-Manuels.htm
/SAMSUNG/Samsung-TV-Audio-Video-3D-UE55ES6540S-Manuels.htm
/SAMSUNG/Samsung-TV-Audio-Video-3D-UE55F8000-TV-LED-55-Full-HD-Smart-TV-3D-UE55F8000SL-Manuels.htm
/SAMSUNG/Samsung-TV-Audio-Video-3D-UE65F6400-TV-LED-65-Full-HD-Smart-TV-3D-UE65F6400AW-Manuels.htm
/SAMSUNG/Samsung-TV-Audio-Video-Enregistreur-DVD-DVD-SH877-Manuels.htm
/SAMSUNG/Samsung-TV-Audio-Video-Enregistreur-DVD-DVD-SH893-Manuels.htm
/SAMSUNG/Samsung-TV-Audio-Video-Enregistreur-DVD-SH897-Manuels.htm
/SAMSUNG/Samsung-TV-Audio-Video-Home-Cinema-Blu-ray-HT-C6930W-Manuels.htm
/SAMSUNG/Samsung-TV-Audio-Video-Home-Cinema-Blu-ray-HT-E4550-Manuels.htm
/SAMSUNG/Samsung-TV-Audio-Video-Home-Cinema-Blu-ray-HT-ES4200-ZFHT-ES4200-manuels.htm
/SAMSUNG/Samsung-TV-Audio-Video-Home-Cinema-HT-C5530-Manuels.htm
/SAMSUNG/Samsung-TV-Audio-Video-Home-Cinema-HT-D4200-Manuels.htm
/SAMSUNG/Samsung-TV-Audio-Video-Home-Cinema-Manuels.htm
/SAMSUNG/Samsung-TV-Audio-Video-Lecteur-Blu-ray-BD-C5300-Manuels.htm
/SAMSUNG/Samsung-TV-Audio-Video-Lecteur-Blu-ray-BD-F8500-Manuels.htm
/SAMSUNG/Samsung-TV-Audio-Video-Lecteur-Blu-ray-BD-P1600-BD-P1600A-Manuels.htm
/SAMSUNG/Samsung-TV-Audio-Video-Lecteur-Blu-ray-BD-P1600-Manuels.htm
/SAMSUNG/Samsung-TV-Audio-Video-Lecteur-Blu-ray-BD-P2500-Manuels.htm
/SAMSUNG/Samsung-TV-Audio-Video-Lecteur-Blu-ray-BD-P4600-Manuels.htm
/SAMSUNG/Samsung-TV-Audio-Video-Lecteur-DVD-DVD-D530WXZF-serie-5-DVD-D530-Manuels.htm
/SAMSUNG/Samsung-TV-Audio-Video-Lecteur-MP3-MP4-Baladeur-MP3-Clip-F3-Noir-2GoYP-F3QB-Manuels.htm
/SAMSUNG/Samsung-TV-Audio-Video-Lecteur-MP3-MP4-P3YP-P3JCB-Manuels.htm
/SAMSUNG/Samsung-TV-Audio-Video-Lecteur-MP3-MP4-R-mix-YP-R1JCP-Manuels.htm
/SAMSUNG/Samsung-TV-Audio-Video-Lecteur-MP3-MP4-S2-YP-S2QB-Manuels.htm
/SAMSUNG/Samsung-TV-Audio-Video-Lecteur-MP3-MP4-Samsung-Q3YP-Q3CB-Manuels.htm
/SAMSUNG/Samsung-TV-Audio-Video-Lecteur-MP3-MP4-YH-820MW-Manuels.htm
/SAMSUNG/Samsung-TV-Audio-Video-Lecteur-MP3-MP4-YP-GI1CW-Manuels.htm
/SAMSUNG/Samsung-TV-Audio-Video-Lecteur-MP3-MP4-YP-GI1EW-Manuels.htm
/SAMSUNG/Samsung-TV-Audio-Video-Lecteur-MP3-MP4-YP-GS1CW-manuels.htm
/SAMSUNG/Samsung-TV-Audio-Video-Lecteur-MP3-MP4-YP-Z5FQW-ELS-Manuels.htm
/SAMSUNG/Samsung-TV-Audio-Video-Micro-Chaine-Hi-Fi-Micro-chaine-MM-D430DWXZF-serie-4-DVD-Manuels.htm
/SAMSUNG/Samsung-TV-Audio-Video-Micro-Chaine-Hi-Fi-MM-C330D-Manuels.htm
/SAMSUNG/Samsung-TV-Audio-Video-Micro-Chaine-Hi-Fi-MM-ZB7-2-Manuels.htm
/SAMSUNG/Samsung-TV-Audio-Video-Micro-Chaine-Hi-Fi-MM-ZB7-Manuels.htm
/SAMSUNG/Samsung-TV-Audio-Video-Moniteur-Grande-taille-460DR-2-Manuels.htm
/SAMSUNG/Samsung-TV-Audio-Video-Moniteur-Grande-taille-ME32B-Manuels.htm
/SAMSUNG/Samsung-TV-Audio-Video-Moniteur-Grande-taille-ME40B-Manuels.htm
/SAMSUNG/Samsung-TV-Audio-Video-Moniteur-Grande-taille-ME46B-Manuels.htm
/SAMSUNG/Samsung-TV-Audio-Video-Moniteur-Grande-taille-ME75B-Manuels.htm
/SAMSUNG/Samsung-TV-Audio-Video-Moniteur-Grande-taille-NL22B-Manuels.htm
/SAMSUNG/Samsung-TV-Audio-Video-Moniteur-Grande-taille-SUR40-Manuels.htm
/SAMSUNG/Samsung-TV-Audio-Video-Moniteur-Grande-taille-TC220W-Manuels.htm
/SAMSUNG/Samsung-TV-Audio-Video-Moniteur-Grande-taille-TS190W-Manuels.htm
/SAMSUNG/Samsung-TV-Audio-Video-TV-Cathodique-CW29Z504N-Manuels.htm
/SAMSUNG/Samsung-TV-Audio-Video-TV-Cathodique-WS32V54N-Manuels.htm
/SAMSUNG/Samsung-TV-Audio-Video-TV-LCD%20-LE22B450-LE22B450C4W-Manuels.htm
/SAMSUNG/Samsung-TV-Audio-Video-TV-LCD-32-LE32D550WXZF-serie-5-HD-TV-LCD-TV-LE32D550K1W-Manuels.htm
/SAMSUNG/Samsung-TV-Audio-Video-TV-LCD-LE19B450C4H-Manuels.htm
/SAMSUNG/Samsung-TV-Audio-Video-TV-LCD-LE22A455C1D-Manuels.htm
/SAMSUNG/Samsung-TV-Audio-Video-TV-LCD-LE22B650-LE22B650T6W-Manuels.htm
/SAMSUNG/Samsung-TV-Audio-Video-TV-LCD-LE22C350-LE22C350D1W-Manuels.htm
/SAMSUNG/Samsung-TV-Audio-Video-TV-LCD-LE22C430C4W-Manuels.htm
/SAMSUNG/Samsung-TV-Audio-Video-TV-LCD-LE22D450G1W-Manuels.htm
/SAMSUNG/Samsung-TV-Audio-Video-TV-LCD-LE23R86BD-Manuels.htm
/SAMSUNG/Samsung-TV-Audio-Video-TV-LCD-LE26A456C2D-Manuels.htm
/SAMSUNG/Samsung-TV-Audio-Video-TV-LCD-LE26A466-LE26A466C2M-Manuels.htm
/SAMSUNG/Samsung-TV-Audio-Video-TV-LCD-LE26B350F1W-Manuels.htm
/SAMSUNG/Samsung-TV-Audio-Video-TV-LCD-LE26C450E1W-Manuels.htm
/SAMSUNG/Samsung-TV-Audio-Video-TV-LCD-LE26C450-LE26C450E1W-Manuels.htm
/SAMSUNG/Samsung-TV-Audio-Video-TV-LCD-LE26C452C4H-Manuels.htm
/SAMSUNG/Samsung-TV-Audio-Video-TV-LCD-LE26C457C6H-Manuels.htm
/SAMSUNG/Samsung-TV-Audio-Video-TV-LCD-LE32A436T1D-Manuels.htm
/SAMSUNG/Samsung-TV-Audio-Video-TV-LCD-LE32A437T2D-Manuels.htm
/SAMSUNG/Samsung-TV-Audio-Video-TV-LCD-LE32A456-LE32A456C2D-Manuels.htm
/SAMSUNG/Samsung-TV-Audio-Video-TV-LCD-LE32A465-LE32A465C1M-Manuels.htm
/SAMSUNG/Samsung-TV-Audio-Video-TV-LCD-LE32A577P2M-Manuels.htm
/SAMSUNG/Samsung-TV-Audio-Video-TV-LCD-LE32A676-LE32A676A1M-Manuels.htm
/SAMSUNG/Samsung-TV-Audio-Video-TV-LCD-LE32B350F1W-Manuels.htm
/SAMSUNG/Samsung-TV-Audio-Video-TV-LCD-LE32B651-LE32B651T3P-Manuels.htm
/SAMSUNG/Samsung-TV-Audio-Video-TV-LCD-LE32C350D1W-Manuels.htm
/SAMSUNG/Samsung-TV-Audio-Video-TV-LCD-LE32C450E1W-Manuels.htm
/SAMSUNG/Samsung-TV-Audio-Video-TV-LCD-LE32C450-LE32C450E1W-Manuels.htm
/SAMSUNG/Samsung-TV-Audio-Video-TV-LCD-LE32C550-LE32C550J1W-Manuels.htm
/SAMSUNG/Samsung-TV-Audio-Video-TV-LCD-LE32C630-LE32C630K1W-Manuels.htm
/SAMSUNG/Samsung-TV-Audio-Video-TV-LCD-LE32D403E2W-Manuels.htm
/SAMSUNG/Samsung-TV-Audio-Video-TV-LCD-LE32D450G1W-Manuels.htm
/SAMSUNG/Samsung-TV-Audio-Video-TV-LCD-LE32R86BD-Manuels.htm
/SAMSUNG/Samsung-TV-Audio-Video-TV-LCD-LE32S86BD-Manuels.htm
/SAMSUNG/Samsung-TV-Audio-Video-TV-LCD-LE32T51B-Manuels.htm
/SAMSUNG/Samsung-TV-Audio-Video-TV-LCD-LE37A457C1D-Manuels.htm
/SAMSUNG/Samsung-TV-Audio-Video-TV-LCD-LE37A568-LE37A568P3M-Manuels.htm
/SAMSUNG/Samsung-TV-Audio-Video-TV-LCD-LE37A626-LE37A626A3M-manuels.htm
/SAMSUNG/Samsung-TV-Audio-Video-TV-LCD-LE37A676-Manuels.htm
/SAMSUNG/Samsung-TV-Audio-Video-TV-LCD-LE37B530-LE37B530P7W-Manuels.htm
/SAMSUNG/Samsung-TV-Audio-Video-TV-LCD-LE37B653T5P-Manuels.htm
/SAMSUNG/Samsung-TV-Audio-Video-TV-LCD-LE37C530F1W-Manuels.htm
/SAMSUNG/Samsung-TV-Audio-Video-TV-LCD-LE37C530-LE37C530F1W.manuels.htm
/SAMSUNG/Samsung-TV-Audio-Video-TV-LCD-LE40A457C1D-Manuels.htm
/SAMSUNG/Samsung-TV-Audio-Video-TV-LCD-LE40A466-LE40A466C2M-Manuels.htm
/SAMSUNG/Samsung-TV-Audio-Video-TV-LCD-LE40A536T1F-Manuels.htm
/SAMSUNG/Samsung-TV-Audio-Video-TV-LCD-LE40A556P1F-Manuels.htm
/SAMSUNG/Samsung-TV-Audio-Video-TV-LCD-LE40A566P1M-Manuels.htm
/SAMSUNG/Samsung-TV-Audio-Video-TV-LCD-LE40A568-LE40A568P3M-Manuels.htm
/SAMSUNG/Samsung-TV-Audio-Video-TV-LCD-LE40A626-LE40A626A3M-Manuels.htm
/SAMSUNG/Samsung-TV-Audio-Video-TV-LCD-LE40A676-LE40A676A1M-Manuels.htm
/SAMSUNG/Samsung-TV-Audio-Video-TV-LCD-LE40A856-LE40A856S1M-Manuels.htm
/SAMSUNG/Samsung-TV-Audio-Video-TV-LCD-LE40B530P7W-Manuels.htm
/SAMSUNG/Samsung-TV-Audio-Video-TV-LCD-LE40B620T2WXXC-LE40B620R3W-Manuels.htm
/SAMSUNG/Samsung-TV-Audio-Video-TV-LCD-LE40B651-LE40B651T3W-Russe-Manuels.htm
/SAMSUNG/Samsung-TV-Audio-Video-TV-LCD-LE40B651T3P-Manuels.htm
/SAMSUNG/Samsung-TV-Audio-Video-TV-LCD-LE40C530-LE40C530F1W-Manuels.htm
/SAMSUNG/Samsung-TV-Audio-Video-TV-LCD-LE40C630-LE40C630K1W-Manuels.htm
/SAMSUNG/Samsung-TV-Audio-Video-TV-LCD-LE40D503F7W-Manuels.htm
/SAMSUNG/Samsung-TV-Audio-Video-TV-LCD-LE40D550K1W-Manuels.htm
/SAMSUNG/Samsung-TV-Audio-Video-TV-LCD-LE40R86BD-Manuels.htm
/SAMSUNG/Samsung-TV-Audio-Video-TV-LCD-LE46A568-LE46A568P3M-Manuels.htm
/SAMSUNG/Samsung-TV-Audio-Video-TV-LCD-LE46A856-LE46A856S1M-Manuels.htm
/SAMSUNG/Samsung-TV-Audio-Video-TV-LCD-LE46B651-LE46B651T3W-Manuels.htm
/SAMSUNG/Samsung-TV-Audio-Video-TV-LCD-LE46C530-LE46C530F1W-Manuels.htm
/SAMSUNG/Samsung-TV-Audio-Video-TV-LCD-LE46C630K1W-Manuels.htm
/SAMSUNG/Samsung-TV-Audio-Video-TV-LCD-LE46C650-LE46C650L1W-Manuels.htm
/SAMSUNG/Samsung-TV-Audio-Video-TV-LCD-LE46D550K1W-Manuels.htm
/SAMSUNG/Samsung-TV-Audio-Video-TV-LCD-Manuels.htm
/SAMSUNG/Samsung-TV-Audio-Video-TV-LED-22-UE22ES5400WXZF-serie-5-SMART-TV-FULL-HD-LED-TV-Manuels.htm
/SAMSUNG/Samsung-TV-Audio-Video-TV-LED-HG32EA590LS-Manuels.htm
/SAMSUNG/Samsung-TV-Audio-Video-TV-LED-HG40EA590LS-Manuels.htm
/SAMSUNG/Samsung-TV-Audio-Video-TV-LED-LE40A796-LE40A796R2M-Manuels.htm
/SAMSUNG/Samsung-TV-Audio-Video-TV-LED-UE19C4000PW-Manuels.htm
/SAMSUNG/Samsung-TV-Audio-Video-TV-LED-UE22C4010PW-Manuels.htm
/SAMSUNG/Samsung-TV-Audio-Video-TV-LED-UE22D5000NH-Manuels.htm
/SAMSUNG/Samsung-TV-Audio-Video-TV-LED-UE22D5010NW-Manuels.htm
/SAMSUNG/Samsung-TV-Audio-Video-TV-LED-UE22ES5000-ZF-Slim-LED-22-SMART-TV-UE22ES5000W-Manuels.htm
/SAMSUNG/Samsung-TV-Audio-Video-TV-LED-UE22ES5410-ZF-Slim-LED-22-SMART-TVUE22ES5410W-Manuels.htm
/SAMSUNG/Samsung-TV-Audio-Video-TV-LED-UE22F5000-TV-LED-22-Full-HD-UE22F5000AW-Manuels.htm
/SAMSUNG/Samsung-TV-Audio-Video-TV-LED-UE26C4000PW-Manuels.htm
/SAMSUNG/Samsung-TV-Audio-Video-TV-LED-UE26D4003BW-Manuels.htm
/SAMSUNG/Samsung-TV-Audio-Video-TV-LED-UE32C4000PH-Manuels.htm
/SAMSUNG/Samsung-TV-Audio-Video-TV-LED-UE32C4000PW-Manuels.htm
/SAMSUNG/Samsung-TV-Audio-Video-TV-LED-UE32C4000-UE32C4000PW-2-Manuels.htm
/SAMSUNG/Samsung-TV-Audio-Video-TV-LED-UE32C5100-UE32C5100QF-Manuels.htm
/SAMSUNG/Samsung-TV-Audio-Video-TV-LED-UE32C6000-UE32C6000RW-Manuels.htm
/SAMSUNG/Samsung-TV-Audio-Video-TV-LED-UE32C6700-UE32C6700US-Manuels.htm
/SAMSUNG/Samsung-TV-Audio-Video-TV-LED-UE32C8700XS-manuels.htm
/SAMSUNG/Samsung-TV-Audio-Video-TV-LED-UE32D4003BW-Manuels.htm
/SAMSUNG/Samsung-TV-Audio-Video-TV-LED-UE32D5720RS-Manuels.htm
/SAMSUNG/Samsung-TV-Audio-Video-TV-LED-UE32EH4000-ZF-LED-32-HD-TV-UE32EH4000W-Manuals-Manuels.htm
/SAMSUNG/Samsung-TV-Audio-Video-TV-LED-UE32EH4000-ZF-LED-32-HD-TV-UE32EH4000W-Manuels.htm
/SAMSUNG/Samsung-TV-Audio-Video-TV-LED-UE32EH5000-ZF-LED-32-FULL-HD-UE32EH5000W-Manuels.htm
/SAMSUNG/Samsung-TV-Audio-Video-TV-LED-UE32EH5300W-Manuels.htm
/SAMSUNG/Samsung-TV-Audio-Video-TV-LED-UE32ES5500-ZF-Slim-LED-32-SMART-TV-UE32ES5500W-Manuels.htm
/SAMSUNG/Samsung-TV-Audio-Video-TV-LED-UE32F4000-TV-LED-32-HDTV-UE32F4000AW-Manuels.htm
/SAMSUNG/Samsung-TV-Audio-Video-TV-LED-UE32F5300-TV-LED-32-Full-HD-Smart-TV-UE32F5300AW-Manuels.htm
/SAMSUNG/Samsung-TV-Audio-Video-TV-LED-UE37B6000VW-Manuels.htm
/SAMSUNG/Samsung-TV-Audio-Video-TV-LED-UE37C6000-UE37C6000RW-Manuels.htm
/SAMSUNG/Samsung-TV-Audio-Video-TV-LED-UE37D5000ZF-UE37D5000PW-Manuels.htm
/SAMSUNG/Samsung-TV-Audio-Video-TV-LED-UE39EH5003W-Manuels.htm
/SAMSUNG/Samsung-TV-Audio-Video-TV-LED-UE40B6000-UE40B6000VW-Manuels.htm
/SAMSUNG/Samsung-TV-Audio-Video-TV-LED-UE40B7000-UE40B7000WW-Manuels.htm
/SAMSUNG/Samsung-TV-Audio-Video-TV-LED-UE40C5100QW-Manuels.htm
/SAMSUNG/Samsung-TV-Audio-Video-TV-LED-UE40C6000RH-Manuels.htm
/SAMSUNG/Samsung-TV-Audio-Video-TV-LED-UE40C6900VS-Manuels.htm
/SAMSUNG/Samsung-TV-Audio-Video-TV-LED-UE40D5003BW-Manuels.htm
/SAMSUNG/Samsung-TV-Audio-Video-TV-LED-UE40D5720RS-Manuels.htm
/SAMSUNG/Samsung-TV-Audio-Video-TV-LED-UE40EH5300W-Manuels.htm
/SAMSUNG/Samsung-TV-Audio-Video-TV-LED-UE40ES5700S-Manuels.htm
/SAMSUNG/Samsung-TV-Audio-Video-TV-LED-UE46B7020WW-Manuels.htm
/SAMSUNG/Samsung-TV-Audio-Video-TV-LED-UE46B8000WW-Manuels.htm
/SAMSUNG/Samsung-TV-Audio-Video-TV-LED-UE46C5100QW-Manuels.htm
/SAMSUNG/Samsung-TV-Audio-Video-TV-LED-UE46C6000-UE46C6000RW-Manuels.htm
/SAMSUNG/Samsung-TV-Audio-Video-TV-LED-UE46C6710-UE46C6710US-Manuels.htm
/SAMSUNG/Samsung-TV-Audio-Video-TV-LED-UE46EH5300W-Manuels.htm
/SAMSUNG/Samsung-TV-Audio-Video-TV-LED-UE46ES5500-ZF-Slim-LED-46-SMART-TVUE46ES5500W-Manuels.htm
/SAMSUNG/Samsung-TV-Audio-Video-TV-LED-UE46F5500-TV-LED-46-Full-HD-Smart-TV-UE46F5500AW-Manuels.htm
/SAMSUNG/Samsung-TV-Audio-Video-TV-LED-UE55C6000-UE55C6000RW-Manuels.htm
/SAMSUNG/Samsung-TV-Audio-Video-TV-LED-UE55C6700-UE55C6700US-Manuels.htm
/SAMSUNG/Samsung-TV-Audio-Video-TV-LED-UE60EH6000S-Manuels.htm
/SAMSUNG/Samsung-TV-Audio-Video-TV-PDP-43-PS43D450WXZF-serie-4-HD-TV-PDP-TVPS43D450A2W-Manuels.htm
/SAMSUNG/Samsung-TV-Audio-Video-TV-PDP-PS42A426-PS42A426C1M-Manuels.htm
/SAMSUNG/Samsung-TV-Audio-Video-TV-PDP-PS42A456-PS42A456P2D-Manuels.htm
/SAMSUNG/Samsung-TV-Audio-Video-TV-PDP-PS42C430-PS42C430A1W-Manuels.htm
/SAMSUNG/Samsung-TV-Audio-Video-TV-PDP-PS42C96HD-PS-42C96HD-Manuels.htm
/SAMSUNG/Samsung-TV-Audio-Video-TV-PDP-PS43E450-ZF-PLASMA-43-HD-TV-PS43E450A1W-manuels.htm
/SAMSUNG/Samsung-TV-Audio-Video-TV-PDP-PS43F4500-TV-Plasma-43-HD-TV-PS43F4500AW-Manuels.htm
/SAMSUNG/Samsung-TV-Audio-Video-TV-PDP-PS50A456-PS50A456P2D-Manuels.htm
/SAMSUNG/Samsung-TV-Audio-Video-TV-PDP-PS50A466-PS50A466P2M-Manuels.htm
/SAMSUNG/Samsung-TV-Audio-Video-TV-PDP-PS50B550-PS50B550T4W-manuels.htm
/SAMSUNG/Samsung-TV-Audio-Video-TV-PDP-PS50B850-PS50B850Y1W-Manuels.htm
/SAMSUNG/Samsung-TV-Audio-Video-TV-PDP-PS50C430-PS50C430A1W-Francais-Manuels.htm
/SAMSUNG/Samsung-TV-Audio-Video-TV-PDP-PS50C430-PS50C430A1W-Manuels.htm
/SAMSUNG/Samsung-TV-Audio-Video-TV-PDP-PS50C530-PS50C530C1W-Manuels.htm
/SAMSUNG/Samsung-TV-Audio-Video-TV-PDP-PS50Q96HD-Manuels.htm
/SAMSUNG/Samsung-TV-Audio-Video-TV-PDP-PS51E450-ZF-PLASMA-51-HD-TVPS51E450A1W-Manuels.htm
/SAMSUNG/Samsung-TV-Audio-Video-TV-PDP-PS58B680-PS58B680T6W-Manuels.htm
/SAMSUNG/Samsung-TV-Audio-Video-TV-PDP-PS59D530A5W-Manuels.htm
/SAMSUNG/Samsung-TV-Audio-Video-TV-PDP-PS63B680-PS63B680T6W-Manuels.htm
/SAMSUNG/Samsung-TV-AV-3D-Blu-ray-HT-E3550-English-Anglais-Manuels.htm
/SAMSUNG/Samsung-TV-AV-3D-TV-TV-UN50ES6350F-Coree-du-Sud-Manuels.htm
/SAMSUNG/Samsung-TV-AV-LED-19-D4003-Series-4-LED-TV%20-UE19D4003BW-Royaume-Uni-Manuels.htm
/SAMSUNG/Samsung-TV-AV-LED-UE40B7000WW-Royaume-Uni-Manuels.htm
/SAMSUNG/Samsung-TV-AV-TV-LED-UE32D5000-UE32D5000PW-Manuels.htm
/SAMSUNG/Samsung-TV-AV-TV-LED-UE40D5000-UE40D5000PW-Manuels.htm
/SAMSUNG/Samsung-TV-AV-TV-LED-UE40D5700-UE40D5700RS-Manuels.htm
/SAMSUNG/Samsung-TVs-LED-TV-UN55ES8000F-55-Class-54.6-Diag-LED-8000-Series-Smart-TV-Manuels.htm
/SAMSUNG/Samsung-TV-Video-3D-Televiseur-DEL-de-75-po-et-de-serie-7100-2013-UN75F7100AF-Manuels.htm
/SAMSUNG/Samsung-UA32ES5500-UA32ES5500R-CN-Manuels.htm
/SAMSUNG/Samsung-UA40ES5500-UA40ES5500R-Chine-Manuels.htm
/SAMSUNG/Samsung-UD22B-Japon-Manuels.htm
/SAMSUNG/Samsung-UE19D4003BW-Manuels.htm
/SAMSUNG/Samsung-UE26EH4000-ZF-LED-26-HD-TV-UE26EH4000W-Manuels.htm
/SAMSUNG/Samsung-UE26EH4500-ZF-LED-26-HD-TV-UE26EH4500W-Manuels.htm
/SAMSUNG/Samsung-UE32D5700RS-Manuels.htm
/SAMSUNG/Samsung-UE32D6530WS-Manuels.htm
/SAMSUNG/Samsung-UE32EH4003W-Manuels.htm
/SAMSUNG/Samsung-UE32ES6710-ZF-Slim-LED-32-SMART-TV-3DUE32ES6710S-Manuels.htm
/SAMSUNG/Samsung-UE37C5100QW-Manuels.htm
/SAMSUNG/Samsung-UE40B6050-UE40B6050VW-Norvege-Manuels.htm
/SAMSUNG/Samsung-UE40C6000-UE40C6000RW-Manuels.htm
/SAMSUNG/Samsung-UE40C6700-UE40C6700US-Manuels.htm
/SAMSUNG/Samsung-UE40D6510WS-Manuels.htm
/SAMSUNG/Samsung-UE40ES5500-ZF-Slim-LED-40-SMART-TV-UE40ES5500W-Manuels.htm
/SAMSUNG/Samsung-UE40ES7000-ZF-Slim-LED-40-SMART-INTERACTION-3D-UE40ES7000S-Manuels.htm
/SAMSUNG/Samsung-UE40ES8000-ZF-Slim-LED-40-SMART-INTERACTION-3D-UE40ES8000S-Manuels.htm
/SAMSUNG/Samsung-UE46C6805-UE46C6805US-Norvege-Manuels.htm
/SAMSUNG/Samsung-UE46C7700-UE46C7700WS-Manuels.htm
/SAMSUNG/Samsung-UE46C8700-UE46C8790XS-Manuels.htm
/SAMSUNG/Samsung-UE46C8700XS-Manuels.htm
/SAMSUNG/Samsung-UE46D5720RS-Manuels.htm
/SAMSUNG/Samsung-UE46D6530WS-Manuels.htm
/SAMSUNG/Samsung-UE46ES6100W-Manuels.htm
/SAMSUNG/Samsung-UE46ES6300-ZF-Slim-LED-46-SMART-TV-3D-UE46ES6300S-Manuels.htm
/SAMSUNG/Samsung-UE46ES8000-ZF-Slim-LED-46-SMART-INTERACTION-3D-UE46ES8000S-Manuels.htm
/SAMSUNG/Samsung-UE46S870XS-Manuels.htm
/SAMSUNG/Samsung-UE50EH5300W-Manuels.htm
/SAMSUNG/Samsung-UE55C8700-UE55C8790XS-Manuels.htm
/SAMSUNG/Samsung-UE55ES6300-ZF-Slim-LED-55-SMART-TV-3D-UE55ES6300S-Manuels.htm
/SAMSUNG/Samsung-UE55ES6560S-Manuels.htm
/SAMSUNG/Samsung-UE55ES8000-ZF-Slim-LED-55-SMART-INTERACTION-3D-UE55ES8000S-Manuels.htm
/SAMSUNG/Samsung-UE75ES9000S-Slim-LED-75-SMART-Interaction-3D-Manuels.htm
/SAMSUNG/Samsung-VC331LLDC6S-Manuels.htm
/SAMSUNG/Samsung-VC331LLMA6S-Japon-Manuels.htm
/SAMSUNG/Samsung-VC-UBL916-Manuels.htm
/SAMSUNG/Samsung-Video-tutorielle-4G-Video.htm
/SAMSUNG/Samsung-Wave-3-noir-Open-market-GT-S8600-Manuels.htm
/SAMSUNG/Samsung-Wave-533-noir-Open-market-GT-S5330-Manuels.htm
/SAMSUNG/Samsung-Wave-578-noir-Open-market-GT-S5780-Manuels.htm
/SAMSUNG/Samsung-Wave-723-gris-Open-market-GT-S7230E-Manuels.htm
/SAMSUNG/samsung-Wave-II-noir-Open-market-GT-S8530-Manuels.htm
/SAMSUNG/Samsung-Wave-M-noir-Open-market-GT-S7250-Manuels.htm
/SAMSUNG/Samsung-Wave-M-noir-Open-market-GT-S7250-Samsung-Manuels.htm
/SAMSUNG/Samsung-Wave-noir-Open-market-GT-S8500-Manuels.htm
/SAMSUNG/Samsung-WEP480-CN-Manuels.htm
/SAMSUNG/Samsung-XE700T1A-HF1FR-Manuels.htm
/SAMSUNG/Samsung-Zephyr-AQV09YWAN-Manuels.htm
/SAMSUNG/Samsung-ZS31FASAB1S-Manuels.htm
/SAMSUNG/Serie-3-300E7A-NP300E7A-S03FR-Manuels.htm
/SAMSUNG/UE40D6500ZFUE40D6500VS.htm
/SAMSUNG/UE55ES8000-ZF-Slim-LED-55-SMART-INTERACTION-3D-UE55ES8000S-Manuels.htm
/SAMSUNG/UE55ES8000-ZF-Slim-LED-55-SMART-INTERACTION-3D-UE55ES8000S-Samsung-Manuels.htm
/SAMSUNG/UE60ES6100WXZF-UE60ES6100W-Samsung-Manuels.htm
Samsung-Imprimantes-..> 11-Jun-2013 07:39 1.5M
![]()
Samsung-IT-producten..> 11-Jun-2013 07:39 1.8M
![]()
Samsung-Portables-et..> 11-Jun-2013 07:39 2.6M
![]()
Samsung-Informatique..> 11-Jun-2013 07:38 1.8M
![]()
Samsung-Portables-et..> 11-Jun-2013 07:38 3.3M
![]()
Samsung-Imprimantes-..> 11-Jun-2013 07:38 3.0M
![]()
Samsung-Peripherique..> 11-Jun-2013 07:37 3.5M
![]()
Samsung-Informatique..> 11-Jun-2013 07:37 3.5M
![]()
Samsung-Mobilite-Tel..> 11-Jun-2013 07:35 1.6M
![]()
Samsung-Informatique..> 11-Jun-2013 07:35 1.3M
![]()
Samsung-Telephone-Mo..> 11-Jun-2013 07:35 2.0M
![]()
Samsung-GSM-Smartpho..> 11-Jun-2013 07:35 1.8M
![]()
Samsung-Imprimantes-..> 11-Jun-2013 06:53 3.2M
![]()
Samsung-TV-Audio-Vid..> 11-Jun-2013 06:53 1.5M
![]()
Samsung-TV-AV-Wirele..> 11-Jun-2013 06:53 1.5M
Samsung-ME40A-TP40-Japon-Manuels
Samsung-UA40ES5500-UA40ES5500R-Chine-Manuels
Samsung-700TSn-2-SSD-Japon-Manuels
Samsung-320TSN-3D-SSD-Japon-Manuels
Samsung-GT-P5110-Japon-Manuels
Samsung-Galaxy-Tab-2-10.1-GT-P5100-Manuels
Samsung-Galaxy-Tab-2-7.0-GT-P3100-Manuels
Samsung-51-PS51E490WXZF-serie-4-3D-HD-TV-PDP-TV-PS51E490B1W-Manuels
Samsung-Galaxy-Note-II-GT-N7100-Manuels
Samsung-AQV12KBBN-Pologne-Manuels
Samsung-ML-2165W-Roumanie-Manuels
Samsung-Notebook-Serie-7-Chronos-700Z5C-S01-NP700Z5C-S01DE-Manuels
Samsung-Player-One-noir-Open-market-GT-S5230-Manuels
Samsung-Galaxy-S-SCL-noir-Open-market-GT-I9003-M4-Manuels
Samsung-Samsung-Galaxy-Pro-gris-Open-market-GT-B7510-Manuels
Samsung-Galaxy-Gio-noir-SFR-GT-S5660-Manuels
Samsung-Galaxy-Teos-noir-Bouygues-GT-I5800-Manuels
Samsung-Galaxy-Spica-noir-Bouygues-GT-I5700-Manuels
Samsung-Omnia-Pro-B7610-noir-Open-market-GT-B7610-Manuels
Samsung-S5610-GT-S5610-Manuels
Samsung-LE32C650-LE32C650L1W-Manuels
Samsung-N145Plus-NP-N145P-Manuels
Samsung-NP20-NP20FK02BG-SEF-Manuels
Samsung-GT-S5570_UM_Open_Gingerbread_Fre_Rev.1.0_110726_Screen.pdf-Manuels
Samsung-GT-I9070P_UM_Open_Gingerbread_Fre_Rev.1.0_120710_Screen.pdf-Manuels
Samsung-GT-I9300_UM_Open_Icecream_Fre_Rev.1.2_120725_Screen.pdf-Manuels
Samsung-Gainable-Slim-MH026FEEA-Manuels
Samsung-40-UE40D5700WXZF-serie-5-SMART-TV-FULL-HD-LED-TV-UE40D5700RS-Manuels
Samsung-UE46C8700-UE46C8790XS-Manuels
Samsung-UE46ES6300-ZF-Slim-LED-46-SMART-TV-3D-UE46ES6300S-Manuels
Samsung-2012_Skype_Eng-0316-1-Manuels
Samsung-UE75ES9000S-Slim-LED-75-SMART-Interaction-3D-Manuels
Samsung-Refrigerateur-1porteA-350-L-Blanc-RR82FHSW-Manuels
Samsung-UE26EH4000-ZF-LED-26-HD-TV-UE26EH4000W-Manuels
Samsung-E-MANUAL-X9DVBEU4E-ENG-Manuel
Samsung-GT-S5360_UM_Open_Gingerbread_Fre_Rev.1.0_111130_Screen-Manuel
Samsung-Galaxy-Tab-10-1-GT-P7500-M16-Manuel
Samsung-Galaxy-Tab-10-1-GT-P7500-M16-Manuels
Samsung-Lecteur-Multimedia-Galaxy-S-WiFi-4-0-Blanc-8Go-YP-G1CW-Manuels
Samsung-Galaxy-551-noir-Open-marketGT-I5510-Manuels
Samsung-Galaxy-Note-10-1-GT-N8000-Manuels
Samsung-GALAXY-S-II-LTE-SC-03D-JP-Manuels
Samsung-GALAXY-Note-SC-05D-JP-Manuels
Samsung-NP-R530-NP-R530-JA02FR-Manuels
Samsung-UE40C6000-UE40C6000RW-Manuels
Samsung-Congelateur-1porteA-277-L-Blanc-RZ80FHSW-Manuels
Nexus-S-noir-Open-market-GT-I9023-GT-B5310-Manuels
Samsung-32-LE32D450WXZF-serie-4-HD-TV-LCD-TV-Manuels
Samsung-46-UE46D5700WXZF-serie-5-SMART-TV-FULL-HD-LED-TV-UE46D5700RS-Manuels
Samsung-UE46ES8000-ZF-Slim-LED-46-SMART-INTERACTION-3D-UE46ES8000S-Manuels
Samsung-UE55ES6300-ZF-Slim-LED-55-SMART-TV-3D-UE55ES6300S-Manuels
Samsung-LE46A676-LE46A676A1M-Manuels
Samsung-UE46C7700-UE46C7700WS-Manuels
Samsung-Refrigerateur-DP-A275-L-Blanc-RT34GBSW-Manuels
Samsung-UE32ES6710-ZF-Slim-LED-32-SMART-TV-3DUE32ES6710S-Manuels
Samsung-Galaxy-Ace-noir-Open-market-GT-S5830-Manuels
Samsung-GALAXY-Tab-GT-P1000-GT-P1000-M16-Manuels
Samsung-Omnia-Pro-B7330-noir-Open-market-GT-B7330-Manuels
Samsung-Omnia-Lite-noir-Orange-GT-B7300-Manuels
Samsung-Galaxy-S2-GT-I9100-Manuels
Samsung-Nexus-S-noir-Open-market-GT-I9023-Manuels
Samsung-Omnia-II-noir-SFRGT-I8000-Manuels
Samsung-Omnia-II-noir-SFR-GT-I8000-Manuels
Samsung-Omnia-7-noir-Open-market-GT-I8700-Manuels
Samsung-Galaxy-noir-Bouygues-GT-I7500-Manuels
Samsung-Galaxy-mini-gris-Open-market-GT-S5570-Manuels
Samsung-XE700T1A-HF1FR-Manuels
17,3" Série 3 300E7A - NP300E7A-S01FR - Manuels
40", UE40D6500WXZF, série 6, SMART TV, 3D, FULL HD, LED TV - UE40D6500VS - Manuels
Micro-chaîne, MM-D330DWXZF, série 3 - MM-D330 - Manuels
Samsung Galaxy Ace noir - Open market - GT-S5830 - Manuels
Samsung Galaxy S II noir - Open market - Manuels
Samsung Galaxy S III - GT-I9300 - Manuels
Samsung Galaxy S noir - Open market - GT-I9000 - Manuels
Série 3 300E7A - NP300E7A-S03FR - Manuels
UE55ES8000/ZF, Slim LED 55", SMART INTERACTION, 3D - UE55ES8000S - Manuels
16/4ppm Imprimante laser couleur CLP-310 Manuels
16/4ppm Multifonction lasercouleur CLX-3170FN Manuels
16/4ppm Multifonction lasercouleur CLX-3185FW Manuels Samsung
16/4ppm Multifonction laser couleur CLX-3185 Manuels Samsung
samsung-Wave-II-noir-Open-market-GT-S8530-Manuels
Samsung-Wave-noir-Open-market-GT-S8500-Manuels
Samsung-Wave-M-noir-Open-market-GT-S7250-Manuels
Samsung-Wave-578-noir-Open-market-GT-S5780-Manuels
Samsung-Wave-533-noir-Open-market-GT-S5330-Manuels
Samsung-Wave-3-noir-Open-market-GT-S8600-Manuels
Samsung-Player-HD-noir-Open-market-GT-I8910-Manuels
Samsung-Player-Duo-noir-Open-market-SGH-D980-Manuels
Samsung-Player-Addict-noir-Open-market-SGH-I900-Manuels
Samsung-Omnia-W-noir-Open-market-GT-I8350-Manuels
Samsung-Multifonctio..> 02-Jan-2014 18:40 2.2M
![]()
Samsung-Imprimantes-..> 02-Jan-2014 18:40 2.9M
![]()
Samsung-Telephone-Mo..> 02-Jan-2014 18:40 2.4M
![]()
Samsung-Informatique..> 02-Jan-2014 18:39 3.4M
![]()
Samsung-Mobilite-Tab..> 02-Jan-2014 18:39 3.2M
![]()
Samsung-Informatique..> 02-Jan-2014 18:38 3.5M
![]()
Samsung-Telephone-Mo..> 02-Jan-2014 18:38 3.5M
![]()
Samsung-Illustrator-..> 10-Dec-2013 17:44 1.8M
![]()
Samsung-Trisha-Silve..> 10-Dec-2013 17:44 1.8M
![]()
Samsung-Donovan-join..> 10-Dec-2013 17:44 1.8M
![]()
Samsung-TV-OLED-Spot..> 10-Dec-2013 17:43 1.5M
![]()
Samsung-Decouvrez-le..> 10-Dec-2013 17:43 1.5M
![]()
Samsung-Tutoriel-Sma..> 10-Dec-2013 17:42 1.5M
![]()
Samsung-OLED-TV-Mult..> 10-Dec-2013 17:42 1.5M
![]()
Samsung-Tutoriel-Sam..> 10-Dec-2013 17:42 1.6M
![]()
Samsung-Tutoriel-Sma..> 10-Dec-2013 17:42 1.5M
![]()
Samsung-Tutoriel-Sam..> 10-Dec-2013 17:41 1.6M
![]()
Samsung-Tutoriel-Sam..> 10-Dec-2013 17:41 1.6M
![]()
Samsung-Telephone-Mo..> 05-Dec-2013 17:28 1.8M
![]()
Samsung-Telephone-Mo..> 05-Dec-2013 17:28 1.9M
![]()
Samsung-Telephone-Mo..> 05-Dec-2013 17:28 2.3M
![]()
Samsung-Telephone-Mo..> 05-Dec-2013 17:28 2.1M
![]()
Samsung-Telephone-Mo..> 05-Dec-2013 17:27 2.4M
![]()
Samsung-Telephone-Mo..> 05-Dec-2013 17:27 2.5M
![]()
Samsung-Games-les-me..> 28-Nov-2013 17:24 1.8M
![]()
Samsung-SMART-TV-DAI..> 28-Nov-2013 17:23 1.8M
![]()
Samsung-Wu-Lei-se-un..> 28-Nov-2013 17:21 1.8M
![]()
Samsung-El-Shaarawy-..> 28-Nov-2013 17:21 1.8M
![]()
Samsung-GALAXY-Note-..> 28-Nov-2013 17:21 1.8M
![]()
Samsung-Moses-joins-..> 28-Nov-2013 17:21 1.8M
![]()
Samsung-Hospital-Rec..> 28-Nov-2013 17:20 1.8M
![]()
Samsung-Noir-Interna..> 28-Nov-2013 17:20 1.8M
![]()
Samsung-Telephone-Mo..> 20-Nov-2013 07:54 1.8M
![]()
Samsung-Gze-joins-GA..> 20-Nov-2013 07:51 1.8M
![]()
Samsung-The-simple-j..> 20-Nov-2013 07:50 1.8M
![]()
Samsung-Messi-joins-..> 20-Nov-2013 07:50 1.8M
![]()
Samsung-Imprimantes-..> 14-Nov-2013 08:13 1.8M
![]()
Samsung-Informatique..> 14-Nov-2013 08:13 1.8M
![]()
Samsung-TV-Audio-Vid..> 14-Nov-2013 08:12 2.0M
![]()
Samsung-Peripherique..> 14-Nov-2013 08:12 1.8M
![]()
Samsung-Peripherique..> 14-Nov-2013 08:11 2.0M
![]()
Samsung-Peripherique..> 14-Nov-2013 08:11 2.0M
![]()
Liste-Manuels-Utilis..> 13-Nov-2013 12:04 442K
![]()
Samsung-Barre-de-son..> 13-Nov-2013 11:42 1.9M
![]()
Samsung-Everyday-Won..> 13-Nov-2013 11:42 2.0M
![]()
Samsung-Galaxy-Gear-..> 13-Nov-2013 11:41 2.0M
![]()
Samsung-Galaxy-Gear-..> 13-Nov-2013 11:41 2.0M
![]()
Samsung-Galaxy-Note-..> 13-Nov-2013 11:41 2.0M
![]()
Samsung-GALAXY-Note-..> 13-Nov-2013 11:40 1.9M
![]()
Samsung-GSM-Tablet-G..> 13-Nov-2013 11:40 2.0M
![]()
Samsung-Home-Applian..> 13-Nov-2013 11:40 1.9M
![]()
Samsung-Informatique..> 13-Nov-2013 11:39 1.9M
![]()
Samsung-Informatique..> 13-Nov-2013 11:39 1.9M
![]()
Samsung-Inside-Magna..> 13-Nov-2013 11:39 2.0M
![]()
Samsung-Interview-wi..> 13-Nov-2013 11:38 2.0M
![]()
Samsung-OverToYou-Fr..> 13-Nov-2013 11:38 2.0M
![]()
Samsung-OverToYou-In..> 13-Nov-2013 11:38 2.0M
![]()
Samsung-Presentation..> 13-Nov-2013 11:37 1.9M
![]()
Samsung-Telephone-Mo..> 13-Nov-2013 11:36 1.3M
![]()
Samsung-Telephone-Mo..> 13-Nov-2013 11:36 695K
![]()
Samsung-Telephone-Mo..> 13-Nov-2013 11:35 758K
![]()
Samsung-Telephone-Mo..> 13-Nov-2013 11:35 2.0M
![]()
Samsung-Telephone-Mo..> 13-Nov-2013 11:35 1.9M
![]()
Samsung-Galaxy-Note-..> 13-Nov-2013 10:42 2.0M
![]()
Samsung-Memory-Solut..> 13-Nov-2013 10:38 2.0M
![]()
Samsung-Memory-Solut..> 13-Nov-2013 10:38 2.0M
![]()
Samsung-Memory-Solut..> 13-Nov-2013 10:38 1.4M
![]()
Samsung-VNAND-PR-Vid..> 13-Nov-2013 10:38 1.4M
![]()
Samsung-SSD-Solution..> 13-Nov-2013 10:37 1.4M
![]()
Samsung-SSD-840-EVO-..> 13-Nov-2013 10:37 1.4M
![]()
Samsung-SSD-Leadersh..> 13-Nov-2013 10:37 1.4M
![]()
Samsung-Redesigning-..> 13-Nov-2013 10:37 1.4M
![]()
Samsung-Telephone-Mo..> 13-Nov-2013 10:36 1.4M
![]()
Samsung-Telephone-Mo..> 13-Nov-2013 10:36 1.4M
![]()
Samsung-Demarrer-ave..> 13-Nov-2013 10:36 1.6M
![]()
Samsung-Demarrer-ave..> 13-Nov-2013 10:36 1.4M
![]()
Samsung-Telephone-Mo..> 13-Nov-2013 10:35 1.7M
![]()
Samsung-Spot-exclusi..> 06-Nov-2013 17:49 2.0M
![]()
Samsung-Partenariat-..> 06-Nov-2013 17:49 2.0M
![]()
Samsung-Galaxy-Note-..> 06-Nov-2013 16:54 2.0M
![]()
Samsung-Galaxy-S4-Zo..> 06-Nov-2013 16:53 2.0M
![]()
Samsung-Galaxy-S4-Zo..> 06-Nov-2013 16:53 2.0M
![]()
Samsung-Tutoriel-Sam..> 06-Nov-2013 16:53 2.0M
![]()
Samsung-Galaxy-Note3..> 31-Oct-2013 19:21 2.0M
![]()
Samsung-Galaxy-Note-..> 31-Oct-2013 19:20 2.0M
![]()
Samsung-Galaxy-Note-..> 31-Oct-2013 19:20 2.0M
![]()
Samsung-Galaxy-Note-..> 31-Oct-2013 19:19 2.0M
![]()
Samsung-Galaxy-Note-..> 31-Oct-2013 19:19 2.0M
![]()
Samsung-Galaxy-Note-..> 31-Oct-2013 19:19 2.0M
![]()
Samsung-Galaxy-Note-..> 31-Oct-2013 19:18 2.0M
![]()
Samsung-Galaxy-Note-..> 31-Oct-2013 19:18 2.0M
![]()
Samsung-Galaxy-Note-..> 31-Oct-2013 19:18 2.0M
![]()
Samsung-Galaxy-Gear-..> 31-Oct-2013 19:17 2.0M
![]()
Samsung-Galaxy-Note-..> 31-Oct-2013 19:17 2.0M
![]()
Samsung-LeBron-James..> 31-Oct-2013 19:16 2.0M
![]()
Samsung-LeBron-James..> 31-Oct-2013 19:16 2.0M
![]()
Samsung-Liste-Video.htm 28-Oct-2013 09:42 2.0M
![]()
Samsung-GALAXY-Note-..> 28-Oct-2013 09:35 2.0M
![]()
Samsung-Everyday-Won..> 28-Oct-2013 09:34 2.0M
![]()
Samsung-Galaxy-Note-..> 28-Oct-2013 09:34 2.0M
![]()
Samsung-CONVERGENCE-..> 28-Oct-2013 09:33 2.0M
![]()
Samsung-Galaxy-Note-..> 28-Oct-2013 09:33 2.0M
![]()
Samsung-Presentation..> 28-Oct-2013 09:33 2.0M
![]()
Samsung-The-Gentlema..> 28-Oct-2013 09:33 2.0M
![]()
Samsung-Presentation..> 28-Oct-2013 09:32 2.0M
![]()
Samsung-Presentation..> 28-Oct-2013 09:32 2.0M
![]()
Samsung-solutions-d-..> 21-Oct-2013 16:45 1.9M
![]()
Samsung-SMART-TV-Rec..> 21-Oct-2013 16:39 1.9M
![]()
Samsung-Barres-de-so..> 21-Oct-2013 16:34 1.9M
![]()
Samsung-ATIV-S-App-V..> 21-Oct-2013 16:30 1.9M
![]()
Samsung-GALAXY-Note-..> 21-Oct-2013 16:29 1.9M
![]()
Samsung-Liste-Imprim..> 15-Oct-2013 16:30 1.4M
![]()
Samsung-Liste-Laser-..> 15-Oct-2013 16:29 1.4M
![]()
Samsung-Liste-Multif..> 15-Oct-2013 16:25 1.4M
![]()
Samsung-TV-Audio-Vid..> 15-Oct-2013 16:20 1.9M
![]()
Samsung-Mobilite-Tab..> 15-Oct-2013 16:04 1.9M
![]()
Samsung-TV-Audio-Vid..> 15-Oct-2013 16:04 1.9M
![]()
Samsung-GALAXY-Note-..> 14-Oct-2013 07:16 2.5M
![]()
Samsung-Introducing-..> 14-Oct-2013 07:15 2.5M
![]()
Samsung-Everyday-Won..> 14-Oct-2013 07:15 2.5M
![]()
Samsung-Galaxy-Gear-..> 14-Oct-2013 07:15 1.8M
![]()
Samsung-Galaxy-Note-..> 14-Oct-2013 07:15 1.8M
![]()
Samsung-Mobilite-Tel..> 07-Oct-2013 08:52 2.5M
![]()
Samsung-Galaxy-Q-Bla..> 07-Oct-2013 08:52 2.5M
![]()
Samsung-Mobile-Smart..> 07-Oct-2013 08:51 2.5M
![]()
Samsung-Mobile-Featu..> 07-Oct-2013 08:51 2.8M
![]()
Samsung-Mobile-Featu..> 07-Oct-2013 08:51 2.8M
![]()
Samsung-Mobile-Table..> 07-Oct-2013 08:50 2.8M
![]()
Samsung-Galaxy-Gear-..> 07-Oct-2013 08:50 2.3M
![]()
Samsung-Galaxy-Gear-..> 03-Oct-2013 06:55 2.3M
![]()
Samsung-Telephone-Mo..> 17-Jul-2013 17:13 1.3M
![]()
Samsung-Telephone-Mo..> 17-Jul-2013 17:13 1.7M
![]()
Samsung-Photo-Camesc..> 17-Jul-2013 17:12 1.7M
![]()
Samsung-TV-Audio-Vid..> 17-Jul-2013 17:12 1.8M
![]()
Samsung-Telephone-Mo..> 17-Jul-2013 17:11 1.3M
![]()
Samsung-Electromenag..> 17-Jul-2013 17:11 1.3M
![]()
Samsung-Informatique..> 17-Jul-2013 17:11 1.7M
![]()
Samsung-Telephone-Mo..> 17-Jul-2013 17:11 1.3M
![]()
Samsung-Telephone-Mo..> 17-Jul-2013 17:11 1.7M
![]()
Samsung-Telephone-Mo..> 17-Jul-2013 17:11 1.7M
![]()
Samsung-Spot-Samsung..> 29-Jun-2013 18:25 1.7M
![]()
Samsung-Smart-Switch..> 29-Jun-2013 18:21 1.7M
![]()
Samsung-Spot-TV-Sams..> 29-Jun-2013 18:21 1.7M
![]()
Samsung-Safari-Imagi..> 29-Jun-2013 18:21 1.7M
![]()
Samsung-GALAXY-S4-pr..> 29-Jun-2013 18:06 1.7M
![]()
Samsung-GALAXY-S4-Th..> 29-Jun-2013 18:06 1.7M
![]()
Samsung-Game-Hub-Vid..> 29-Jun-2013 18:05 1.7M
![]()
Samsung-Readers-Hub-..> 29-Jun-2013 18:05 1.7M
![]()
Samsung-Presentation..> 29-Jun-2013 18:05 1.7M
![]()
Samsung-GALAXY-S4-S-..> 28-Jun-2013 19:04 1.7M
![]()
Samsung-Unleash-Your..> 28-Jun-2013 19:04 1.7M
![]()
Samsung-Unleash-Your..> 28-Jun-2013 19:04 1.7M
![]()
Samsung-Vous-allez-a..> 28-Jun-2013 19:03 1.7M
![]()
Liste-Manuels-Utilis..> 28-Jun-2013 19:03 381K
![]()
Samsung-Unleash-Your..> 28-Jun-2013 19:02 1.7M
![]()
Samsung-Samsung-Unle..> 28-Jun-2013 19:01 1.7M
![]()
Samsung-GALAXY-S4-Ch..> 28-Jun-2013 18:08 1.7M
![]()
Samsung-GALAXY-S4-Sm..> 28-Jun-2013 18:05 1.7M
![]()
Samsung-GALAXY-S4-Le..> 28-Jun-2013 17:35 1.7M
![]()
Samsung-GALAXY-S4-Ai..> 28-Jun-2013 17:32 1.7M
![]()
Samsung-GALAXY-S4-Ai..> 28-Jun-2013 17:26 1.7M
![]()
Samsung-Telephone-Mo..> 28-Jun-2013 09:49 1.7M
![]()
Samsung-Galaxy-Tab-1..> 28-Jun-2013 09:46 2.7M
NETWORK BOX Installation Guide
Guide d’installation du BOITIER RESEAU
BN68-03137F-03
Package Contents / Contenu de l’emballage
Ports / Ports
Warranty Card
(Not available in some locations) /
Carte de garantie
(Non disponible dans certains pays)
Installation Guide /
Guide d’installation
Screw (M4 L6) 4EA /
Vis (M4 L6) 4EA
[English]
Unpack the product and check if all of the following contents have been included.
[Bahasa Indonesia]
Buka kemasan produk dan periksa apakah semua isi berikut ini telah disertakan.
[Français]
Déballez l’appareil et vérifiez si vous disposez bien des éléments suivants.
[Deutsch]
Packen Sie das Gerät aus und prüfen Sie, ob alle nachfolgend aufgeführten Gegenstände mitgeliefert wurden.
[Magyar]
Csomagolja ki a terméket, és ellenőrizze, hogy a csomag tartalmazza-e a következő tartozékok mindegyikét.
[Italiano]
Disimballare il prodotto e verificare che tutte le parti siano presenti.
[Казақ]
Құрылғының бумасын шешіп, төмендегі бөлшектерінің барлығы бар екенін тексеріп алыңыз.
[Polski]
Rozpakuj urządzenie i sprawdź, czy są dostępne wszystkie poniższe elementy.
[Português]
Tire o produto da embalagem e verifique se todos os conteúdos seguintes foram incluídos.
[Русский]
Распакуйте устройство и проверьте комплект поставки.
[Español]
Desembale el producto y compruebe que no falte ninguna de las piezas siguientes.
[Svenska]
Packa upp produkten och kontrollera att följande finns med.
[Türkçe]
Ürünü paketinden çıkarın ve aşağıdaki parçaların pakette olup olmadığını kontrol edin.[日本語]
製品を開梱し、以下の内容がすべて含まれていることを確認します。
* 付属の電源コードセットは本製品のみにご使用ください。
他の電気機器には使用しないでください。[简体中文]
拆开产品包装,检查是否有以下物件。[繁體中文]
打開包裝檢查以下物件是否齊全。
[한국어]
제품의 포장을 풀고, 모든 구성품이 있는지 확인하세요.
]ةيبرعلا[
.اهلخاد ةدوجوم ةيلاتلا تايوتحملا ةفاك نأ نم ققحتو جتنملا ةوبع غرفأ
[English]
This product is for industrial purposes.
Be sure to install the product in a compatible Samsung Display.
(The product cannot be used independently.)
Do not attempt to disassemble, repair or altar the product yourself.
Do not insert any metal or foreign object into the product.
Be sure the product is installed by a professional trained for installation and uninstallation.
Contact Samsung Electronics for details.
[Bahasa Indonesia]
Produk ini untuk penggunaan industri.
Pastikan untuk memasang produk pada Tampilan Samsung yang kompatibel.
(Produk tidak dapat digunakan secara terpisah.)
Jangan coba membongkar, memperbaiki, atau mengubah sendiri produk ini.
Jangan masukkan benda logam atau benda asing apa pun ke dalam produk.
Pastikan produk dipasang oleh profesional yang terlatih dalam pemasangan dan pelepasan produk.
Hubungi Samsung Electronics untuk rinciannya.
[Français]
Ce produit est à usage industriel.
Veillez à installer le produit sur un écran Samsung compatible.
(Le produit ne peut pas être utilisé indépendamment.)
Ne tentez pas de démonter, réparer ou modifier le produit vous-même.
N’insérez pas d’objet métallique ou étranger dans le produit.
Assurez-vous que le produit est installé par un professionnel formé à l’installation et à la désinstallation.
Contactez Samsung Electronics pour obtenir plus de détails.
[Deutsch]
Dies ist ein Gerät zum industriellen Einsatz.
Achten Sie darauf, dass das Produkt auf einem kompatiblen Samsung-Bildschirm installiert wird.
(Das Gerät kann für sich allein nicht verwendet werden.)
Sie dürfen das Gerät nicht selbst öffnen, reparieren oder verändern.
Führen Sie keine Metallgegenstände oder andere Fremdkörper in das Gerät ein.
Achten Sie darauf, dass das Gerät von einer für die Installation und Deinstallation geschulten Fachkraft installiert wird.
Einzelheiten erfahren Sie bei Samsung Electronics.
[Magyar]
Ez a termék ipari célokra készült.
A terméket csak kompatibilis Samsung kijelzőre telepítse.
(A termék önmagában nem használható.)
Ne szerelje szét, ne javítsa és ne alakítsa át a terméket.
Ne dugjon fém- vagy idegen tárgyakat a termékbe.
A termék fel- és leszerelését csak képzett szakember végezheti.
A részletekkel kapcsolatban forduljon a Samsung Electronics ügyfélszolgálatához.
[Italiano]
Questo prodotto è per uso industriale.
Installare il prodotto in un Display Samsung compatibile.
(Il prodotto non può essere utilizzato separatamente.)
Non disassemblare, riparare o modificare il prodotto autonomamente.
Non inserire oggetti metallici o corpi estranei all’interno del prodotto.
Il prodotto deve essere installato da un tecnico specializzato.
Contattare Samsung Electronics per ulteriori dettagli.
[Казақ]
Бұл құрылғы өндірістік мақсаттар үшін арналған.
Құрылғыны үйлесімді Samsung дисплейінде орнатқаныңызға сенімді болыңыз.
(Бұл құрылғыны дербес қолдануға болмайды.)
Құрылғыны өз бетіңізбен бөлшектемеңіз, жөндемеңіз немесе өзгертпеңіз.
Құрылғыға кез келген темір немесе басқа бөгде затта салмаңыз.
Құрылғыны кәсіби жаттыққан маман орнатқанына және жойғанына сенімді болыңыз.
Мәліметтер алу үшін Samsung Electronics компаниясына хабарласыңыз.
Символ Кедендік одақтың 005/2011 техникалық регламентіне сәйкес қолданылады және осы өнімнің қаптамасын екінші рет пайдалануға арналмағанын және жоюға жататынын көрсетеді. Осы өнімнің қаптамасын азық-түлік өнімдерін сақтау үшін пайдалануға тыйым салынады.
Символ қаптаманы жою мүмкіндігін көрсетеді. Символ сандық код және/немесе әріп белгілері түріндегі қаптама материалының белгісімен толықтырылуы мүмкін.
[Polski]
Produkt ma przeznaczenie przemysłowe.
Upewnij się, że produkt jest zainstalowany dla kompatybilnego wyświetlacza firmy Samsung.
(Produkt nie może być wykorzystywany oddzielnie.)
Nie należy własnoręcznie demontować, naprawiać lub dokonywać zmian produktu.
Nie należy umieszczać na urządzeniu żadnych metalowych lub obcych przedmiotów.
Upewnij się, że produkt jest montowany i demontowany przez wyszkolonego specjalistę.
Aby dowiedzieć się więcej, skontaktuj się z firmą Samsung Electronics.
[Português]
Este produto é para fins industriais.
Certifique-se de que instala o produto num monitor Samsung compatível.
(O produto não pode ser utilizado independentemente.)
Não tente desmontar, reparar ou alterar o produto.
Não introduza objectos de metal ou substâncias estranhas no produto.
Certifique-se de que o produto é instalado por um técnico profissional na instalação e desinstalação.
Contacte a Samsung Electronics para mais informações.
[Русский]
Данное устройство предназначено для промышленного использования.
Устройство должно быть установлено на совместимый дисплей Samsung.
(Устройство нельзя использовать отдельно.)
Не пытайтесь самостоятельно ремонтировать, разбирать или вносить изменения в устройство.
Не вставляйте в устройство металлические или иные посторонние предметы.
Установка устройства должна выполняться специалистом по установке и демонтажу.
Для получения дополнительной информации обратитесь к представителю Samsung Electronics.
Символ «не для пищевой продукции» применяется в соответствие с техническим регламентом Таможенного союза «О безопасности упаковки» 005/2011 и указывает на то, что упаковка данного продукта не предназначена для повторного использования и подлежит утилизации. Упаковку данного продукта запрещается использовать для хранения пищевой продукции.
Символ «петля Мебиуса» указывает на возможность утилизации упаковки. Символ может быть дополнен обозначением материала упаковки в виде цифрового и/или буквенного обозначения.
[Español]
Este producto es para uso industrial.
Asegúrese de instalar el producto en una pantalla Samsung compatible.
(Este producto no se puede utilizar por separado.)
No intente desmontar, reparar ni modificar el producto usted mismo.
No inserte ningún objeto metálico o extraño en el producto.
Asegúrese de que el producto lo instala y lo desinstala un profesional acreditado.
Póngase en contacto con Samsung Electronics para obtener toda la información.
[Svenska]
Den här produkten är till för industriella syften.
Se till att installera produkten på en kompatibel Samsung-skärm.
(Produkten kan inte användas separat.)
Montera inte isär, reparera inte och ändra inte produkten på egen hand.
För inte in några metallföremål eller främmande föremål i produkten.
Se till att produkten installeras av en fackman när det gäller installation och avinstallation.
Kontakta Samsung Electronics för information.
[Türkçe]
Bu ürün, endüstriyel kullanım içindir.
Ürünü uyumlu bir Samsung Ekranına taktığınızdan emin olun.
(Ürün tek başına kullanılamaz.)
Ürünü kendi başınıza parçalarına ayırmaya, onarmaya veya değiştirmeye çalışmayın.
Ürünün içine metal parçalar veya yabancı maddeler atmayın.
Ürünün, kurulum ve kaldırma ile ilgili eğitim görmüş profesyonel bir kişi tarafından kurulduğundan emin olun.
Ayrıntılar için Samsung Electronics’e danışın.[日本語]
この製品は業務用です。
対応するサムスン ディスプレイに製品を取り付けてください。
(この製品は単体では使用できません)
絶対にご自身で製品を分解、修理または改造しないでください。
金属や異物を製品の中に入れないでください。
この製品は、取り付けおよび取り外しの訓練を受けた専門技術者に取り付けてもらってください。
詳細については Samsung Electronics にお問い合わせください。[简体中文]
本产品用于工业用途。
请确保将本产品安装到兼容的三星显示器。
(本产品不能单独使用。)
请勿尝试自行拆卸、修理或改装本产品。
切勿将任何金属物或异物插入到本产品。
请务必由接受过安装及卸载培训的专业人士安装本产品。
请联系三星电子以获取详细信息。
生产企业(TSEC):天津三星电子有限公司地址(TSEC):天津市西青区津港公路微电子工业区微四路地址(TSEC):天津经济技术开发区西区江泰路20号生产企业(DONGYU):中山东域电子有限公司地址(DONGYU):广东省中山市东区中山五路嘉华电子城内A栋3-4楼[繁體中文]
本產品適用於工業用途。
請務必將產品安裝在相容的三星顯示器上。
(本產品不可單獨使用。)
切勿企圖擅自拆卸、維修或改裝本產品。
切勿將任何金屬或外物插入本產品。
本產品必須由受過安裝和解除安裝訓練的專業人士進行安裝作業。
如需詳細資訊,請聯絡三星電子。
[한국어]
이 제품은 산업용 제품입니다.
반드시 호환 가능한 삼성전자의 일부 디스플레이 제품에 장착하여 사용하세요.
(단독으로는 사용할 수 없습니다.)
사용자 임의로 제품을 분리, 수리, 개조하지 마세요.
제품 속에 금속물이나 이물질을 넣지 마세요.
제품을 설치할 때는 제품에 대한 설치 또는 해체 교육을 받은 전문가에게 맡기세요.
자세한 내용은 삼성전자로 문의하세요.
]ةيبرعلا[
.ةيعانصلا ضارغلأل جتنملا اذه.Samsung نم ةقفاوتم ضرع ةشاشب جتنملا بيكرت نم دكأت
).لصفنم لكشب جتنملا مادختسا نكمي لا(
.كسفنب هليدعت وأ هحلاصإ وأ جتنملا كف لواحت لا
.جتنملا يف بيرغ وأ يندعم ءيش يأ لاخدإب مقت لا
.هّكف و جتنملا بيكرت يف سرمتم صصختم ةطساوب هبيكرت مت دق جتنملا نأ دكأت.ليصافتلا ىلع لوصحلل Samsung Electronics ب لصتا
[English]
MIC IN : Connect to a microphone.
AUDIO OUT : Connects to the audio of a source device
USB 2.0 : Connect to a USB device such as a USB keyboard, mouse, memory, or digital camera.
USB 3.0 : Connect to a device that supports USB 3.0.
(Also compatible with a USB 2.0 device)
DP OUT : Connect the network box to a display device that supports DP using the DP cable.
LAN : Connect to the Internet using a LAN cable.
POWER : Power on or off the network box.
[Bahasa Indonesia]
MIC IN : Hubungkan ke mikrofon.
AUDIO OUT : Menyambung ke audio perangkat sumber
USB 2.0 : Sambungkan ke perangkat USB, seperti keyboard USB, mouse, memori, atau kamera digital.
USB 3.0 : Sambungkan ke perangkat yang mendukung USB 3.0.
(Kompatibel pula dengan perangkat USB 2.0)
DP OUT : Sambungkan kotak jaringan ke perangkat monitor pendukung DP dengan kabel DP.
LAN : Sambungkan ke Internet dengan kabel LAN.
POWER : Menghidupkan atau mematikan kotak jaringan.
[Français]
MIC IN : Connexion à un microphone.
AUDIO OUT : Connexion au signal audio d’un périphérique source.
USB 2.0 : Connexion à un périphérique USB de type clavier USB, souris, mémoire ou appareil photo numérique.
USB 3.0 : Connexion à un périphérique compatible USB 3.0.
(Également compatible avec un périphérique USB 2.0.)
DP OUT : Connexion du boîtier réseau à un périphérique d’affichage qui prend en charge DP via le câble DP.
LAN : Connexion à Internet via un câble LAN.
POWER : Mise sous/hors tension du boîtier réseau.
[Deutsch]
MIC IN : Verbinden mit einem Mikrofon.
AUDIO OUT : Anschließen an den Audioausgang eines externen Gerätes
USB 2.0 : Zur Verbindung mit einem USB-Gerät, z. B. USB-Tastatur, Maus, Speicherstick oder Digitalkamera.
USB 3.0 : Zur Verbindung mit einem Gerät, das USB 3.0 unterstützt
(auch kompatibel mit einem USB-2.0-Gerät)
DP OUT : Zur Verbindung der Netzwerkbox über das DP-Kabel mit einem Anzeigegerät, das DP unterstützt
LAN : Zur Verbindung mit dem Internet über ein LAN-Kabel
POWER : Schaltet die Netzwerkbox ein und aus
[Magyar]
MIC IN : Csatlakoztasson mikrofont.
AUDIO OUT : Csatlakoztatás forráseszköz audiocsatlakozójához
USB 2.0 : Csatlakoztassa az USB eszközt, mint például USB billentyűzet, egér, memória vagy digitális kamera.
USB 3.0 : Csatlakoztatás USB 3.0-t támogató eszközhöz.
(Kompatibilis az USB 2.0 eszközökkel is)
DP OUT : Csatlakoztassa a hálózati dobozt egy olyan kijelzőeszközhöz, amely támogatja a DP-t, egy DP kábel használatával.
LAN : Csatlakozás az internethez LAN kábellel.
POWER : A hálózati doboz be- és kikapcsolása.
[Italiano]
MIC IN : Collegamento a un microfono.
AUDIO OUT : Collega alla porta audio di un dispositivo sorgente
USB 2.0 : Consente di effettuare il collegamento a un dispositivo USB, ad esempio una tastiera, un mouse, una memoria o una fotocamera digitale USB.
USB 3.0 : Consente di effettuare il collegamento a un dispositivo che supporta USB 3.0.
(Compatibile anche con un dispositivo USB 2.0)
DP OUT : Consente di effettuare il collegamento del box di rete a un dispositivo di visualizzazione che supporta DP mediante il cavo DP.
LAN : Consente di effettuare il collegamento a Internet mediante un cavo LAN.
POWER : Consente di accendere o spegnere il box di rete.
[Казақ]
MIC IN : Микрофонға қосады.
AUDIO OUT : Қайнар көз құрылғының дыбысына қосылады.
USB 2.0 : USB пернетақтасы, тінтуір, жад немесе сандық камера сияқты USB құрылғысына қосыңыз.
USB 3.0 : USB 3.0 қолдайтын құрылғыға қосыңыз.
(USB 2.0 құрылғымен де үйлесімді)
DP OUT : DP кабелінің көмегімен DP қолдайтын дисплей құрылғысына қосыңыз.
LAN : Жергілікті желі кабелімен интернетке қосыңыз.
POWER : Желі қорабын қосыңыз немесе өшіріңіз.
[Polski]
MIC IN : Gniazdo podłączenia mikrofonu.
AUDIO OUT : Do łączenia monitora z wyjściem audio urządzenia źródłowego.
USB 2.0 : Służy do podłączania urządzeń USB, takich jak klawiatura, mysz, pamięć lub kamera cyfrowa.
USB 3.0 : Służy do podłączania urządzeń obsługujących standard USB 3.0
(kompatybliny również z urządzeniami obsługującymi standard USB 2.0)
DP OUT : Służy do podłączenia skrzynki sieciowej do wyświetlacza obsługującego standard DP przy użyciu kabla DP.
LAN : Służy do łączenia się z Internetem za pomocą kabla LAN.
POWER : Służy do włączania lub wyłączania skrzynki sieciowej.
[Português]
MIC IN : Ligar a um microfone.
AUDIO OUT : Liga-se ao áudio de um dispositivo de entrada
USB 2.0 : Ligue um dispositivo USB, como um teclado, rato, memória ou câmara digital USB.
USB 3.0 : Ligue um dispositivo que suporte USB 3.0.
(Também é compatível com dispositivos USB 2.0)
DP OUT : Ligue a caixa de rede a um dispositivo de visualização que suporte DP utilizando o cabo DP.
LAN : Ligue à Internet com um cabo LAN.
POWER : Ligue ou desligue a caixa de rede.
[Русский]
MIC IN : Подключение микрофона.
AUDIO OUT : Подключение к аудиовходу устройства-источника сигналов
USB 2.0 : Подключение к USB-устройству, такому как клавиатура, мышь, запоминающее устройство или цифровая камера USB.
USB 3.0 : Подключение к устройству, поддерживающему интерфейс USB 3.0.
(Также совместим с устройством USB 2.0tnrh)
DP OUT : Подключение медиасервера к устройству отображения, поддерживающему DP, с использованием кабеля DP.
LAN : Подключение к Интернету по кабелю локальной сети.
POWER : Включение или выключение медиасервера.
[Español]
MIC IN : Conectar un micrófono.
AUDIO OUT : Conexión del audio de un dispositivo de origen
USB 2.0 : Conectar a un dispositivo USB como un teclado USB, un ratón, una memoria o una cámara digital.
USB 3.0 : Conectar a un dispositivo compatible con USB 3.0.
(También compatible con dispositivos USB 2.0)
DP OUT : Conecte la caja de red a un dispositivo de visualización compatible con DP mediante el cable DP.
LAN : Conectar a Internet mediante un cable LAN.
POWER : Encender o apagar la caja de red.
[Svenska]
MIC IN : Anslut till en mikrofon.
AUDIO OUT : Ansluter ljudet för källenheten
USB 2.0 : Anslut till en USB-enhet, till exempel ett USB-tangentbord, en mus, ett USB-minne eller en digital kamera.
USB 3.0 : Anslut till en enhet som stöder USB 3.0.
(Även kompatibel med en USB 2.0-enhet)
DP OUT : Anslut nätverksboxen till en skärm som stöder DP med DP-kabeln.
LAN : Anslut till Internet med en nätverkskabel.
POWER : Sätta på och stänga av nätverksboxen
[Türkçe]
MIC IN : Bir mikrofona bağlayın.
AUDIO OUT : Bir kaynak cihazın ses kısmına bağlanır
USB 2.0 : USB klavye, fare, bellek veya dijital kamera gibi bir USB aygıtına bağlar.
USB 3.0 : USB 3.0’ı destekleyen bir aygıta bağlar.
(USB 2.0 aygıtıyla da uyumludur)
DP OUT : Ağ kutusunu DP kablosunu kullanarak DP’yi destekleyen bir ekran aygıtına bağlar.
LAN : LAN kablosuyla İnternete bağlar.
POWER : Ağ kutusunu açar veya kapatır.[日本語]
MIC IN : マイクと接続します。
AUDIO OUT : 入力信号デバイスの音声に接続する
USB 2.0 : USB キーボード、マウス、メモリ、またはデジタル カメラなどの USB デバイスを接続します。
USB 3.0 : USB 3.0 対応のデバイスに接続します。
(USB 2.0 デバイスにも対応しています)
DP OUT : DP ケーブルを使用して、ネットワーク ボックスを DP 対応のディスプレイ装置に接続します。
LAN : LAN ケーブルを使用してインターネットに接続します。
POWER : ネットワーク ボックスの電源をオンまたはオフにします。[简体中文]
MIC IN : 连接麦克风。
AUDIO OUT : 连接到节目源设备的音频
USB 2.0 : 连接到 USB 键盘、鼠标、存储器或数码相机等 USB 设备。
USB 3.0 : 连接到支持 USB 3.0 的设备。
(也兼容 USB 2.0 设备)
DP OUT : 使用 DP 缆线将网络盒连接到支持 DP 的显示设备。
LAN : 使用 LAN 缆线连接到 Internet。
POWER : 打开或关闭网络盒的电源。[繁體中文]
MIC IN : 連接至麥克風。
AUDIO OUT : 連接至訊號源裝置的音訊。
USB 2.0 : 連接至 USB 裝置,例如 USB 鍵盤、滑鼠、記憶體或數位相機等。
USB 3.0 : 連接至支援 USB 3.0 的裝置。
(還與 USB 2.0 裝置相容)
DP OUT : 使用 DP 纜線將網路盒連接至支援 DP 的顯示裝置。
LAN : 使用 LAN 纜線連接至網際網路。
POWER : 開啟或關閉網路盒的電源。
[한국어]
MIC IN : 마이크를 연결할 때 사용합니다.
AUDIO OUT : 헤드폰이나 외부스피커로 소리를 내보낼 때 사용합니다.
USB2.0 : USB 키보드/마우스/메모리, 디지털 카메라 등 USB 장치를
연결할 때 사용하세요.
USB3.0 : USB 3.0을 지원하는 장치를 연결할 때 사용하세요.
(USB 2.0 장치와 호환가능)
DP OUT : DP 케이블로 네트워크 박스와 DP를 지원하는 디스플레이
장치를 연결할때 사용하세요.
LAN : LAN 케이블로 인터넷을 연결할 때 사용하세요.
POWER : 네트워크 박스를 ON/OFF 할때 사용하세요.
]ةيبرعلا[.نوفوركيملاب ليصوتلا : MIC IN.ردصم زاهج توصب ليصوتلل : AUDIO OUT.ةيمقر اريماك وأ ةركاذ وأ سوام وأ USB حيتافم ةحول لثم USB زاهجب ليصوتلا : USB2.0USB 3.0 معدي زاهجب ليصوتلا : USB3.0
)USB 2.0 زاهج عم اًضيأ قفاوتم(.DP لبك مادختساب DP معدي ضرع زاهجب ةكبشلا زاهج ليصوت : DP OUT.LAN لبك مادختساب تنرتنلإاب لاصتلاا : LAN.ةكبشلا زاهج ليغشت فاقيإ وأ ليغشت : POWER
Network box
(PIM (Plug In Module)) /
Boîtier réseau
(PIM (Plug In Module))
Bracket /
Support
FFC Cable /
câble FFC
Screw x (M3 L6) 4EA /
Vis (M3 L6) 4EA
Mounting the PIM / Montage du PIM
Product Specifications / Spécifications du produit
Entering PIM mode / Passage dans le mode PIM
[Казақ]
Егер өніммен бірге берілетін операциялық жүйе басқа операциялық жүйеге немесе операциялық жүйенің алдыңғы нұсқасына өзгертілгеннен кейін немесе операциялық жүйемен үйлеспейтін бағдарламалық жасақтама орнатылғаннан кейін ақау орын алған жағдайда техникалық қолдау көрсетілмейді және қызмет көрсету техникалық маманының келуі үшін ақы алынады. Құрылғыны ауыстырып алуға немесе қайтаруға болмайды.
[Polski]
W przypadku pojawienia się problemu po zmianie systemu operacyjnego dostarczonego z produktem na inny system operacyjny lub po przywróceniu poprzedniej wersji systemu operacyjnego bądź zainstalowania oprogramowania niezgodnego z dostarczonym systemem operacyjnym, użytkownik nie będzie mógł skorzystać ze wsparcia technicznego, a wizyta technika serwisowego będzie odpłatna. Nie będzie również możliwa wymiana produktu ani otrzymanie zwrotu kosztów zakupu.
[Português]
Se ocorrer um problema após alterar o sistema operativo fornecido com a caixa de rede por outro ou pela versão anterior do mesmo, ou ao instalar software que não é compatível com o sistema operativo fornecido, não poderá beneficiar da assistência técnica e ser-lhe-á cobrada uma taxa pelo serviço de um técnico de assistência. Também não poderá trocar o produto, nem obter um reembolso.
[Русский]
В случае возникновения проблемы после установки другой операционной системы вместо операционной системы, предоставляемой с изделием, восстановления предыдущей версии операционной системы или установки программного обеспечения, несовместимого с предоставленной операционной системой, техническая поддержка предоставляться не будет и обращение к специалисту по обслуживанию будет платным. Замена или возмещение стоимости продукта также будут невозможны.
[Español]
Si surge algún problema después de cambiar el sistema operativo proporcionado con el producto por un sistema operativo distinto o por la versión anterior del sistema operativo, o de instalar software no compatible con el sistema operativo proporcionado, no podrá beneficiarse del soporte técnico y tendrá que correr con los gastos de la visita de un técnico de mantenimiento. Tampoco podrá optar al cambio del producto ni a un reembolso.
[Svenska]
Om du byter det operativsystem som följer med produkten till ett annat operativsystem eller återställer det till en tidigare version av operativsystemet eller om du installerar programvara som inte är kompatibel med det medlevererade operativsystemet och det uppstår problem i anslutning till dessa åtgärder, kommer du inte att kunna utnyttja vår tekniska support, och vi kommer dessutom att tvingas ta ut en avgift för ett eventuellt besök av en servicetekniker. Du har inte heller rätt att byta eller lämna tillbaka produkten och få pengarna tillbaka i dessa fall.
[Türkçe]
IÜrünle birlikte sağlanan işletim sisteminin farklı bir işletim sistemine değiştirilmesi, veya işletim sisteminin önceki sürümünün geri yüklenmesi veya sağlanan işletim sistemiyle uyumlu olmayan bir yazılımın yüklenmesi üzerine sorunla karşılaşırsanız, teknik destekten yararlanamazsınız ve servis teknisyeninin ziyareti bir ücrete tabi olur. Ayrıca ürün değiştirme veya ücret iadesi de söz konusu olmaz.[日本語]
製品に付属のオペレーティング システムを別のオペレーティング システムまたは以前のバージョンのオペレーティング システムに変更した後、あるいは付属のオペレーティング システムに対して互換性のないソフトウェアをインストールした後に問題が発生した場合、技術サポートのサービスを受けることができなくなり、サービス技術者の出張費用も変更されます。 製品の交換または返品も受け付けられません。[简体中文]
如果将随产品提供的操作系统更改为其他操作系统或先前版本的操作系统,或者安装了与所提供操作系统不兼容的软件,则在出现问题时您将无法获得技术支持,并且需要付费才能享受技术人员上门服务。 此外,产品也无法退换或退款。[繁體中文]
如果在將隨產品提供的作業系統變更為其他作業系統或舊版本的作業系統後,或者安裝與所提供作業系統不相容的軟體後發生問題,您將無法享受技術支援,且將對服務技術人員拜訪服務支付費用。 也不提供產品更換或退款服務。
[한국어]
제품에 제공되는 운영체제를 다른 운영체제 또는 이전 버전으로 임의 변경하거나, 기본으로 제공된 운영체제를 지원하지 않는 소프트웨어를 설치한 경우, 기술 지원 및 제품 교환, 환불이 불가하고 서비스 요청시 소정의 수수료가 부과됩니다.
]ةيبرعلا[
،قفرملا ليغشتلا ماظن عم قفاوتي لا جمانرب تيبثت وأ ليغشتلا ماظن نم قباسلا رادصلإا ىلإ وأ رخآ ليغشت ماظن ىلإ جتنملا عم قفرملا ليغشتلا ماظن رييغت دعب ةلكشم ثودح ةلاح يف.هلادبتساو جتنملا عاجرإ ةيناكمإ رفوتت .ةمدخلا نع نيلوئسملا نيينفلا دحأ ةرايز ىلع قفاوملل موسر عفد كنم بلطيسو ينفلا معدلا نم ةدافتسلاا نم نكمتت نلف
[English]
1. After installing and connecting the PIM, power on the display device.
2. Press the SOURCE button on the remote control provided with the display device. Next, select Plug In Module.
3. Select the default application you want to run when MagicInfo starts.
4. Enter the IP information.
5. Select a language. (The default language is English.)
6. Select a display mode.
7. Double-check the settings you have just configured.
N Default Sound Setting on the PIM is set to HDMI.
When connecting the PIM to an OPS display made by another manufacturer that does not support HDMI sound, change the PIM’s Sound Setting to Analog.
[Bahasa Indonesia]
1. Setelah PIM terpasang dan terhubung, nyalakan monitor.
2. Tekan tombol SOURCE pada remote control yang disediakan bersama perangkat monitor. Selanjutnya, pilih Plug In Module.
3. Pilih aplikasi bawaan yang Anda ingin jalankan ketika MagicInfo dimulai.
4. Masukkan informasi IP.
5. Pilih bahasa. (Bahasa bawasan adalah Bahasa Inggris.)
6. Pilih mode tampilan.
7. Periksa lagi pengaturan yang baru Anda konfigurasi.
N Default Sound Setting pada PIM diatur ke HDMI.
Saat menghubungkan PIM ke penampil OPS produksi perusahaan lain yang tidak mendukung suara HDMI, ubah Sound Setting PIM ke Analog.
[Français]
1. Une fois le PIM installé et branché, mettez le périphérique d’affichage sous tension.
2. Appuyez sur le bouton SOURCE de la télécommande fournie avec le périphérique d’affichage. Ensuite, sélectionnez Plug In Module.
3. Sélectionnez l’application devant s’exécuter par défaut lors du démarrage de MagicInfo.
4. Entrez les informations IP.
5. Sélectionnez une langue. (La langue par défaut est l’anglais.)
6. Sélectionnez un mode d’affichage.
7. Vérifiez les paramètres que vous venez de définir.
N Le paramètre Default Sound Setting du PIM est réglé sur HDMI.
Si vous connectez le PIM à un écran OPS provenant d’un autre fabricant et qui ne prend pas en charge le son HDMI, réglez le paramètre Sound Setting du PIM sur Analog.
[Deutsch]
1. Schalten Sie das Anzeigegerät ein, nachdem Sie das PIM montiert und angeschlossen haben.
2. Drücken Sie auf der mit dem Anzeigegerät gelieferten Fernsteuerung die Taste SOURCE. Wählen Sie nun „Plug In Module“ aus.
3. Wählen Sie die Standardanwendung aus, die beim Starten von MagicInfo ausgeführt werden soll.
4. Geben Sie die IP-Informationen ein.
5. Wählen Sie eine Sprache aus. (Die Standardsprache ist Englisch.)
6. Wählen Sie einen Anzeigemodus aus.
7. Überprüfen Sie die soeben konfigurierten Einstellungen genau.
N Default Sound Setting auf dem PIM ist HDMI.
Wenn Sie das PIM an einen OPS-Monitor eines anderen Herstellers anschließen, auf dem HDMI-Ton nicht unterstützt wird, ändern Sie die Sound Setting des PIMs auf Analog.
[Magyar]
1. A PIM-modul felszerelését és csatlakoztatását követően kapcsolja be a kijelzőt.
2. A kijelzőhöz mellékelt távirányítón nyomja meg a SOURCE gombot. Ezután válassza a Plug In Module egységet.
3. Válassza ki, hogy melyik legyen az alapértelmezett alkalmazás, amelyet a Magicinfo indításakor futtat.
4. Gépelje be az IP információt.
5. Válasszon egy nyelvet. (Az alapértelmezett nyelv az angol.)
6. Válasszon egy kijelzőési módot.
7. Ellenőrizze a most konfigurált beállításokat.
N A PIM Default Sound Setting értéke HDMI.
Ha a PIM eszközt más gyártó HDMI-támogatás nélküli OPS kompatibilis megjelenítőjéhez csatlakoztatja, akkor módosítsa a PIM Sound Setting értékét Analog beállításra.
[Italiano]
1. Dopo aver installato e collegato il modulo PIM, accendere il dispositivo di visualizzazione.
2. Premere il tasto SOURCE sul telecomando fornito con il dispositivo di visualizzazione. Selezionare quindi Plug In Module.
3. Selezionare l’applicazione predefinita che si desidera eseguire quando viene avviato MagicInfo.
4. Immettere le informazioni relative all’IP.
5. Selezionare una lingua. (La lingua predefinita è l’inglese.)
6. Selezionare una modalità di visualizzazione.
7. Verificare attentamente le impostazioni appena configurate.
N Default Sound Setting del modulo PIM è impostato su HDMI.
Quando si collega il modulo PIM a un display OPS fabbricato da un altro produttore e che non supporta il suono HDMI, modificare l’impostazione Sound Setting del modulo PIM in Analog.
[Казақ]
1. PIM модулін орнатып, жалғағаннан кейін дисплей құрылғысын қуат көзіне қосыңыз.
2. Дисплей құрылғысымен бірге берілген қашықтан басқару құралында SOURCE түймесін басыңыз. Одан кейін Plug In Module таңдаңыз.
3. MagicInfo қосылғанда іске қосылғанды қалайтын әдепкі бағдарламаны таңдаңыз.
4. IP ақпаратын енгізіңіз.
5. Тілді таңдаңыз. (Әдепкі тіл - Ағылшын.)
6. Дисплей режимін таңдаңыз.
7. Конфигурацияланған параметрлерді екі рет тексеріңіз.
N PIM жүйесіндегі Default Sound Setting параметрі HDMI қызметіне орнатылған.
HDMI дыбысын қамтамасыз етпейтін басқа өндіруші көмегімен жасалған OPS дисплейін PIM жүйесіне қосқан кезде PIM жүйесінің Sound Setting параметрін Analog мәніне өзгертіңіз.
[Polski]
1. Po zainstalowaniu i podłączeniu modułu PIM włącz wyświetlacz.
2. Naciśnij przycisk SOURCE na pilocie dostarczonym z wyświetlaczem. Następnie wybierz opcję Plug In Module.
3. Wybierz domyślną aplikację, która będzie się uruchamiać wraz funkcją MagicInfo.
4. Wprowadź dane adresu IP.
5. Wybierz język. (Językiem domyślnym jest język angielski)
6. Wybierz tryb wyświetlania.
7. Sprawdź skonfigurowane ustawienia.
N Dla opcji Default Sound Setting modułu PIM wybrano ustawienie HDMI.
W przypadku podłączania modułu PIM do monitora OPS innego producenta, nieobsługującego dźwięku HDMI, należy zmienić ustawienie opcji Sound Setting modułu PIM na Analog.
[Português]
1. Depois de instalar e ligar o PIM, ligue o dispositivo de visualização.
2. Prima SOURCE no botão do telecomando fornecido com o dispositivo de visualização. A seguir, seleccione Plug In Module.
3. Seleccione a aplicação predefinida que pretende executar quando o MagicInfo iniciar.
4. Introduza as informações do IP.
5. Seleccione um idioma. (O idioma predefinido é o Inglês.)
6. Seleccione um modo de visualização.
7. Verifique as definições que acabou de configurar.
N A Default Sound Setting no PIM está ajustada em HDMI.
Quando ligar o PIM a um monitor com OPS de outro fabricante que não suporte som HDMI, altere a Sound Setting do PIM para Analog.
[Русский]
1. После установки и подключения модуля PIM включите устройство отображения.
2. Нажмите кнопку SOURCE на пульте ДУ для устройства отображения. Затем выберите Plug In Module.
3. Выберите приложение по умолчанию, которое должно запускаться вместе с MagicInfo.
4. Введите сведения об IP-адресе.
5. Выберите язык. (Язык по умолчанию — английский.)
6. Выберите режим экрана.
7. Еще раз проверьте установленные настройки.
N В качестве Default Sound Setting для модуля PIM установлено значение HDMI.
При подключении модуля PIM к дисплею OPS другого производителя, не поддерживающему звук HDMI, следует изменить Sound Setting модуля PIM на Analog.
[Español]
1. Tras instalar y conectar el PIM, encienda el dispositivo de pantalla.
2. Pulse el botón SOURCE en el mando a distancia incluido con el dispositivo de pantalla. A continuación, seleccione Plug In Module.
3. Seleccione la aplicación predeterminada que desee que se ejecute cuando MagicInfo se inicie.
4. Indique la información de IP.
5. Seleccione un idioma. (El idioma predeterminado es inglés.)
6. Seleccione un modo de visualización.
7. Vuelva a comprobar los valores que acaba de configurar.
N Default Sound Setting en el PIM se ha establecido como HDMI.
Al conectar el PIM a una pantalla OPS de otro fabricante que no admita sonido HDMI deberá modificar Sound Setting en el PIM y establecerlo como Analog.
[Svenska]
1. När du har installerat och anslutit PIM-modulen startar du skärmen.
2. Tryck på knappen SOURCE på fjärrkontrollen som följer med skärmen. Välj sedan Plug In Module.
3. Välj vilket standarprogram som ska köras när MagicInfo startas.
4. Ange IP-informationen.
5. Välj språk. (Standardspråket är engelska.)
6. Välj visningsläge.
7. Kontrollera de inställningar du just har konfigurerat.
N Default Sound Setting på PIM-modulen är inställd på HDMI.
När du ansluter PIM-modulen till en OPS-skärm från en annan tillverkare och denna skärm inte stöder HDMI-ljud ändrar du Sound Setting på PIM-modulen till Analog.
[Türkçe]
1. PIM’ti taktıktan ve bağladıktan sonra ekran aygıtını açın.
2. Ekran aygıtıyla birlikte verilen uzaktan kumandadaki SOURCE düğmesine basın. Ardından Plug In Module seçeneğini seçin.
3. MagicInfo başlatıldığında çalıştırılmasını istediğiniz varsayılan uygulamayı seçin.
4. IP bilgilerini girin.
5. Dil seçin. (Varsayılan dil İngilizcedir.)
6. Görüntüleme modu seçin.
7. Yeni yapılandırdığınız ayarları bir kez daha denetleyin.
N PIM üzerindeki Default Sound Setting HDMI seçeneğine ayarlıdır.
PIM’yi başka bir üreticiye ait ve HDMI ses desteklemeyen bir OPS ekrana bağlarken, change the PIM’nin Sound Setting ayarını Analog seçeneğine getirin.[日本語]
1. PIM の取り付けおよび接続の完了後、ディスプレイの電源をオンにします。
2. ディスプレイに付属しているリモコンの SOURCE を押します。 次に Plug In Module を選択します。
3. MagicInfo を起動したときに実行するデフォルトのアプリケーションを選択します。
4. IP 情報を入力します。
5. 言語を選択します。(デフォルトの言語は英語です。)
6. ディスプレイ モードを選択します。
7. 先ほど行った設定をダブルクリックします。
N PIM の Default Sound Setting は、HDMI に設定されています。
HDMI サウンドに対応していない他社製の OPS ディスプレイに PIM を接続する場合、PIM の Sound Setting を Analog に変更してください。[简体中文]
1. 在安装并连接 PIM 后,打开显示设备的电源。
2. 按显示设备随附的遥控器上的 SOURCE 按钮。 然后选择 Plug In Module。
3. 选择 MagicInfo 启动时要运行的默认应用程序。
4. 输入 IP 信息。
5. 选择一种语言。(默认语言为英语。)
6. 选择显示模式。
7. 检查您已配置的设置。
N PIM 上的 Default Sound Setting 设为 HDMI。
连接 PIM 至其他制造商生产的不支持 HDMI 声音的 OPS 显示设备时,请将 PIM 的 Sound Setting 设为 Analog。[繁體中文]
1. 在安裝並連接 PIM 之後,開啟顯示裝置的電源。
2. 按顯示裝置隨附的遙控器上的 SOURCE 按鈕。 然後選擇 Plug In Module。
3. 選擇在 MagicInfo 啟動時您要執行的預設應用程式。
4. 輸入 IP 資訊。
5. 選擇語言。(預設語言為英文。)
6. 選擇顯示模式。
7. 仔細檢查剛完成的設定。
N PIM 上的 Default Sound Setting 設為 HDMI。
連接 PIM 至其他製造商生產的不支援 HDMI 聲音的 OPS 顯示裝置時,請將 PIM 的 Sound Setting 設為 Analog。
[한국어]
1. PIM의 설치 및 연결이 완료되면, 디스플레이 기기의 전원을 켜세요.
2. 디스플레이 기기에 제공된 리모컨의 SOURCE 버튼을 눌러, Plug In Module을 선택하세요.
3. 시작 프로그램으로 설정할 Application을 선택하세요.
4. IP 정보를 입력하세요.
5. 사용하고자 하는 언어를 선택하세요. (기본언어는 영어입니다.)
6. 화면의 회전 타입을 선택하세요.
7. 설정 값을 확인하세요.
N PIM의 Default Sound Setting은 HDMI 출력으로 설정되어 있습니다.
HDMI Sound를 지원하지 않는 타사의 OPS Display를 PIM과 연결할 때에는 PIM의 Sound Setting을 Analog로 변경한 후 사용하시기 바랍니다.
]ةيبرعلا[.ضرعلا زاهج ليغشتب مق ،اهليصوتو PIM ةدحو بيكرت دعب .1 ددح مث .ضرعلا زاهج عم قفرملا دعُب نع مكحتلا زاهجب دوجوملا SOURCE رزلا ىلع طغضا .2
.Plug In Module.MagicInfo ءدب دنع هليغشت يف بغرت يذلا يضارتفلاا قيبطتلا ددح .3.IP تامولعم لخدأ .4
).ةيضارتفلاا ةغللا يه ةيزيلجنلإا( .ةغل ددح .5
.ضرعلا عضو ددح .6
.اهنيوكتب تمق يتلا تادادعلإا قوف اًجودزم اًرقن رقنا .7 .HDMI ىلع طوبضم PIM ةدحوب دوجوملا Default Sound Setting N
ةعِّنصم ةكرش ةطساوب ةعَّنصمو حوتفملا ليصوتلا تافصاومب زيمتت )OPS( ةشاشب PIM ةدحو ليصوت دنع.Analog ىلإ PIM ةدحوب صاخلا Sound Setting رييغت يغبني ،HDMI توص معدت لا ىرخأ
[English]
To install the network box inside the product, ensure it is installed by a technician who is trained to install and disassemble the product.
[Bahasa Indonesia]
Pemasangan kotak jaringan di dalam produk hanya boleh dilakukan oleh teknisi yang terlatih memasang dan mengurai produk.
[Français]
Pour installer le boîtier réseau au sein du produit, assurez-vous de faire appel à un technicien formé à l’installation et au démontage du produit.
[Deutsch]
Der Einbau der Netzwerkbox im Inneren des Geräts darf nur von einem Techniker durchgeführt werden, der für den Einbau und Ausbau des Geräts geschult ist.
[Magyar]
A hálózati doboznak a készülék belsejébe történő beépítését csak olyan szakember végezheti, akit kiképeztek a készülék szerelésére és szétszedésére.
[Italiano]
Per installare il box di rete all’interno del prodotto, assicurarsi che tale operazione venga eseguita da un tecnico preparato per l’installazione e lo smontaggio del prodotto.
[Казақ]
Желі қорабын өнім ішіне орнату үшін мұны өнімді орнатуға және бөлшектеуге үйренген техникалық маманның жүзеге асыруына көз жеткізіңіз.
[Polski]
Instalacja skrzynki sieciowej wewnątrz urządzenia powinna być przeprowadzona przez technika wyszkolonego w zakresie instalacji i demontowania produktu.
[Português]
Para instalar a caixa de rede dentro do produto, certifique-se de que a instalação é feita por um técnico com formação para a instalação e desmontagem do produto.
[Русский]
Установка медиасервера внутри устройства должна выполняться техническим специалистом, имеющим навыки установки и демонтажа устройства.
[Español]
Para instalar la caja de red dentro del producto, asegúrese de que la instala un técnico acreditado.
[Svenska]
Om du vill installera nätverksboxen inuti produkten, ser du till att arbetet sköts av en tekniker som är utbildad för installation och demontering av produkten.
[Türkçe]
Ağ kutusunu ürünün içine kurmak için, bunun ürünü kurmak ve kaldırmak konusunda eğitimli bir teknisyen tarafından yapıldığından emin olun.[日本語]
ネットワーク ボックスの製品への取り付けは、必ず製品の設置および解体の訓練を受けた技術者が行ってください。[简体中文]
要将网络盒安装到产品内部,请确保由受过产品安装和拆卸培训的技术人员进行安装。[繁體中文]
若要在產品內部安裝網路盒,請務必由受過產品安裝與拆卸培訓的技師來安裝。
[한국어]
제품 내부에 설치할 때는 제품에 대한 설치 또는 해체 교육을 받은 전문가에게
맡기세요.
]ةيبرعلا[
.هبيكرتو جتنملا كف ىلع بَّردم ينف قيرط نع هبيكرت بجي ،جتنملا لخاد ةكبشلا زاهج بيكرتل
1324
D32BV2
Q32BV4
Q28BP4
APU
AMD A4-3310M
AMD A8-3510M
2.1GHz Dual-core
(boost up to 2.5GHz)
1.8GHz Quad-core (boost up to 2.5GHz)
256KB(L1) /1MB(L2) Cache
256KB(L1) /1MB(L2) Cache
Memory
2GB
(DDR3 SO-DIMM 2GB x 1)
4GB
(DDR3 SO-DIMM 4GB x 1)
Storage Device
SSD 32GB
SSD 128GB
Operating System
Windows Embedded Standard 7
Windows 7 Professional for Emebedded
Free Installed Software
Magic Info-i Premium
Magic IWB (Interactive Write Board)
Graphics
Radeon HD6000 series
(integrated in APU)
Radeon HD6000 series (integrated in APU)
IO Ports
DP
DisplayPort Out
LAN
Gigabit Ethernet (RJ-45)
USB
USB 2.0 Port x 2 / USB 3.0 Port x 2
ETC
Audio Out / MIC In
Power
DC 12V ~ 19V/5.8A (PIM is powered by OPS connector from Main SET)
Size
200 x 175.6 x 34.4 mm (7.9 x 7.0 x 1.4 inches) / 1.9 kg (4.2 Ibs)
Compatible Model
ME65B, ME75B, DE40C, DE46C, DE55C
[English]
If a problem occurs after changing the operating system provided with the product to another operating system or to the previous version of the operating system, or installing software that is not compatible with the operating system provided, you will not be able to benefit from technical support and will be charged a fee for a visit from a service technician. A product exchange or refund will also not be available.
[Bahasa Indonesia]
Jika terjadi masalah akibat penggantian sistem operasi yang disertakan bersama produk ini dengan sistem operasi lain atau sistem operasi versi sebelumnya, atau pemasangan piranti lunak yang tidak cocok dengan sistem operasi yang disediakan, Anda tidak berhak atas dukungan teknis dan akan dikenai biaya kunjungan oleh teknisi. Produk tidak dapat ditukar dan uang tidak dapat dikembalikan.
[Français]
Si un problème survient suite au remplacement du système d’exploitation fourni avec le produit par un autre système ou par la version antérieure du même système d’exploitation, ou à l’installation d’un logiciel incompatible avec le système d’exploitation fourni, vous ne pourrez pas bénéficier de l’assistance technique et la visite d’un technicien de service vous sera facturée. De plus, aucun échange ou remboursement ne sera possible.
[Deutsch]
Wenn nach der Installation eines anderen als dem mit dem Gerät gelieferten Betriebssystems oder einer vorherigen Version des Betriebssystems oder nach der Installation von Software, die nicht mit dem mitgelieferten Betriebssystem kompatibel ist, Probleme auftreten, können Sie nicht den technischen Support in Anspruch nehmen. Außerdem werden die Kosten eines Servicetechnikers in Rechnung gestellt. Außerdem besteht nicht die Möglichkeit, das Gerät auszutauschen oder den Kaufbetrag zurückzuerstatten.
[Magyar]
Ha probléma merül fel a hálózati dobozhoz mellékelt operációs rendszer módosítása, az operációs rendszer előző verziójának visszaállítása, vagy olyan szoftver telepítése után, amely nem kompatibilis a kapott operációs rendszerrel, akkor nem lesz módja a műszaki támogatás előnyeinek kihasználására és a szerviztechnikus kiszállásáért díjat számítunk fel. Nem lesz lehetősége a készülék kicserélésére vagy árának visszatérítésére sem.
[Italiano]
Se si verifica un problema dopo l’installazione di un sistema operativo diverso da quello fornito con il prodotto, l’utilizzo di una versione precedente del sistema operativo o l’installazione di un software non compatibile con il sistema operativo in dotazione, non sarà possibile usufruire del supporto tecnico e il costo dell’intervento del tecnico verrà addebitato all’utente. Inoltre, non sarà possibile disporre di alcun cambio del prodotto, né usufruire del rimborso.
6587
[English]
To install the network box inside the product, ensure it is installed by a technician who is trained to install and disassemble the product.
* Ensure the fan () is facing outward.
[Bahasa Indonesia]
Pemasangan kotak jaringan di dalam produk hanya boleh dilakukan oleh teknisi yang terlatih memasang dan mengurai produk.
* Pastikan kipas () menghadap ke luar.
[Français]
Pour installer le boîtier réseau au sein du produit, assurez-vous de faire appel à un technicien formé à l’installation et au démontage du produit.
* Assurez-vous que le ventilateur () est orienté vers l’extérieur.
[Deutsch]
Der Einbau der Netzwerkbox im Inneren des Geräts darf nur von einem Techniker durchgeführt werden, der für den Einbau und Ausbau des Geräts geschult ist.
* Stellen Sie sicher, dass der Lüfter () nach außen zeigt.
[Magyar]
A hálózati doboznak a készülék belsejébe történő beépítését csak olyan szakember végezheti, akit kiképeztek a készülék szerelésére és szétszedésére.
* Ügyeljen arra, hogy a ventilátor () kifelé nézzen.
[Italiano]
Per installare il box di rete all’interno del prodotto, assicurarsi che tale operazione venga eseguita da un tecnico preparato per l’installazione e lo smontaggio del prodotto.
* Assicurarsi che la ventola () sia rivolta verso l’esterno.
[Казақ]
Желі қорабын өнім ішіне орнату үшін мұны өнімді орнатуға және бөлшектеуге үйренген техникалық маманның жүзеге асыруына көз жеткізіңіз.
* Желдеткіш () алға қарап тұрғанына көз жеткізіңіз.
[Polski]
Instalacja skrzynki sieciowej wewnątrz urządzenia powinna być przeprowadzona przez technika wyszkolonego w zakresie instalacji i demontowania produktu.
* Wentylator () powinien być skierowany na zewnątrz.
[Português]
Para instalar a caixa de rede dentro do produto, certifique-se de que a instalação é feita por um técnico com formação para a instalação e desmontagem do produto.
* Certifique-se de que a ventoinha () está virada para fora.
[Русский]
Установка медиасервера внутри устройства должна выполняться техническим специалистом, имеющим навыки установки и демонтажа устройства.
* Убедитесь, что вентилятор () направлен наружу.
[Español]
Para instalar la caja de red dentro del producto, asegúrese de que la instala un técnico acreditado.
* Asegúrese de que el ventilador () apunta hacia fuera.
[Svenska]
Om du vill installera nätverksboxen inuti produkten, ser du till att arbetet sköts av en tekniker som är utbildad för installation och demontering av produkten.
* Se till att fläkten () är riktad utåt.
[Türkçe]
Ağ kutusunu ürünün içine kurmak için, bunun ürünü kurmak ve kaldırmak konusunda eğitimli bir teknisyen tarafından yapıldığından emin olun.
* Fanın () dışa doğru baktığından emin olun.[日本語]
ネットワーク ボックスの製品への取り付けは、必ず製品の設置および解体の訓練を受けた技術者が行ってください。
* ファン () が外向きであることを確認してください。[简体中文]
要将网络盒安装到产品内部,请确保由受过产品安装和拆卸培训的技术人员进行安装。
* 确保风扇 () 朝外。[繁體中文]
若要在產品內部安裝網路盒,請務必由受過產品安裝與拆卸培訓的技師來安裝。
* 確保風扇 () 朝外。
[한국어]
제품 내부에 설치할 때는 제품에 대한 설치 또는 해체 교육을 받은 전문가에게
맡기세요.
* FAN 부위()를 위쪽으로 하여 장착하세요.
]ةيبرعلا[
.هبيكرتو جتنملا كف ىلع بَّردم ينف قيرط نع هبيكرت بجي ،جتنملا لخاد ةكبشلا زاهج بيكرتل.جراخلا ىلإ )( ةحورملا هيجوت نم دكأت *
(USA only)
Dispose unwanted electronics through an approved recycler.To find the nearest recycling location, go to our website:www.samsung.com/recyclingdirect or call, (877) 278 - 0799
CALIFORNIA USA ONLY (Applicable for networking models only.)
This Perchlorate warning applies only to primary CR(Manganese Dioxide) Lithium coin cells in the product sold or distributed ONLY in California
NETWORK BOX Installation Guide
Guide d’installation du BOITIER RESEAU
BN68-03137H-03
Package Contents / Contenu de l’emballage
Ports / Ports
Warranty Card
(Not available in all locations)
Carte de garantie
(Non disponible partout)
EWF-Install Guide
EWF-Guide d’installation
NetWork Box
Boîtier réseau
Power Cord
Cordon d’alimentation
MagicInfo Software DVD
DVD du logiciel MagicInfo
Screw (x 5)
Vis (x 5)
Rubber (x 2)
Caoutchouc (x 2)
[English]
Unpack the product and check if all of the following contents have been included.
[Bahasa Indonesia]
Buka kemasan produk dan periksa apakah semua isi berikut ini telah disertakan.
[Français]
Déballez l’appareil et vérifiez si vous disposez bien des éléments suivants.
[Deutsch]
Packen Sie das Gerät aus und prüfen Sie, ob alle nachfolgend aufgeführten Gegenstände mitgeliefert wurden.
[Magyar]
Csomagolja ki a terméket, és ellenőrizze, hogy a csomag tartalmazza-e a következő tartozékok mindegyikét.
[Italiano]
Disimballare il prodotto e verificare che tutte le parti siano presenti.
[Казақ]
Құрылғының бумасын шешіп, төмендегі бөлшектерінің барлығы бар екенін тексеріп алыңыз.
[Polski]
Rozpakuj urządzenie i sprawdź, czy są dostępne wszystkie poniższe elementy.
[Português]
Tire o produto da embalagem e verifique se todos os conteúdos seguintes foram incluídos.
[Русский]
Распакуйте устройство и проверьте комплект поставки.
[Español]
Desembale el producto y compruebe que no falte ninguna de las piezas siguientes.
[Svenska]
Packa upp produkten och kontrollera att följande finns med.
[Türkçe]
Ürünü paketinden çıkarın ve aşağıdaki parçaların pakette olup olmadığını kontrol edin.[日本語]
製品を開梱し、以下の内容がすべて含まれていることを確認します。
* 付属の電源コードセットは本製品のみにご使用ください。
他の電気機器には使用しないでください。[简体中文]
拆开产品包装,检查是否有以下物件。[繁體中文]
打開包裝檢查以下物件是否齊全。
[한국어]
제품의 포장을 풀고, 모든 구성품이 있는지 확인하세요.
]ةيبرعلا[
.اهلخاد ةدوجوم ةيلاتلا تايوتحملا ةفاك نأ نم ققحتو جتنملا ةوبع غرفأ
[English]
This product is for industrial purposes.
Be sure to install the product in a compatible Samsung Display.
(The product cannot be used independently.)
Do not attempt to disassemble, repair or altar the product yourself.
Do not insert any metal or foreign object into the product.
Be sure the product is installed by a professional trained for installation and uninstallation.
Contact Samsung Electronics for details.
[Bahasa Indonesia]
Produk ini untuk penggunaan industri.
Pastikan untuk memasang produk pada Tampilan Samsung yang kompatibel.
(Produk tidak dapat digunakan secara terpisah.)
Jangan coba membongkar, memperbaiki, atau mengubah sendiri produk ini.
Jangan masukkan benda logam atau benda asing apa pun ke dalam produk.
Pastikan produk dipasang oleh profesional yang terlatih dalam pemasangan dan pelepasan produk.
Hubungi Samsung Electronics untuk rinciannya.
[Français]
Ce produit est à usage industriel.
Veillez à installer le produit sur un écran Samsung compatible.
(Le produit ne peut pas être utilisé indépendamment.)
Ne tentez pas de démonter, réparer ou modifier le produit vous-même.
N’insérez pas d’objet métallique ou étranger dans le produit.
Assurez-vous que le produit est installé par un professionnel formé à l’installation et à la désinstallation.
Contactez Samsung Electronics pour obtenir plus de détails.
[Deutsch]
Dies ist ein Gerät zum industriellen Einsatz.
Achten Sie darauf, dass das Produkt auf einem kompatiblen Samsung-Bildschirm installiert wird.
(Das Gerät kann für sich allein nicht verwendet werden.)
Sie dürfen das Gerät nicht selbst öffnen, reparieren oder verändern.
Führen Sie keine Metallgegenstände oder andere Fremdkörper in das Gerät ein.
Achten Sie darauf, dass das Gerät von einer für die Installation und Deinstallation geschulten Fachkraft installiert wird.
Einzelheiten erfahren Sie bei Samsung Electronics.
[Magyar]
Ez a termék ipari célokra készült.
A terméket csak kompatibilis Samsung kijelzőre telepítse.
(A termék önmagában nem használható.)
Ne szerelje szét, ne javítsa és ne alakítsa át a terméket.
Ne dugjon fém- vagy idegen tárgyakat a termékbe.
A termék fel- és leszerelését csak képzett szakember végezheti.
A részletekkel kapcsolatban forduljon a Samsung Electronics ügyfélszolgálatához.
[Italiano]
Questo prodotto è per uso industriale.
Installare il prodotto in un Display Samsung compatibile.
(Il prodotto non può essere utilizzato separatamente.)
Non disassemblare, riparare o modificare il prodotto autonomamente.
Non inserire oggetti metallici o corpi estranei all’interno del prodotto.
Il prodotto deve essere installato da un tecnico specializzato.
Contattare Samsung Electronics per ulteriori dettagli.
[Казақ]
Бұл құрылғы өндірістік мақсаттар үшін арналған.
Құрылғыны үйлесімді Samsung дисплейінде орнатқаныңызға сенімді болыңыз.
(Бұл құрылғыны дербес қолдануға болмайды.)
Құрылғыны өз бетіңізбен бөлшектемеңіз, жөндемеңіз немесе өзгертпеңіз.
Құрылғыға кез келген темір немесе басқа бөгде затта салмаңыз.
Құрылғыны кәсіби жаттыққан маман орнатқанына және жойғанына сенімді болыңыз.
Мәліметтер алу үшін Samsung Electronics компаниясына хабарласыңыз.
[Polski]
Produkt ma przeznaczenie przemysłowe.
Upewnij się, że produkt jest zainstalowany dla kompatybilnego wyświetlacza firmy Samsung.
(Produkt nie może być wykorzystywany oddzielnie.)
Nie należy własnoręcznie demontować, naprawiać lub dokonywać zmian produktu.
Nie należy umieszczać na urządzeniu żadnych metalowych lub obcych przedmiotów.
Upewnij się, że produkt jest montowany i demontowany przez wyszkolonego specjalistę.
Aby dowiedzieć się więcej, skontaktuj się z firmą Samsung Electronics.
[Português]
Este produto é para fins industriais.
Certifique-se de que instala o produto num monitor Samsung compatível.
(O produto não pode ser utilizado independentemente.)
Não tente desmontar, reparar ou alterar o produto.
Não introduza objectos de metal ou substâncias estranhas no produto.
Certifique-se de que o produto é instalado por um técnico profissional na instalação e desinstalação.
Contacte a Samsung Electronics para mais informações.
[Русский]
Данное устройство предназначено для промышленного использования.
Устройство должно быть установлено на совместимый дисплей Samsung.
(Устройство нельзя использовать отдельно.)
Не пытайтесь самостоятельно ремонтировать, разбирать или вносить изменения в устройство.
Не вставляйте в устройство металлические или иные посторонние предметы.
Установка устройства должна выполняться специалистом по установке и демонтажу.
Для получения дополнительной информации обратитесь к представителю Samsung Electronics.
[Español]
Este producto es para uso industrial.
Asegúrese de instalar el producto en una pantalla Samsung compatible.
(Este producto no se puede utilizar por separado.)
No intente desmontar, reparar ni modificar el producto usted mismo.
No inserte ningún objeto metálico o extraño en el producto.
Asegúrese de que el producto lo instala y lo desinstala un profesional acreditado.
Póngase en contacto con Samsung Electronics para obtener toda la información.
[Svenska]
Den här produkten är till för industriella syften.
Se till att installera produkten på en kompatibel Samsung-skärm.
(Produkten kan inte användas separat.)
Montera inte isär, reparera inte och ändra inte produkten på egen hand.
För inte in några metallföremål eller främmande föremål i produkten.
Se till att produkten installeras av en fackman när det gäller installation och avinstallation.
Kontakta Samsung Electronics för information.
[Türkçe]
Bu ürün, endüstriyel kullanım içindir.
Ürünü uyumlu bir Samsung Ekranına taktığınızdan emin olun.
(Ürün tek başına kullanılamaz.)
Ürünü kendi başınıza parçalarına ayırmaya, onarmaya veya değiştirmeye çalışmayın.
Ürünün içine metal parçalar veya yabancı maddeler atmayın.
Ürünün, kurulum ve kaldırma ile ilgili eğitim görmüş profesyonel bir kişi tarafından kurulduğundan emin olun.
Ayrıntılar için Samsung Electronics’e danışın.[日本語]
この製品は業務用です。
対応するサムスン ディスプレイに製品を取り付けてください。
(この製品は単体では使用できません)
絶対にご自身で製品を分解、修理または改造しないでください。
金属や異物を製品の中に入れないでください。
この製品は、取り付けおよび取り外しの訓練を受けた専門技術者に取り付けてもらってください。
詳細については Samsung Electronics にお問い合わせください。[简体中文]
本产品用于工业用途。
请确保将本产品安装到兼容的三星显示器。
(本产品不能单独使用。)
请勿尝试自行拆卸、修理或改装本产品。
切勿将任何金属物或异物插入到本产品。
请务必由接受过安装及卸载培训的专业人士安装本产品。
请联系三星电子以获取详细信息。
生产企业(TSEC):天津三星电子有限公司地址(TSEC):天津市西青区津港公路微电子工业区微四路地址(TSEC):天津经济技术开发区西区江泰路20号生产企业(DONGYU):中山东域电子有限公司地址(DONGYU):广东省中山市东区中山五路嘉华电子城内A栋3-4楼[繁體中文]
本產品適用於工業用途。
請務必將產品安裝在相容的三星顯示器上。
(本產品不可單獨使用。)
切勿企圖擅自拆卸、維修或改裝本產品。
切勿將任何金屬或外物插入本產品。
本產品必須由受過安裝和解除安裝訓練的專業人士進行安裝作業。
如需詳細資訊,請聯絡三星電子。
[한국어]
이 제품은 산업용 제품입니다.
반드시 호환 가능한 삼성전자의 일부 디스플레이 제품에 장착하여 사용하세요.
(단독으로는 사용할 수 없습니다.)
사용자 임의로 제품을 분리, 수리, 개조하지 마세요.
제품 속에 금속물이나 이물질을 넣지 마세요.
제품을 설치할 때는 제품에 대한 설치 또는 해체 교육을 받은 전문가에게 맡기세요.
자세한 내용은 삼성전자로 문의하세요.
]ةيبرعلا[
.ةيعانصلا ضارغلأل جتنملا اذه.Samsung نم ةقفاوتم ضرع ةشاشب جتنملا بيكرت نم دكأت
).لصفنم لكشب جتنملا مادختسا نكمي لا(
.كسفنب هليدعت وأ هحلاصإ وأ جتنملا كف لواحت لا
.جتنملا يف بيرغ وأ يندعم ءيش يأ لاخدإب مقت لا
.هّكف و جتنملا بيكرت يف سرمتم صصختم ةطساوب هبيكرت مت دق جتنملا نأ دكأت.ليصافتلا ىلع لوصحلل Samsung Electronics ب لصتا
MAGICINFO OUT to DVI cable (250 mm)
Câble MAGICINFO OUT vers DVI (250 mm)
MAGICINFO OUT to DVI cable (1600 mm)
Câble MAGICINFO OUT vers DVI (1600 mm)
[English]
USB 3.0 : Connect to a device that supports USB 3.0.
(Also compatible with a USB 2.0 device)
USB 2.0 : Connect to a USB device such as a USB keyboard, mouse, memory, or digital camera.
LAN : Connect to the Internet using a LAN cable.
MAGICINFO OUT : Connect the network box to a Samsung display device that has a MAGICINFO port using the MAGICINFO OUT-DVI cable provided. (A display device not manufactured by Samsung cannot be used.)
DP OUT : Connect the network box to a display device that supports DP using the DP cable.
RS232C : Connect to a device that supports serial communication. : Power on or off the network box.
POWER S/W : Turn on or shut off the AC power supply.
POWER : Connect to the power cord.
[Bahasa Indonesia]
USB 3.0 : Sambungkan ke perangkat yang mendukung USB 3.0.
(Kompatibel pula dengan perangkat USB 2.0)
USB 2.0 : Sambungkan ke perangkat USB, seperti keyboard USB, mouse, memori, atau kamera digital.
LAN : Sambungkan ke Internet dengan kabel LAN.
MAGICINFO OUT : Sambungkan kotak jaringan ke perangkat monitor Samsung dengan port MAGICINFO menggunakan kabel MAGICINFO OUT-DVI yang disediakan.(Perangkat monitor selain produksi Samsung tidak dapat digunakan)
DP OUT : Sambungkan kotak jaringan ke perangkat monitor pendukung DP dengan kabel DP.
RS232C : Sambungkan ke perangkat yang mendukung komunikasi seri. : Menghidupkan atau mematikan kotak jaringan.
POWER S/W : Menghidupkan atau mematikan catu daya AC.
POWER : Menghubungkan ke kabel daya.
[Français]
USB 3.0 : Connexion à un périphérique compatible USB 3.0.
(Également compatible avec un périphérique USB 2.0.)
USB 2.0 : Connexion à un périphérique USB de type clavier USB, souris, mémoire ou appareil photo numérique.
LAN : Connexion à Internet via un câble LAN.
MAGICINFO OUT : Connexion du boîtier réseau à un périphérique d’affichage Samsung disposant d’un port MAGICINFO via le câble MAGICINFO OUT-DVI fourni. (Seuls les périphériques d’affichage fabriqués par Samsung peuvent être utilisés.)
DP OUT : Connexion du boîtier réseau à un périphérique d’affichage qui prend en charge DP via le câble DP.
RS232C : Connexion à un périphérique qui prend en charge les communications série. : Mise sous/hors tension du boîtier réseau.
POWER S/W : Mise sous/hors tension de l’alimentation CA.
POWER : Connexion au cordon d’alimentation.
[Deutsch]
USB 3.0 : Zur Verbindung mit einem Gerät, das USB 3.0 unterstützt
(auch kompatibel mit einem USB-2.0-Gerät)
USB 2.0 : Zur Verbindung mit einem USB-Gerät, z. B. USB-Tastatur, Maus, Speicherstick oder Digitalkamera.
LAN : Zur Verbindung mit dem Internet über ein LAN-Kabel
MAGICINFO OUT : Zur Verbindung der Netzwerkbox über das mitgelieferte MAGICINFO OUT-DVI-Kabel mit einem Samsung Anzeigegerät, das über einen MAGICINFO-Port verfügt. (Ein nicht von Samsung hergestelltes Anzeigegerät kann nicht verwendet werden.)
DP OUT : Zur Verbindung der Netzwerkbox über das DP-Kabel mit einem Anzeigegerät, das DP unterstützt
RS232C : Zur Verbindung mit einem Gerät, das serielle Datenübertragung unterstützt : Schaltet die Netzwerkbox ein und aus
POWER S/W : Schaltet die Stromversorgung ein und aus
POWER : Zum Anschluss des Netzkabels
[Magyar]
USB 3.0 : Csatlakoztatás USB 3.0-t támogató eszközhöz.
(Kompatibilis az USB 2.0 eszközökkel is)
USB 2.0 : Csatlakoztassa az USB eszközt, mint például USB billentyűzet, egér, memória vagy digitális kamera.
LAN : Csatlakozás az internethez LAN kábellel.
MAGICINFO OUT : Csatlakoztassa a hálózati dobozt egy olyan Samsung kijelzőhöz, amely rendelkezik egy MAGICINFO porttal, a mellékelt MAGICINFO OUT-DVI kábel használatával. (A nem Samsung által gyártott kijelzőeszközök nem használhatók.)
DP OUT : Csatlakoztassa a hálózati dobozt egy olyan kijelzőeszközhöz, amely támogatja a DP-t, egy DP kábel használatával.
RS232C : Csatlakoztatás soros kommunikációt támogató eszközhöz. : A hálózati doboz be- és kikapcsolása.
POWER S/W : Az AC tápellátás be- és kikapcsolása.
POWER : Csatlakoztatás a tápkábelhez.
[Italiano]
USB 3.0 : Consente di effettuare il collegamento a un dispositivo che supporta USB 3.0.
(Compatibile anche con un dispositivo USB 2.0)
USB 2.0 : Consente di effettuare il collegamento a un dispositivo USB, ad esempio una tastiera, un mouse, una memoria o una fotocamera digitale USB.
LAN : Consente di effettuare il collegamento a Internet mediante un cavo LAN.
MAGICINFO OUT : Consente di effettuare il collegamento del box di rete a un dispositivo di visualizzazione Samsung dotato di una porta MAGICINFO mediante il cavo MAGICINFO OUT-DVI in dotazione. (Non è possibile utilizzare un dispositivo di visualizzazione non prodotto da Samsung)
DP OUT : Consente di effettuare il collegamento del box di rete a un dispositivo di visualizzazione che supporta DP mediante il cavo DP.
RS232C : Consente di effettuare il collegamento a un dispositivo che supporta la comunicazione seriale. : Consente di accendere o spegnere il box di rete.
POWER S/W : Consente di attivare o disattivare l’alimentazione CA.
POWER : Consente di effettuare il collegamento al cavo di alimentazione.
[Казақ]
USB 3.0 : USB 3.0 қолдайтын құрылғыға қосыңыз.
(USB 2.0 құрылғымен де үйлесімді)
USB 2.0 : USB пернетақтасы, тінтуір, жад немесе сандық камера сияқты USB құрылғысына қосыңыз.
LAN : Жергілікті желі кабелімен интернетке қосыңыз.
MAGICINFO OUT : Желі қорабын бірге берілген MAGICINFO OUT-DVI кабелімен MAGICINFO порты бар Samsung дисплей құрылғысына қосыңыз. (Samsung шығармаған дисплей құрылғысын пайдалануға болмайды.)
DP OUT : DP кабелінің көмегімен DP қолдайтын дисплей құрылғысына қосыңыз.
RS232C : Реттік байланысты қолдайтын құрылғыға қосыңыз. : Желі қорабын қосыңыз немесе өшіріңіз.
POWER S/W : Айнымалы ток көзін өшіріңіз немесе сөндіріңіз.
POWER : Қуат сымына қосыңыз.
[Polski]
USB 3.0 : Służy do podłączania urządzeń obsługujących standard USB 3.0
(kompatybliny również z urządzeniami obsługującymi standard USB 2.0)
USB 2.0 : Służy do podłączania urządzeń USB, takich jak klawiatura, mysz, pamięć lub kamera cyfrowa.
LAN : Służy do łączenia się z Internetem za pomocą kabla LAN.
MAGICINFO OUT : Służy do podłączania skrzynki sieciowej do wyświetlacza firmy Samsung wyposażonego w gniazdo MAGICINFO przy użyciu dostarczonego kabla MAGICINFO OUT-DVI (wyświetlacze firm innych niż Samsung nie są obsługiwane).
DP OUT : Służy do podłączenia skrzynki sieciowej do wyświetlacza obsługującego standard DP przy użyciu kabla DP.
RS232C : Służy do podłączania urządzeń obsługujących komunikację przez port szeregowy. : Służy do włączania lub wyłączania skrzynki sieciowej.
POWER S/W : Służy do włączania lub wyłączania zasilania sieciowego.
POWER : Służy do podłączania kabla zasilającego.
[Português]
USB 3.0 : Ligue um dispositivo que suporte USB 3.0.
(Também é compatível com dispositivos USB 2.0)
USB 2.0 : Ligue um dispositivo USB, como um teclado, rato, memória ou câmara digital USB.
LAN : Ligue à Internet com um cabo LAN.
MAGICINFO OUT : Ligue a caixa de rede a um dispositivo Samsung com uma porta MAGICINFO, utilizando o cabo MAGICINFO OUT-DVI fornecido. (Não pode utilizar um dispositivo de visualização que não tenha sido fabricado pela Samsung.)
DP OUT : Ligue a caixa de rede a um dispositivo de visualização que suporte DP utilizando o cabo DP.
RS232C : Ligue um dispositivo que suporte comunicação em série. : Ligue ou desligue a caixa de rede.
POWER S/W : Ligue ou desligue a fonte de alimentação CA.
POWER : Ligue o cabo de alimentação.
[Русский]
USB 3.0 : Подключение к устройству, поддерживающему интерфейс USB 3.0.
(Также совместим с устройством USB 2.0tnrh)
USB 2.0 : Подключение к USB-устройству, такому как клавиатура, мышь, запоминающее устройство или цифровая камера USB.
LAN : Подключение к Интернету по кабелю локальной сети.
MAGICINFO OUT : Подключение медиасервера к устройству отображения Samsung, оснащенному портом MAGICINFO, с использованием входящего в комплект кабеля MAGICINFO OUT-DVI. (Подключение устройств отображения сторонних производителей невозможно.)
DP OUT : Подключение медиасервера к устройству отображения, поддерживающему DP, с использованием кабеля DP.
RS232C : Подключение к устройству, поддерживающему последовательный обмен данными. : Включение или выключение медиасервера.
POWER S/W : Включение или выключение источника питания переменного тока.
POWER : Подключение к кабелю питания.
[Español]
USB 3.0 : Conectar a un dispositivo compatible con USB 3.0.
(También compatible con dispositivos USB 2.0)
USB 2.0 : Conectar a un dispositivo USB como un teclado USB, un ratón, una memoria o una cámara digital.
LAN : Conectar a Internet mediante un cable LAN.
MAGICINFO OUT : Conectar la caja de red a un dispositivo de visualización Samsung que tenga un puerto MAGICINFO mediante el cable MAGICINFO OUT-DVI que se incluye. (No se pueden utilizar dispositivos de visualización no fabricados por Samsung.)
DP OUT : Conecte la caja de red a un dispositivo de visualización compatible con DP mediante el cable DP.
RS232C : Conectar a un dispositivo compatible con la comunicación en serie. : Encender o apagar la caja de red.
POWER S/W : Encender o apagar la fuente de alimentación de corriente alterna.
POWER : Conectar al cable de alimentación.
[Svenska]
USB 3.0 : Anslut till en enhet som stöder USB 3.0.
(Även kompatibel med en USB 2.0-enhet)
USB 2.0 : Anslut till en USB-enhet, till exempel ett USB-tangentbord, en mus, ett USB-minne eller en digital kamera.
LAN : Anslut till Internet med en nätverkskabel.
MAGICINFO OUT : Anslut nätverksboxen till en Samsung-skärm som är utrustad med en MAGICINFO-port med den medföljande MAGICINFO OUT-DVI-kabeln. (Det går inte att använda en skärm från en annan tillverkare än Samsung.)
DP OUT : Anslut nätverksboxen till en skärm som stöder DP med DP-kabeln.
RS232C : Anslut till en enhet som stöder seriell kommunikation. : Sätta på och stänga av nätverksboxen
POWER S/W : Sätt på eller stäng av strömförsörjningen.
POWER : Anslut strömsladden.
[Türkçe]
USB 3.0 : USB 3.0’ı destekleyen bir aygıta bağlar.
(USB 2.0 aygıtıyla da uyumludur)
USB 2.0 : USB klavye, fare, bellek veya dijital kamera gibi bir USB aygıtına bağlar.
LAN : LAN kablosuyla İnternete bağlar.
MAGICINFO OUT : Ağ kutusunu, sağlanan MAGICINFO OUT-DVI kablosunu kullanarak MAGICINFO bağlantı noktası olan bir Samsung ekran aygıtına bağlar. (Samsung tarafından üretilmeyen bir ekran kullanılamaz.)
DP OUT : Ağ kutusunu DP kablosunu kullanarak DP’yi destekleyen bir ekran aygıtına bağlar.
RS232C : Seri iletişimi destekleyen bir aygıta bağlar. : Ağ kutusunu açar veya kapatır.
POWER S/W : AC güç kaynağını açar veya kapatır.
POWER : Güç kablosuna bağlanır.[日本語]
USB 3.0 : USB 3.0 対応のデバイスに接続します。
(USB 2.0 デバイスにも対応しています)
USB 2.0 : USB キーボード、マウス、メモリ、またはデジタル カメラなどの USB デバイスを接続します。
LAN : LAN ケーブルを使用してインターネットに接続します。
MAGICINFO OUT : 付属の MAGICINFO OUT-DVI ケーブルを使用して、ネットワーク ボックスを MAGICINFO ポートを備える Samsung 製ディスプレイ装置に接続します。 (Samsung 製以外のディスプレイ装置は使用できません。)
DP OUT : DP ケーブルを使用して、ネットワーク ボックスを DP 対応のディスプレイ装置に接続します。
RS232C : シリアル通信対応のデバイスに接続します。 : ネットワーク ボックスの電源をオンまたはオフにします。
POWER S/W : AC 電源をオンまたはオフにします。.
POWER : 電源コードを接続します。[简体中文]
USB 3.0 : 连接到支持 USB 3.0 的设备。
(也兼容 USB 2.0 设备)
USB 2.0 : 连接到 USB 键盘、鼠标、存储器或数码相机等 USB 设备。
LAN : 使用 LAN 缆线连接到 Internet。
MAGICINFO OUT : 使用随附的 MAGICINFO OUT-DVI 缆线将网络盒连接到具有 MAGICINFO 端口的 Samsung 显示设备。(不能使用非 Samsung 制造的显示设备。)
DP OUT : 使用 DP 缆线将网络盒连接到支持 DP 的显示设备。
RS232C : 连接到支持串行通信的设备。 : 打开或关闭网络盒的电源。
POWER S/W : 打开或关闭交流电源。
POWER : 连接到电源线。[繁體中文]
USB 3.0 : 連接至支援 USB 3.0 的裝置。
(還與 USB 2.0 裝置相容)
USB 2.0 : 連接至 USB 裝置,例如 USB 鍵盤、滑鼠、記憶體或數位相機等。
LAN : 使用 LAN 纜線連接至網際網路。
MAGICINFO OUT : 使用提供的 MAGICINFO OUT-DVI 纜線將網路盒連接至有 MAGICINFO 連接埠的 Samsung 顯示裝置。(不可使用非 Samsung 製造的顯示裝置。)
DP OUT : 使用 DP 纜線將網路盒連接至支援 DP 的顯示裝置。
RS232C : 連接至支援序列通訊的裝置。 : 開啟或關閉網路盒的電源。
POWER S/W : 開啟或關閉 AC 電源。
POWER : 連接至電源線。
[한국어]
USB 3.0 : USB 3.0을 지원하는 장치를 연결할 때 사용하세요.
(USB 2.0 장치와 호환가능)
USB 2.0 : USB 키보드/마우스/메모리, 디지털 카메라 등 USB 장치를
연결할 때 사용하세요.
LAN : LAN 케이블로 인터넷을 연결할 때 사용하세요.
MAGICINFO OUT : 제공되는 MAGICINFO OUT-DVI 케이블로 네트워크 박스와 MAGICNIFO 단자가 있는 삼성 디스플레이 장치를 연결할 때 사용하세요. (타 디스플레이 장치 사용불가)
DP OUT : DP 케이블로 네트워크 박스와 DP를 지원하는 디스플레이
장치를 연결할 때 사용하세요.
RS232C : SERIAL 통신을 지원하는 장치를 연결할 때 사용하세요. : 네트워크 박스를 ON/OFF 할 때 사용하세요.
POWER S/W : AC 전원을 공급/차단 할 때 사용하세요.
POWER : 전원 코드를 연결하세요.
]ةيبرعلا[USB 3.0 معدي زاهجب ليصوتلا : USB 3.0
)USB 2.0 زاهج عم اًضيأ قفاوتم(.ةيمقر اريماك وأ ةركاذ وأ سوام وأ USB حيتافم ةحول لثم USB زاهجب ليصوتلا : USB 2.0.LAN لبك مادختساب تنرتنلإاب لاصتلاا : LAN MAGICINFO ذفنمب ةدّوزم Samsung ضرع ةشاشب ةكبش زاهج ليصوت : MAGICINFO OUT تاشاشلل معد رفاوتي لا( .قفرملا MAGICINFO OUT-DVI لبكلا مادختساب).Samsung ريغ ىرخأ تاكرش نم ةعّنصملا.DP لبك مادختساب DP معدي ضرع زاهجب ةكبشلا زاهج ليصوت : DP OUT.لسلستملا لاصتلاا معدي زاهجب ليصوتلا : RS232C.ةكبشلا زاهج ليغشت فاقيإ وأ ليغشت : .ددرتملا رايتلا دّروم ليغشت فاقيإ وأ ليغشت : POWER S/W.يبرهكلا رايتلا كلسب زاهجلا ليصوتل مدختسُي : POWER
Mounting the Network Box / Montage du boîtier réseau
Product Specifications / Spécifications du produit
Entering MagicInfo mode / Passage dans le mode MagicInfo
Connecting to the Network Box / Connexion au boîtier réseau
[English]
Connect the MAGICINFO OUT-DVI cable between the MAGICINFO port on the network box and the DVI port on the display device.
* Press SOURCE on the remote control provided with the display device to change the input source to MAGICINFO.
* Only the MAGICINFO OUT-DVI cable provided with the product is compatible.
[Bahasa Indonesia]
Hubungkan kabel MAGICINFO OUT-DVI antara port MAGICINFO pada kotak jaringan dan port DVI pada perangkat penampil.
* Tekan SOURCE pada remote control yang disediakan bersama perangkat monitor untuk mengubah sumber input ke MAGICINFO.
* Hanya kabel MAGICINFO OUT-DVI yang disertakan bersama produk yang dapat digunakan.
[Français]
Connectez le câble MAGICINFO OUT-DVI entre le port MAGICINFO du boîtier réseau et le port DVI sur le périphérique d’affichage.
* Appuyez sur le bouton SOURCE de la télécommande fournie avec le périphérique d’affichage pour remplacer la source d’entrée par MAGICINFO.
* Seul le câble MAGICINFO OUT-DVI fourni avec le produit est compatible.
[Deutsch]
Verbinden Sie den MAGICINFO-Port der Netzwerkbox über das MAGICINFO OUT-DVI-Kabel mit dem DVI-Port des Anzeigegeräts.
* Drücken Sie auf der mit dem Anzeigegerät gelieferten Fernbedienung SOURCE, um die Eingangsquelle in MAGICINFO zu ändern.
* Nur das mit dem Gerät gelieferte MAGICINFO OUT-DVI-Kabel ist kompatibel.
[Magyar]
Csatlakoztassa a MAGICINFO OUT-DVI kábelt a hálózati doboz MAGICINFO portja és a kijelzőeszköz DVI portja között.
* Nyomja meg a kijelzőeszközhöz mellékelt távirányító SOURCE gombját, és ezzel a bemeneti jelforrást MAGICINFO módba állítja.
* Csak a készülékhez mellékelt MAGICINFO OUT-DVI kábel a kompatibilis.
[Italiano]
Collegare il cavo MAGICINFO OUT-DVI tra la porta MAGICINFO sul box di rete e la porta DVI sul dispositivo di visualizzazione.
* Premere SOURCE sul telecomando fornito con il dispositivo di visualizzazione per cambiare la sorgente di ingresso in MAGICINFO.
* Solo il cavo MAGICINFO OUT-DVI fornito con il prodotto è compatibile.
[Казақ]
MAGICINFO OUT-DVI кабелін желілік блоктағы MAGICINFO порты мен дисплей құрылғысындағы DVI портының арасына қосыңыз.
* Кіріс көзін MAGICINFO етіп өзгерту үшін дисплеймен бірге берілетін қашықтан басқару пультіндегі SOURCE түймесін басыңыз.
* Өніммен бірге берілетін MAGICINFO OUT-DVI кабелі ғана үйлесімді.
[Polski]
Podłącz jeden koniec kabla MAGICINFO OUT-DVI do gniazda MAGICINFO na skrzynce sieciowej, a drugi do gniazda DVI na wyświetlaczu.
* Naciśnij przycisk SOURCE na pilocie dostarczonym z wyświetlaczem, aby zmienić źródło sygnału wejściowego na MAGICINFO.
* Zgodny jest tylko kabel MAGICINFO OUT-DVI dostarczony z produktem.
[Português]
Ligue o cabo MAGICINFO OUT-DVI à porta MAGICINFO na caixa de rede e à porta DVI no dispositivo de visualização.
* Prima SOURCE no telecomando fornecido com o dispositivo de visualização, para alterar a fonte de entrada para MAGICINFO.
* Só o cabo MAGICINFO OUT-DVI fornecido com o produto é compatível.
[Русский]
Подсоедините кабель MAGICINFO OUT-DVI к порту MAGICINFO медиасервера и порту DVI устройства отображения.
* Нажмите кнопку SOURCE на пульте дистанционного управления, предоставляемом вместе с устройством отображения, чтобы изменить источник сигнала на MAGICINFO.
* Можно использовать только кабель MAGICINFO OUT-DVI, предоставляемый вместе с продуктом.
[Español]
Conecte el cable MAGICINFO OUT-DVI entre el puerto MAGICINFO de la caja de red y el puerto DVI del dispositivo de visualización.
* Pulse SOURCE en el mando a distancia que se incluye con el dispositivo de visualización para cambiar la fuente de entrada a MAGICINFO.
* Sólo es compatible el cable MAGICINFO OUT-DVI que se incluye con el producto.
[Svenska]
Anslut MAGICINFO OUT-DVI-kabeln mellan MAGICINFO-porten på nätverksboxen och DVI-porten på skärmen.
* Tryck på knappen SOURCE på fjärrkontrollen som levereras med skärmen för att ändra indatakällan till MAGICINFO.
* Endast den MAGICINFO OUT-DVI-kabel som medföljer produkten är kompatibel.
[Türkçe]
MAGICINFO OUT-DVI kablosunu ağ kutusundaki MAGICINFO bağlantı noktası ile ekran aygıtındaki DVI bağlantı noktası arasına takın.
* Giriş kaynağının MAGICINFO olarak değiştirmek için ekran aygıtıyla birlikte sağlanan uzaktan kumandadaki SOURCE düğmesine basın.
* Yalnızca ürünle birlikte verilen MAGICINFO OUT-DVI kablosu uyumludur.[日本語]
MAGICINFO OUT-DVI ケーブルを使用して、ネットワーク ボックスの MAGICINFO ポートとディスプレイ装置の DVI ポートを接続します。
* ディスプレイ装置のリモコンの SOURCE ボタンを押して、入力ソースを MAGICINFO に変更します。
* 製品に付属の MAGICINFO OUT-DVI ケーブル以外は非対応です。[简体中文]
将 MAGICINFO OUT-DVI 缆线连接到网络盒上的 MAGICINFO 端口和显示设备上的 DVI 端口。
* 按显示设备随附的遥控器上的 SOURCE,将输入信号源更改为 MAGICINFO。
* 仅兼容产品随附的 MAGICINFO OUT-DVI 缆线。[繁體中文]
將 MAGICINFO OUT-DVI 纜線連接至網路盒上的 MAGICINFO 連接埠和顯示裝置上的 DVI 連接埠。
* 按顯示裝置隨附的遙控器上的 SOURCE,將輸入訊號源變更為 MAGICINFO。
* 僅與產品隨附的 MAGICINFO OUT-DVI 纜線相容。
[한국어]
MAGICINFO OUT-DVI 케이블로 네트워크 박스의 MAGICINFO 단자와 디스플레이
기기의 DVI 단자를 연결하세요.
* SOURCE 버튼을 눌러 입력 신호를 MAGICINFO로 변경하세요.
* 제품과 함께 제공된 MAGICINFO OUT-DVI 케이블만 호환 가능합니다.
]ةيبرعلا[ ذفنملاو ةكبشلا زاهج ىلع دوجوملا MAGICINFO ذفنملا نيب MAGICINFO OUT-DVI لبكلا ليصوتب مق.ضرعلا زاهجب دوجوملا DVI.MAGICINFO ىلإ لاخدلإا ردصم رييغتل دعُب نع مكحتلا زاهجب دوجوملا SOURCE رزلا طغضا *.طقف زاهجلا عم قفرملا MAGICINFO OUT-DVI لبكلا قفاوتي *
[English]
If a problem occurs after changing the operating system provided with the product to another operating system or to the previous version of the operating system, or installing software that is not compatible with the operating system provided, you will not be able to benefit from technical support and will be charged a fee for a visit from a service technician. A product exchange or refund will also not be available.
[Bahasa Indonesia]
Jika terjadi masalah akibat penggantian sistem operasi yang disertakan bersama produk ini dengan sistem operasi lain atau sistem operasi versi sebelumnya, atau pemasangan piranti lunak yang tidak cocok dengan sistem operasi yang disediakan, Anda tidak berhak atas dukungan teknis dan akan dikenai biaya kunjungan oleh teknisi. Produk tidak dapat ditukar dan uang tidak dapat dikembalikan.
[Français]
Si un problème survient suite au remplacement du système d’exploitation fourni avec le produit par un autre système ou par la version antérieure du même système d’exploitation, ou à l’installation d’un logiciel incompatible avec le système d’exploitation fourni, vous ne pourrez pas bénéficier de l’assistance technique et la visite d’un technicien de service vous sera facturée. De plus, aucun échange ou remboursement ne sera possible.
[Deutsch]
Wenn nach der Installation eines anderen als dem mit dem Gerät gelieferten Betriebssystems oder einer vorherigen Version des Betriebssystems oder nach der Installation von Software, die nicht mit dem mitgelieferten Betriebssystem kompatibel ist, Probleme auftreten, können Sie nicht den technischen Support in Anspruch nehmen. Außerdem werden die Kosten eines Servicetechnikers in Rechnung gestellt. Außerdem besteht nicht die Möglichkeit, das Gerät auszutauschen oder den Kaufbetrag zurückzuerstatten.
[Magyar]
Ha probléma merül fel a hálózati dobozhoz mellékelt operációs rendszer módosítása, az operációs rendszer előző verziójának visszaállítása, vagy olyan szoftver telepítése után, amely nem kompatibilis a kapott operációs rendszerrel, akkor nem lesz módja a műszaki támogatás előnyeinek kihasználására és a szerviztechnikus kiszállásáért díjat számítunk fel. Nem lesz lehetősége a készülék kicserélésére vagy árának visszatérítésére sem.
[Italiano]
Se si verifica un problema dopo l’installazione di un sistema operativo diverso da quello fornito con il prodotto, l’utilizzo di una versione precedente del sistema operativo o l’installazione di un software non compatibile con il sistema operativo in dotazione, non sarà possibile usufruire del supporto tecnico e il costo dell’intervento del tecnico verrà addebitato all’utente. Inoltre, non sarà possibile disporre di alcun cambio del prodotto, né usufruire del rimborso.
[Казақ]
Егер өніммен бірге берілетін операциялық жүйе басқа операциялық жүйеге немесе операциялық жүйенің алдыңғы нұсқасына өзгертілгеннен кейін немесе операциялық жүйемен үйлеспейтін бағдарламалық жасақтама орнатылғаннан кейін ақау орын алған жағдайда техникалық қолдау көрсетілмейді және қызмет көрсету техникалық маманының келуі үшін ақы алынады. Құрылғыны ауыстырып алуға немесе қайтаруға болмайды.
[Polski]
W przypadku pojawienia się problemu po zmianie systemu operacyjnego dostarczonego z produktem na inny system operacyjny lub po przywróceniu poprzedniej wersji systemu operacyjnego bądź zainstalowania oprogramowania niezgodnego z dostarczonym systemem operacyjnym, użytkownik nie będzie mógł skorzystać ze wsparcia technicznego, a wizyta technika serwisowego będzie odpłatna. Nie będzie również możliwa wymiana produktu ani otrzymanie zwrotu kosztów zakupu.
[Português]
Se ocorrer um problema após alterar o sistema operativo fornecido com a caixa de rede por outro ou pela versão anterior do mesmo, ou ao instalar software que não é compatível com o sistema operativo fornecido, não poderá beneficiar da assistência técnica e ser-lhe-á cobrada uma taxa pelo serviço de um técnico de assistência. Também não poderá trocar o produto, nem obter um reembolso.
[Русский]
В случае возникновения проблемы после установки другой операционной системы вместо операционной системы, предоставляемой с изделием, восстановления предыдущей версии операционной системы или установки программного обеспечения, несовместимого с предоставленной операционной системой, техническая поддержка предоставляться не будет и обращение к специалисту по обслуживанию будет платным. Замена или возмещение стоимости продукта также будут невозможны.
[Español]
Si surge algún problema después de cambiar el sistema operativo proporcionado con el producto por un sistema operativo distinto o por la versión anterior del sistema operativo, o de instalar software no compatible con el sistema operativo proporcionado, no podrá beneficiarse del soporte técnico y tendrá que correr con los gastos de la visita de un técnico de mantenimiento. Tampoco podrá optar al cambio del producto ni a un reembolso.
[Svenska]
Om du byter det operativsystem som följer med produkten till ett annat operativsystem eller återställer det till en tidigare version av operativsystemet eller om du installerar programvara som inte är kompatibel med det medlevererade operativsystemet och det uppstår problem i anslutning till dessa åtgärder, kommer du inte att kunna utnyttja vår tekniska support, och vi kommer dessutom att tvingas ta ut en avgift för ett eventuellt besök av en servicetekniker. Du har inte heller rätt att byta eller lämna tillbaka produkten och få pengarna tillbaka i dessa fall.
[Türkçe]
IÜrünle birlikte sağlanan işletim sisteminin farklı bir işletim sistemine değiştirilmesi, veya işletim sisteminin önceki sürümünün geri yüklenmesi veya sağlanan işletim sistemiyle uyumlu olmayan bir yazılımın yüklenmesi üzerine sorunla karşılaşırsanız, teknik destekten yararlanamazsınız ve servis teknisyeninin ziyareti bir ücrete tabi olur. Ayrıca ürün değiştirme veya ücret iadesi de söz konusu olmaz.[日本語]
製品に付属のオペレーティング システムを別のオペレーティング システムまたは以前のバージョンのオペレーティング システムに変更した後、あるいは付属のオペレーティング システムに対して互換性のないソフトウェアをインストールした後に問題が発生した場合、技術サポートのサービスを受けることができなくなり、サービス技術者の出張費用も変更されます。 製品の交換または返品も受け付けられません。[简体中文]
如果将随产品提供的操作系统更改为其他操作系统或先前版本的操作系统,或者安装了与所提供操作系统不兼容的软件,则在出现问题时您将无法获得技术支持,并且需要付费才能享受技术人员上门服务。 此外,产品也无法退换或退款。[繁體中文]
如果在將隨產品提供的作業系統變更為其他作業系統或舊版本的作業系統後,或者安裝與所提供作業系統不相容的軟體後發生問題,您將無法享受技術支援,且將對服務技術人員拜訪服務支付費用。 也不提供產品更換或退款服務。
[한국어]
제품에 제공되는 운영체제를 다른 운영체제 또는 이전 버전으로 임의 변경하거나, 기본으로 제공된 운영체제를 지원하지 않는 소프트웨어를 설치한 경우, 기술 지원 및 제품 교환, 환불이 불가하고 서비스 요청 시 소정의 수수료가 부과됩니다.
]ةيبرعلا[
نم ةدافتسلاا نم نكمتت نلف ،قفرملا ليغشتلا ماظن عم قفاوتي لا جمانرب تيبثت وأ ليغشتلا ماظن نم قباسلا رادصلإا ىلإ وأ رخآ ليغشت ماظن ىلإ جتنملا عم قفرملا ليغشتلا ماظن رييغت دعب ةلكشم ثودح ةلاح يف.هلادبتساو جتنملا عاجرإ ةيناكمإ رفوتت .ةمدخلا نع نيلوئسملا نيينفلا دحأ ةرايز ىلع قفاوملل موسر عفد كنم بلطيسو ينفلا معدلا
[English]
1. After installing and connecting the network box (sold separately), power on the display device.
2. Press SOURCE on the remote control provided with the display device. Next, select MAGICINFO.
3. Select the default application you want to run when MagicInfo starts.
4. Enter the IP information.
5. Select a language. (The default language is English.)
6. Select a display mode.
7. Double-check the settings you have just configured.
[Bahasa Indonesia]
1. Setelah menginstal dan menghubungkan kotak jaringan (dijual terpisah), nyalakan perangkat monitor.
2. Tekan SOURCE pada remote control yang disediakan bersama perangkat monitor. Selanjutnya, pilih MAGICINFO.
3. Pilih aplikasi bawaan yang Anda ingin jalankan ketika MagicInfo dimulai.
4. Masukkan informasi IP.
5. Pilih bahasa. (Bahasa bawasan adalah Bahasa Inggris.)
6. Pilih mode tampilan.
7. Periksa lagi pengaturan yang baru Anda konfigurasi.
[Français]
1. Une fois le boîtier réseau (vendu séparément) installé et connecté, mettez le périphérique d’affichage sous tension.
2. Appuyez sur le bouton SOURCE de la télécommande fournie avec le périphérique d’affichage. Sélectionnez ensuite MAGICINFO.
3. Sélectionnez l’application devant s’exécuter par défaut lors du démarrage de MagicInfo.
4. Entrez les informations IP.
5. Sélectionnez une langue. (La langue par défaut est l’anglais.)
6. Sélectionnez un mode d’affichage.
7. Vérifiez les paramètres que vous venez de définir.
[Deutsch]
1. Schalten Sie das Anzeigegerät nach der Installation und nach dem Anschluss der Netzwerkbox (separat erhältlich) ein.
2. Drücken Sie auf der mit dem Anzeigegerät mitgelieferten Fernbedienung SOURCE. Wählen Sie nun MAGICINFO aus.
3. Wählen Sie die Standardanwendung aus, die beim Starten von MagicInfo ausgeführt werden soll.
4. Geben Sie die IP-Informationen ein.
5. Wählen Sie eine Sprache aus. (Die Standardsprache ist Englisch.)
6. Wählen Sie einen Anzeigemodus aus.
7. Überprüfen Sie die soeben konfigurierten Einstellungen genau.
[Magyar]
1. A (külön beszerzendő) hálózati doboz telepítése és csatlakoztatása után kapcsolja be a készüléket.
2. Nyomja meg a kijelzőeszközhöz mellékelt SOURCE gombot. Ezután válassza a MAGICINFO opciót.
3. Válassza ki, hogy melyik legyen az alapértelmezett alkalmazás, amelyet a Magicinfo indításakor futtat.
4. Gépelje be az IP információt.
5. Válasszon egy nyelvet. (Az alapértelmezett nyelv az angol.)
6. Válasszon egy kijelzőési módot.
7. Ellenőrizze a most konfigurált beállításokat.
[Italiano]
1. Una volta che il prodotto è stato installato e collegato al box di rete (venduto separatamente), accendere il dispositivo di visualizzazione.
2. Premere SOURCE sul telecomando fornito con il prodotto. Successivamente, selezionare MAGICINFO.
3. Selezionare l’applicazione predefinita che si desidera eseguire quando viene avviato MagicInfo.
4. Immettere le informazioni relative all’IP.
5. Selezionare una lingua. (La lingua predefinita è l’inglese.)
6. Selezionare una modalità di visualizzazione.
7. Verificare attentamente le impostazioni appena configurate.
[Казақ]
1. Желі қорабы орнатылып, қосылғаннан кейін (жеке сатылады) дисплей құрылғысын қосыңыз.
2. Дисплей құрылғысымен бірге берілген қашықтан басқару пультіндегі SOURCE түймесін басыңыз. Содан кейін MAGICINFO түймесін таңдаңыз.
3. MagicInfo қосылғанда іске қосылғанды қалайтын әдепкі бағдарламаны таңдаңыз.
4. IP ақпаратын енгізіңіз.
5. Тілді таңдаңыз. (Әдепкі тіл - Ағылшын.)
6. Дисплей режимін таңдаңыз.
7. Конфигурацияланған параметрлерді екі рет тексеріңіз.
[Polski]
1. Włącz wyświetlacz po zainstalowaniu i podłączeniu skrzynki sieciowej (sprzedawanej osobno).
2. Naciśnij przycisk SOURCE na pilocie dostarczonym z wyświetlaczem. Następnie wybierz opcję MAGICINFO.
3. Wybierz domyślną aplikację, która będzie się uruchamiać wraz funkcją MagicInfo.
4. Wprowadź dane adresu IP.
5. Wybierz język. (Językiem domyślnym jest język angielski)
6. Wybierz tryb wyświetlania.
7. Sprawdź skonfigurowane ustawienia.
[Português]
1. Após instalar e ligar a caixa de rede (vendida em separado), ligue o dispositivo de visualização.
2. Prima SOURCE no telecomando fornecido com o dispositivo de visualização. Em seguida, seleccione MAGICINFO.
3. Seleccione a aplicação predefinida que pretende executar quando o MagicInfo iniciar.
4. Introduza as informações do IP.
5. Seleccione um idioma. (O idioma predefinido é o Inglês.)
6. Seleccione um modo de visualização.
7. Verifique as definições que acabou de configurar.
[Русский]
1. После установки и подключения медиасервера (продается отдельно) включите устройство отображения.
2. Нажмите кнопку SOURCE на пульте дистанционного управления, предоставляемом вместе с устройством отображения. Затем выберите MAGICINFO.
3. Выберите приложение по умолчанию, которое должно запускаться вместе с MagicInfo.
4. Введите сведения об IP-адресе.
5. Выберите язык. (Язык по умолчанию — английский.)
6. Выберите режим экрана.
7. Еще раз проверьте установленные настройки.
[Español]
1. Una vez instalada y conectada al producto la caja de red (que se vende por separado), encienda el dispositivo de visualización.
2. Pulse SOURCE en el mando a distancia que se incluye con el dispositivo de visualización. A continuación, seleccione MAGICINFO.
3. Seleccione la aplicación predeterminada que desee que se ejecute cuando MagicInfo se inicie.
4. Indique la información de IP.
5. Seleccione un idioma. (El idioma predeterminado es inglés.)
6. Seleccione un modo de visualización.
7. Vuelva a comprobar los valores que acaba de configurar.
[Svenska]
1. När du har installerat och anslutit nätverksboxen (som säljs separat) sätter du på skärmen.
2. Tryck på SOURCE på fjärrkontrollen som följer med skärmen. Välj sedan MAGICINFO.
3. Välj vilket standarprogram som ska köras när MagicInfo startas.
4. Ange IP-informationen.
5. Välj språk. (Standardspråket är engelska.)
6. Välj visningsläge.
7. Kontrollera de inställningar du just har konfigurerat.
[Türkçe]
1. Ağ kutusunu (ayrı satılır) kurduktan ve ürüne bağladıktan sonra, ekran aygıtının gücünü açın.
2. Ekran aygıtıyla birlikte sağlanan uzaktan kumandadaki SOURCE düğmesine basın. Ardından, MAGICINFO’yu seçin.
3. MagicInfo başlatıldığında çalıştırılmasını istediğiniz varsayılan uygulamayı seçin.
4. IP bilgilerini girin.
5. Dil seçin. (Varsayılan dil İngilizcedir.)
6. Görüntüleme modu seçin.
7. Yeni yapılandırdığınız ayarları bir kez daha denetleyin.[日本語]
1. ネットワーク ボックス (別売) を設置して接続した後、ディスプレイ装置をオンにします。
2. ディスプレイ装置のリモコンの SOURCE を押します。 次に、MAGICINFO を選択します。
3. MagicInfo を起動したときに実行するデフォルトのアプリケーションを選択します。
4. IP 情報を入力します。
5. 言語を選択します。(デフォルトの言語は英語です。)
6. ディスプレイ モードを選択します。
7. 先ほど行った設定をダブルクリックします。[简体中文]
1. 安装并连接网络盒(单独出售)之后,打开显示设备的电源。
2. 按显示设备随附的遥控器上的。 然后,选择 MAGICINFO。
3. 选择 MagicInfo 启动时要运行的默认应用程序。
4. 输入 IP 信息。
5. 选择一种语言。(默认语言为英语。)
6. 选择显示模式。
7. 检查您已配置的设置。[繁體中文]
1. 安裝並連接網路盒(單獨出售)後,開啟顯示裝置的電源。
2. 按顯示裝置隨附的遙控器上的 SOURCE。 接下來,選擇 MAGICINFO。
3. 選擇在 MagicInfo 啟動時您要執行的預設應用程式。
4. 輸入 IP 資訊。
5. 選擇語言。(預設語言為英文。)
6. 選擇顯示模式。
7. 仔細檢查剛完成的設定。
[한국어]
1. 네트워크 박스(별매품)의 설치 및 연결이 완료되면, 디스플레이 기기의 전원을 켜세요.
2. 디스플레이 기기에 제공된 리모컨의 SOURCE 버튼을 눌러, MagicInfo를 선택하세요.
3. 시작 프로그램으로 설정할 Application을 선택하세요.
4. IP 정보를 입력하세요.
5. 사용하고자 하는 언어를 선택하세요. (기본언어는 영어입니다.)
6. 화면의 회전 타입을 선택하세요.
7. 설정 값을 확인하세요.
]ةيبرعلا[
.ضرعلا زاهج ليغشتب مق ،)لصفنم لكشب عابُي( هليصوتو ةكبشلا زاهج بيكرت دعب .1.MagicInfo ددح مث .دعُب نع مكحتلا زاهجب دوجوملا SOURCE رز طغضا .2.MagicInfo ءدب دنع هليغشت يف بغرت يذلا يضارتفلاا قيبطتلا ددح .3.IP تامولعم لخدأ .4
).ةيضارتفلاا ةغللا يه ةيزيلجنلإا( .ةغل ددح .5
.ضرعلا عضو ددح .6
E-MANUAL
Thank you for purchasing this Samsung product.
To receive more complete service, please register
your product at
www.samsung.com/register
Model______________ Serial No.______________
Contents
e-Manual Guide
Viewing the e-Manual
1 Scrolling a Page
1 Using the Top Icons
1 Returning to the Home Page
1 Searching the Index
2 Searching Pages
2 Closing the e-Manual
2 Jumping to a Menu Item
2 Updating the e-Manual
Connections
Aerial Connection
Video Device Connections
5 HDMI Connection
6 Component Connection
6 AV Connection
7 SCART Connection
Audio Device Connections
8 Digital Audio (Optical) Connection
9 ARC (Audio Return Channel)
Headphone Connection
Computer Connection
10 HDMI Connection
11 HDMI-to-DVI Connection
Getting Started
Switching Between Video Sources
Programming
13 Auto Tuning
Channel Settings
14 Country (Area)
15 Manual Tuning
15 When Aerial Source is set to Air or Cable
16 Transfer Channel List
16 Delete CAM Operator Profile
17 Satellite System
19 Scanning for Satellite Channels
Channel Management
22 Remove Channels
22 Number Change
22 Channel Lock
22 Channel Unlock
22 Rename Analogue Channels
Common Interface
Audio Options
Favourites Channels
25 Add Channels
25 Remove Channels
26 Rearrange the Favourites Channels List
26 Rename a Favourites Channel List
26 Copy a Favourites Channels List
Network Settings
Network Configuration
27 Wired Network
28 Wireless Network
28 LED 5300 series
29 Wireless Network Precautions
29 LED 5300 series
29 Network Security Protocols
Wired Network Setup
30 Automatic Wired Network Setup
31 Manual Wired Network Setup
33 Failed Wired Connection
Wireless Network Setup
34 Automatic Wireless Network Setup
35 Manual Wireless Network Setup
37 WPS Button
37 Failed Wireless Connection
38 Dynamic versus Static IP Addresses
Checking the Network Status
40 Wi-Fi Direct
40 AllShare Settings
40 Rename the TV
Controlling TV
Smart Touch Control
41 Inserting the Batteries (AAA X 2)
41 Connecting to the TV
42 Reconnecting the Smart Touch Control
42 Battery Low Alarm
43 Buttons and Descriptions
45 Special Functions
Touchpad
46 Dragging
46 Press
47 Flicking
47 Pressing and Holding
47 Pressing and Dragging
48 Scrolling Up/Down
48 Scrolling Left/Right
49 Changing Channels by Entering Numbers
49 Numerical Input Guide
49 Adjusting the Touchpad
50 Show Status and Notification Banner
50 Recommendations
50 History
50 Deleting History Data
50 Searching
Using the Virtual Remote Control
51 Changing the Virtual Remote Control Panel
51 Change a position of the Virtual Remote Panel
51 Using the Number Panel
51 Using the Playback Control Panel
51 Using the Quick Access Panel
51 Adjusting the virtual remote control
Universal Remote Setup
52 Connecting the IR EXTENDER CABLE
52 Add the External Device
53 Using the Universal Remote Control
53 Registered External Device Management
Entering Text using the Onscreen Keypad
54 Entering Text using the QWERTY Keypad
54 Additional Features
SMART Interaction
SMART Interaction
55 Precautions
55 Face Recognition
55 TV Camera Use
56 Motion Control
56 Voice Recognition
Voice Recognition
58 Operating Environment
58 Voice Recognition Tutorial
58 Enabling Voice Recognition
59 Basic Voice Recognition Use
59 Voice Recognition Settings
60 Interactive Voice Recognition Commands
60 Deactivating Voice Recognition
Motion Control
61 Operating Environment
62 Motion Control Environment Test
62 Motion Control Tutorial
62 Motion Control Activation
63 Using the Basic Motion Controls
63 Motion Control Options
64 Motion Control Screen
64 The Screen Composition while Viewing TV
65 The Smart Hub Screen Composition
Face Recognition
67 Operating Environment
67 Note the following when using Face Recognition.
68 Face Registration
68 Face Recognition Login
Using Peripheral Devices
69 Keyboard Connection
69 Keyboard Use
70 Mouse Connection
70 Mouse Use
TV Viewing
TV Viewing
71 Programme Info
71 Change the Broadcast Signal
71 Guide
71 Change Channels
72 Recording the Current Programme
72 Change Category
72 Quick Navigation
72 Schedule Viewing
72 Schedule Recording
72 Checking the Programme Info
73 Channel List
73 Change Channels
73 Sorting
74 Genre
74 Change the Broadcast Signal
74 Change the Channel List
Schedule Viewing
75 Digital Channel Schedule Viewing
75 Guide
75 Programme Info
76 Analogue Channel Schedule Viewing
76 Cancel a Schedule Viewing
76 Edit Schedule List
Schedule Recording
77 Precautions
78 Dedicated Recording Device Setup
78 Plug & Play
79 Dedicated Recording Device Management
79 Programme Recording
79 Instant Recording
79 Guide
80 Programme Info
80 Specified Time and Date
80 Cancel the Schedule Recording function
80 Edit Timer List
Recorded Programme Playback
81 Changing the Viewing Mode
81 Filtered View
81 Playlist Creation
81 Recording Lock/Unlock
82 Deleting Saved Programmes
82 Rename
82 Device Management
82 Playing a Different Programme
82 Programme Scan
83 Additional Recorded Programme Playback Settings
Timeshift
84 Precautions
85 Activating the Timeshift function
3D TV
86 Precautions
86 Tips
87 Activating 3D Mode
87 Setting 3D Effects
PIP
Analogue Screen Calibration
89 Fine Tune
Subtitles
90 Show Subtitles
90 Subtitle Options
90 Changing the Teletext Language
TV Settings
Basic Picture Settings
91 Changing the Picture Mode
92 Picture Quality
92 Applying the Current Picture Quality Setting to Another
Input
93 Picture Size
94 Screen Position
94 4:3 Screen Size
94 Picture Off
94 Picture Reset
Advanced Settings
Picture Options
99 Calibrating the Screen Display
99 Auto Adjustment
99 PC Screen Adjustment
Basic Sound Settings
101 Changing the Sound Mode
102 Adjusting the Sound Settings
102 Auto Volume
102 TV Installation Type
102 3D Audio
102 Sound Reset
Speaker Settings
103 Speaker Select
103 Additional Settings
103 DTV Audio Level
104 Digital Audio Out
104 Dolby Digital Comp
104 Samsung Audio Device Connection
Clock and Timer
105 Setting the Time
105 Auto
105 Time Offset
106 Manual
106 Sleep Timer
106 On Timer
107 Off Timer
Screen Protection and Maintenance
108 Eco Solution
109 Screen Burn Protection
109 Pixel Shift
109 Auto Protection Time
110 Scrolling
110 Side Grey
110 Auto Protection Time
Password
111 Password Change
111 Programme Rating Lock
Additional Features
112 Changing the Menu Language
112 Game Mode
112 Precautions and Restrictions
113 BD Wise
113 Menu Transparency
113 Sound Feedback
113 Panel Locking
114 Booting Logo
114 Anti Flicker
114 DivX® Video On Demand
SMART TV Features
Smart Hub
115 Agreements Required to Use Smart Hub
116 Samsung Account
116 Creating a Samsung Account
116 Terms & Conditions and Privacy Policy
117 Logging In
117 Linking a Samsung Account to Other Accounts
117 Managing Accounts
118 Resetting Smart Hub
118 Searching
118 Keyword Search
118 Setting Search Scope
118 Sports Mode
119 Status and Notification
119 Motion Control Configuration
119 Samsung Account Configuration
119 Network Configuration
119 Notifications
Social
120 Social Settings
120 Application Check
120 Connecting a Service to a Samsung Account
121 Watching Videos
121 Friend Profile
121 Video Calling a Friend
121 Filters
Apps
122 Precautions
123 Installing Standard Applications
123 Launching an Application
123 Samsung Apps
123 Searching for Apps
123 Installing Applications
124 Apps Management
124 Edit My Apps
124 Change Order
124 Removing Applications
124 Adding Applications
125 Deleting Applications
125 Managing Application Folders
125 Application Lock/Unlock
125 Application Update
126 Fitness
126 Creating a Profile
126 Kids
127 Web Browser
127 Social Networks
127 Linking Service Accounts
127 3D Explorer
128 Apps Settings
128 Auto Ticker
128 Push Notifications Settings
128 Channel-Bound Apps
128 Properties
On TV
130 On TV Settings
130 On TV Setup
130 Recommendation Notice
130 Recommendation Method
130 Adult Content Block
131 Auto Start
131 Watching an On-Aerial Recommended Programme
131 Scheduled Recommended Programme Info
131 Activating the Guide
131 Programme Recommendations by Time
131 Watching Recorded Programmes
Films and TV Shows
132 Sub Menus on the bottom of the main screen
133 Custom Recommendations List
133 Watching Content
133 VOD Rating Lock
133 Miscellaneous
Photos, Videos & Music
134 Restrictions
135 Supported File Formats
135 USB Device Connection
135 USB Device Removal
135 Playing all the Content on a Storage Device
135 Clearing the Recent Playlist
136 Using Networked External Storage Devices
137 Allowing DLNA Device Connections
137 AllShare
137 Exporting Contents
Video Playback
138 Changing the view mode
138 Playlist Creation
138 Opening a Different File
139 Video Scanning
139 Show Subtitles
140 Additional Video Playback Settings
Music Playback
141 Changing the view mode
141 Playlist Creation
141 Music Scanning
141 Opening a Different File
141 Additional Music Playback Settings
Photo Playback
142 Changing the view mode
142 Slideshow
142 Slideshow Settings
142 Playlist Creation
142 Opening a Different File
142 Background Music
143 Mini Player
143 Additional Photo Playback Settings
Anynet+ (HDMI-CEC)
144 Precautions
145 Anynet+ (HDMI-CEC) Setup
145 Anynet+ (HDMI-CEC) Use
145 Switching between Anynet+ Devices
146 Anynet+ (HDMI-CEC) Device Menu
146 ARC
Mirroring Mobile Device Screens on the TV
147 Screen Mirroring
147 Mobile Device Connection
Other Information
Support
148 Remote Management
148 What is Remote Support?
149 How Does it Work?
150 e-Manual
150 Self Diagnosis
150 Picture Test
151 Sound Test
151 Motion Control Environment Check
151 Signal Information
151 Reset
152 Updating the Software
152 Update now
152 Manual Update
153 Auto update
153 Manage Satellite Channels (when the aerial was set to
Satellite)
153 Usage Mode
153 Support Info
Data Service
154 Auto Run Data Service
154 Using Data Service
155 Main Data Service buttons and their functions
HbbTV
Connecting to a TV Viewing Card slot
157 To connect the CI CARD, follow these steps:
157 Using the “CI or CI+ CARD”
158 To connect the CI CARD Adapter, follow these steps:
159 Using the “CI or CI+ CARD”
Teletext Feature
Anti-theft Kensington Lock
Display Resolution
162 IBM
162 MAC
163 VESA DMT
164 Picture Size and Input Signal
164 Supported 3D Resolutions
164 HDMI
Subtitle and Media Contents file formats, and Codec
166 Subtitle
166 External
166 Internal
167 Supported image resolutions
167 Supported music file formats
168 Video Codec
169 Video Codecs
169 Other Restrictions
169 Video Decoders
169 Audio Decoders
170 3D Precautions
170 CAUTION
171 SAFETY PRECAUTIONS
172 WARRANTY
Licence
Troubleshooting
Screen
Sound
3D TV
Connection
179 Aerial (Air / Cable / Satellite) Connection
180 Computer Connection
Networking
Miscellaneous
Data Service
Schedule Recording / Timeshift
Anynet+ (HDMI-CEC)
Photos, Videos & Music
Apps
Reset the Personal Info and TV settings
Web Browser
Viewing the e-Manual
The embedded e-Manual contains information about your TV's key features.
This TV has a built-in user guide. To read it, use one of the following methods:
●● Open the Support menu and choose e-Manual (Troubleshooting).
●● Press the E-MANUAL button on the standard remote control.
●● Press the MORE button on the Smart Touch Control to display control buttons on the screen.
Flick the Touch Pad until e-Manual appears and select it.
"" Words in blue refer to screen menu options and words in light blue refer to remote control buttons.
"" A printable version of this guide is also available at www.samsung.com/support.
Scrolling a Page
To scroll a page, use of one of the following methods:
●● Press the or button on the scroll bar at the right edge of the screen.
●● Drag or flick up or down the line on either the left or right edge of the touchpad. This method is
not available for LED 4500 - 6300 Series.
●● Place the focus on the or button at the right edge of the screen, drag or flick up or down
on the touchpad.
For LED 4500 - 6300 Series
●● Place the focus on the or button at the right edge of the screen, press the up or down
arrow button on the remote.
Using the Top Icons
Use the icons on the top left of the screen to navigate through pages. These icons are available when
two or more pages are passed.
Returning to the Home Page
To return to the home page, press the a button or select on the top right of the screen.
Searching the Index
Press the b button or select on the top right of the screen to display the index. Select a term to
display the page containing the term.
Searching Pages
Press the { button or select on the top of the screen to access the search screen. Enter a search
phrase and select Done. Select an item from the search results list to navigate to the relevant page.
Closing the e-Manual
To close the e-Manual, press and hold the RETURN button or select at the upper-right corner of
the screen or press EXIT button.
Jumping to a Menu Item
To directly jump to the menu item that is described in the current section, select Try Now. It is possible
to jump from a menu item directly to the related section in the e-Manual. If you want to read an
e-Manual entry on a specific screen menu feature, press the Virtual Remote panel's or the regular
remote's E-MANUAL button to load the corresponding e-Manual page.
For LED 4500 - 6300 Series
On the screen menu, press the E-MANUAL button that appears on the screen.
"" This feature may not be available, depending on the menu.
Updating the e-Manual
Open the Smart Hub and select Apps, and then select More Apps. The e-manual can be updated in
the same way with an application update.
On the More Apps screen, select Apps to update. Select e-Manual from the list. The e-Manual starts
updating to the latest version. However, Apps to update appears on the screen only when the update
is required.
Aerial Connection
Refer to the diagram and connect the aerial cable to the aerial input connector. Make sure that you do
not bend the cable. The number of connectors and their names and locations may vary depending on
the model.
Connect the correct aerial cable for your viewing environment (over-the-air or cable broadcasting).
However, an aerial connection is not necessary if you are using a cable box or satellite receiver.
Video Device Connections
This TV has a wide range of connectors for video input from video devices such as Blu-ray players,
DVD players, camcorders and gaming consoles. Below is a list of featured connectors shown in
descending order of picture quality.
●● HDMI
●● Component
●● AV
Connect the video device to the TV via an HDMI connector for the best picture quality. If the device
does not have an HDMI connector, try a component connector to get the next best possible picture
quality.
The number of connectors and their names and locations may vary depending on the model.
When connecting an external device, refer to the device's operating manual. The number of external
device connectors and their names and locations may vary depending on the manufacturer.
HDMI Connection
Refer to the diagram and connect the HDMI cable to the video device's HDMI output connector and the
TV's HDMI input connector. One of the following HDMI cable types is recommended:
●● High-Speed HDMI Cable
●● High-Speed HDMI Cable with Ethernet
Use an HDMI cable with a thickness of 14 mm or less. Using a non-certified HDMI cable may result in
a blank screen or a connection error.
"" Some HDMI cables and devices may not be compatible with the TV due to different HDMI specifications.
"" This TV does not support HDMI Ethernet Channel. Ethernet is a LAN (Local Area Network) built on coaxial
cables standardized by the IEEE.
Component Connection
Refer to the diagram and connect the AV cable to the TV's component input connectors and the
device's component output connectors. Make sure the cable colours match the connector colours.
AV Connection
Refer to the diagram and connect the AV cable to the TV's external input connectors and the device's
AV output connectors.
If you are using the TV's external input connectors, connect the video cable to the Y connector. Some
models feature a video connector as well. In this case, connect the cable to the video connector.
SCART Connection
Connect the TV’s SCART input connector to the device’s SCART output connector using a SCART
cable. An extra audio connection is not needed because SCART also carries audio.
"" SCART can only carry standard-definition video.
Audio Device Connections
This SMART TV has a wide range of connectors for audio input from devices such as amplifiers, Bluray
players and DVD players. For better audio quality, it is a good idea to use an AV receiver.
●● Digital Audio (Optical)
●● ARC (Audio Return Channel)
The number of connectors and their names and locations may vary depending on the model.
When connecting an external device, refer to the device's operating manual. The number of external
device connectors and their names and locations may vary depending on the manufacturer.
Digital Audio (Optical) Connection
Refer to the diagram and connect the optical cable to the TV's digital audio output connector and the
device's digital audio input connector.
Connecting the device using an optical cable does not automatically turn off the TV speakers. To turn
off the TV speakers, open the Speaker Select (Screen Menu > Sound > Speaker Settings > Speaker
Select) menu, then set External Speaker.
Adjust the audio device's volume using its remote control.
An unusual noise coming from the audio device while it is being used may indicate a problem with the
audio device itself. If this is the case, ask for assistance from the audio device manufacturer.
5.1-channel audio for digital channels is only available with broadcasts that support 5.1-channel audio.
ARC (Audio Return Channel)
This TV supports 3D and ARC (Audio Return Channel) functions via an HDMI cable. ARC enables
digital sound to be output using just an HDMI cable. However, ARC is only available through the HDMI
(ARC) port and only when the TV is connected to an ARC-enabled AV receiver. Connect the HDMI
cable to the TV's HDMI (ARC) connector and the device's HDMI output connector.
Headphone Connection
Refer to the diagram and connect the headphones to the headphone output connector. Only use
headphones with a 3-conductor TRS type jack. The headphone volume and the TV volume are
adjusted independently of each other. While the headphones are connected, the TV speakers are muted
and certain Sound options are deactivated.
"" This option is only available for LED TVs.
Computer Connection
This TV has the following computer connection ports:
●● HDMI
●● HDMI-to-DVI
For the highest picture quality, connect the computer to the HDMI/DVI port. Not all computers are
HDMI-enabled. In this case, use an HDMI-to-DVI cable to connect the computer to the TV. Refer to the
"Display Resolution" for information on the resolution settings supported by the TV.
HDMI Connection
Refer to the diagram and connect the HDMI cable to the TV's HDMI input port and the computer's
HDMI output port.
HDMI-to-DVI Connection
Refer to the diagram and connect the HDMI-to-DVI cable to the TV's HDMI (DVI) port and the
computer's DVI output port. The HDMI-to-DVI connection is available through the HDMI (DVI) port
only.
DVI cannot carry audio. To listen to the computer sound, connect the external speaker to the
computer’s audio output connector.
Switching Between Video Sources
Press SOURCE button to switch between devices connected to the TV.
For example, to switch to a game console connected to the second HDMI connector, press SOURCE
button. From the Source list, select HDMI2. The connector names may vary depending on the product.
Select TOOLS at the upper-right corner of the Source screen to access the following functions.
●● Information
View detailed information about the connected devices.
●● Edit Name
You can edit name of devices connected to the TV to more easily identify external sources.
With a computer connected to the TV's HDMI (DVI) port via an HDMI cable, for example, you can
change Edit Name to PC.
With a computer connected to the TV's HDMI (DVI) port via an HDMI-to-DVI cable, for example,
you can change Edit Name to DVI PC.
With an AV device connected to the TV's HDMI (DVI) port via an HDMI-to-DVI cable, for
example, you can change Edit Name to DVI Devices.
●● Refresh
Select this if a connected device does not appear in the list. If the list does not show the device
after selecting Refresh, check the status of the TV-to-device connection.
●● Disconnect USB Device
Remove the USB device from the list safely. This function is only available when the USB device
selected.
●● Universal remote setup
To add a new external device to control it with the Touch Remote Control, press the SOURCE
button and select Universal remote setup on the top right of the screen. Using the universal
remote control, users can control external devices connected to the TV, such as a settop box,
Blu-ray player, and AV receiver.
Programming
Scan and index available channels.
You can also remove channels from the index, and designate favourites channels for a more convenient
TV viewing experience. Programming is not necessary if you are connected to a cable or satellite
receiver.
Auto Tuning
Screen Menu > Broadcasting > Auto Tuning Try Now
Broadcasting
Auto Tuning
Aerial Air
Channel List
Guide
Schedule Manager
Edit Channel
Edit Favourites
"" The displayed image may differ depending on the model.
Automatically scans and indexes all channels received through the TV's aerial input connector.
111 To start, navigate to Broadcasting and select Auto Tuning.
222 Select Start when prompted with a message. This initiates the Auto Tuning function. The process
can take up to 30 minutes to complete. If starting the Auto Tuning function when there is an
existing index of channels overwrites the previous index.
●● Auto Tuning
Scans for channels automatically and stores them in the TV’s memory. Try Now
●● Cable Search Option (when the aerial was set to Cable)
(Depending on the country)
Sets additional search options such as the frequency and symbol rate for a cable network search.
Try Now
Channel Settings
Screen Menu > Broadcasting > Channel Settings Try Now
Broadcasting
Channel Settings
Subtitle Off
Audio Options
Programme Rating Lock Allow All
Teletext Language ----
Common Interface
Channel Lock On
Country (Area)
Screen Menu > Broadcasting > Channel Settings > Country (Area) Try Now
Select your country so that the TV can correctly auto-tune the broadcasting channels.
"" The PIN input screen appears. Enter your 4 digit PIN number.
"" Depending on the country or region.
●● Digital Channel
Change the country for digital channels.
●● Analogue Channel
Change the country for analogue channels.
Manual Tuning
Screen Menu > Broadcasting > Channel Settings > Manual Tuning Try Now
Scans for a channel manually and stores in the TV.
"" If a channel is locked using the Channel Lock function, the PIN input window appears.
"" This function may not be supported depending on the country.
When Aerial Source is set to Air or Cable
●● Digital Channel Tuning
Scans for a digital channel.
111 Select the New.
"" When selecting Aerial → Air: Channel, Frequency, Bandwidth
"" When selecting Aerial → Cable: Frequency, Modulation, Symbol Rate
222 Select the Search. When scanning has finished, a channel is updated in the channel list.
●● Analogue Channel Tuning
Scans for an analogue channel.
111 Select the New.
222 Set the Programme, Colour System, Sound System, Channel and Search.
333 Select the Store. When scanning has finished, a channel is updated in the channel list.
Channel mode
●● P (programme mode)
When tuning is complete, the broadcasting stations in your area have been assigned to position
numbers from P0 to P99. You can select a channel by entering the position number in this mode.
●● C (aerial channel mode) / S (cable channel mode)
These two modes allow you to select a channel by entering the assigned number for each aerial
broadcasting station or cable channel.
Transfer Channel List
Screen Menu > Broadcasting > Channel Settings > Transfer Channel List Try Now
Imports or exports the channel map.
"" You should connect USB storage to use this function.
"" The PIN input screen appears. Enter the PIN using your remote.
●● Import from USB: Import channel list from USB. Try Now
●● Export to USB: Export channel list to USB. This function is available when USB is connected. Try
Now
Delete CAM Operator Profile
Screen Menu > Broadcasting > Channel Settings > Delete CAM Operator Profile Try Now
Select the CAM operator to delete.
Satellite System
Screen Menu > Broadcasting > Channel Settings > Satellite System Try Now
A set of satellite dish settings must be configured for each wanted satellite before performing a
channel scan.
Satellite System is available when Aerial is set to Satellite.
"" The PIN input screen appears. Enter your 4 digit PIN number.
●● Satellite Selection: You can choose the satellites for this TV. Try Now
●● LNB Power: Enables or disables the power supply for the LNB. Try Now
●● LNB Settings: Configures the outdoor equipment. Try Now
Satellite: Selects the satellite for receiving digital broadcasts.
Transponder: Selects a transponder from the list or adds a new transponder.
DiSEqC Mode: Selects DiSEqC mode for the selected LNB.
Lower LNB Oscillators: Sets the LNB oscillators to a lower frequency.
Upper LNB Oscillators: Sets the LNB oscillators to a higher frequency.
Tone 22 kHz: Selects the Tone 22 kHz depending on the LNB type. For a universal LNB it should
be Auto.
●● SatCR/Unicable Settings: Configure single cable installation. Try Now
"" SatCR is short for satellite channel router.
"" This function may not support depending on the country.
SatCR/Unicable: Enables or disable single cable installation support.
Slot Number: Select the SatCR user slot number for this receiver.
Slot Frequency: Enter the appropriate frequency to receive the signal from SatCR.
Detect Slot Frequency: Auto-detect the signal frequency for the selected slot number.
Verify Slot Frequency: Verify that the frequency entered corresponds to the selected slot.
●● Positioner Settings: Configures the aerial positioner. Try Now
Positioner: Enables or disables the positioned control.
Positioner Type: Sets the positioned type between DiSEqC 1.2 and USALS (Universal Satellite
Automatic Location System).
–– My Longitude: Sets the longitude for my location.
–– My Latitude: Sets the latitude for my location.
–– Satellite Longitude Settings: Sets the longitude of user defined satellites.
User Mode: Sets the position of satellite aerial according to each satellite.
If you store the current position of satellite aerial according to a certain satellite, when the signal
of that satellite is needed, the satellite aerial can be moved to pre-populated position.
–– Satellite: Selects the satellite to set the position for.
–– Transponder: Selects a transponder from the list for signal reception.
–– Moving Mode: Selects the movement mode between discrete and continuous movement.
–– Step Size: Adjusts the step size degrees for the aerial rotation. Step Size is available when
Moving Mode is set to Step.
–– Go To Stored Position: Rotates the aerial to the stored satellite position.
–– Aerial Position: Adjusts and stores the aerial position for the selected satellite.
–– Store Current Position: Stores current position as the selected positioner limit.
Installer Mode: Sets limits to the scope of movement of satellite aerial or reset the position.
Generally, installation guide uses this function.
–– Limit Position: Selects the direction of the positioner Limit.
–– Aerial Position: Adjusts and stores the aerial position for the selected satellite.
–– Store Current Position: Stores the current position as the selected positioner Limit.
–– Go to zero: Moves the aerial to the reference position.
–– Reset positioner limit: Allows the aerial to rotate over the full arc.
●● Reset All Settings: All satellite settings will be reset to the initial values. Try Now
Scanning for Satellite Channels
Screen Menu > Broadcasting > Channel Settings > Manual Tuning
Press Scan after setting the items below.
●● Transponder
Selects the transponder.
●● Scan Mode
Selects either free or all channels to store.
●● Network Search
Enable / Disable network search.
●● Signal Quality
Display the current status of broadcasting signal.
●● Network Name
This displays the name of the network that is found.
"" Information on a satellite and its transponder is subject to change depending on the broadcasting
conditions.
"" When setting is completed, move to Search. Channel scan is started.
Channel Management
Screen Menu > Broadcasting > Edit Channel Try Now Try Now
Broadcasting
Auto Tuning
Aerial Air
Channel List
Guide
Schedule Manager
Edit Channel
Edit Favourites
"" The displayed image may differ depending on the model.
Remove channels from the index, and rename analogue channels. The Edit Channel screen icons
indicate the following:
●● : An analogue channel
●● : A favourites channel
●● : A locked channel
In the Edit Channel screen, select the Virtual Remote panel's or the regular remote's TOOLS button to
access the following options:
●● Sorting
(Digital channels only)
Change the list ordered by name or number.
●● Aerial
Choose between Air, Cable or Satellite.
●● Category
The TV's channel index is divided into different categories such as All, TV, Radio, Data/Other,
Analogue, Recently Viewed and Most Viewed. Choose a category.
●● Edit Favourites
Organize favorites lists to find favourite channels and switch between channels more easily.
●● Channel Info
Check the information of the channel.
●● Information
Check the information of the broadcast.
Remove Channels
Screen Menu > Broadcasting > Edit Channel
Remove registered channels from the index. Removing channels appearing in the Recently Viewed or
Most Viewed list clears the channels from the list only and does not remove them from the index.
111 From the screen, select the channels you wish to remove. Unselect channels by choosing them
again.
222 Press { button. The selected channel(s) will be deleted.
Number Change
Change the number of the channels in edit channels List.
111 Press a button to bring up the edit channels list and select the channel you wish to change the
number of the channels.
222 Select the number you wish change. Select Done E or press touchpad to finish.
Channel Lock
Screen Menu > Broadcasting > Channel Lock Try Now
You can lock channels you don't want your children to view.
Lock is only available with Channel Lock set to On.
Navigate to the Edit Channel screen, select the channels you wish to lock, press b button, and then
enter the password. This locks the selected channels.
Channel Unlock
Unlock locked channels. Navigate to the Edit Channel screen, select the locked channels you wish to
unlock, press b button and then enter the password. This unlocks the selected channels.
Rename Analogue Channels
From the screen, select an analogue channel, and then select the virtual remote panel's or the regular
remote's TOOLS button. The list screen appears. Select Rename channel from the list.
You can now rename the selected channel. The new name can be up to 5 characters long.
Common Interface
Screen Menu > Broadcasting > Common Interface Try Now
●● CI Menu
This enables the user to select from the CAM-provided menu. Select the CI Menu based on the
menu PC Card.
●● CAM video transcoding
You can configure the setting to transcode the video codec from the CAM automatically. Turn it
Off if you do not want to use it.
"" You must use a CAM that supports transcoding the video codec.
●● Application Info
View information on the CAM inserted into the CI slot and on the “CI or CI+ CARD” which is
inserted into the CAM. You can install the CAM anytime whether the TV is on or off.
111 Purchase a CI CAM module at your nearest dealer or by phone.
222 Firmly insert the “CI or CI+ CARD” into the CAM in the direction of the arrow.
333 Insert the CAM with the “CI or CI+ CARD” into the common interface slot, in the direction of the
arrow so that it aligns parallel with the slot.
444 Check if you can see a picture on a scrambled signal channel.
●● CICAM PIN Manager
Manage of CICAM (Common Interface Common Access Module) PIN. You can save PIN or change
stored PIN, and set other options about PIN.
Audio Options
Screen Menu > Broadcasting > Audio Options Try Now
●● Audio Language Try Now
(Digital channels only)
Change the default value for audio languages.
●● Primary audio: Set the primary audio language.
●● Secondary audio: Set the secondary audio language.
"" The available language may differ depending on the broadcast.
●● Audio Format Try Now
(Digital channels only)
Change a desired audio format. The supported audio format may vary depending on the
broadcast programme.
●● Audio Description Try Now
(Not available in all locations) (Digital channels only)
This function handles the Audio Stream for the AD (Audio Description) which is sent along with
the Main audio from the broadcaster.
"" Audio Description: Turn the audio description function on or off.
"" Volume: Adjust the audio description volume.
Favourites Channels
Screen Menu > Broadcasting > Edit Favourites Try Now
Broadcasting
Auto Tuning
Aerial Air
Channel List
Guide
Schedule Manager
Edit Channel
Edit Favourites
"" The displayed image may differ depending on the model.
You can designate frequently watched channels as favourites. The channels assigned as a favourite
are displayed with the symbol on the Edit Channel and channel list screens. You can create up to 5
favourites channel lists. You can also rename and edit favourites channel lists.
From the Edit Favourites screen, select the Virtual Remote panel's or the regular remote's TOOLS
button to access the following options:
●● Sorting: Change the list ordered by name or number. This function is not available on analogue
channel.
●● Aerial: Choose between Air, Cable, and Satellite.
●● Edit Channel: You can manage the channels saved on the TV.
●● Information: View detailed information about the current programme.
Add Channels
Add a channel to a favourites channels list.
111 Press a button to bring up the channel list containing the channels you wish to add and then
select the channels.
222 Press b button to bring up a favourites channels list and then { button to add the selected
channels.
Remove Channels
Remove channels from a favourites channels list.
111 Press b button to bring up a favourites channels list and then select the channels you wish to
remove.
222 Press { button to remove the channels from the list.
Rearrange the Favourites Channels List
Rearrange the order of the channels in a Favourites Channels List.
111 Press b button to bring up the favourites channels list and select the channel you wish to move.
222 Press a button to rearrange the order of the selected channel. Select Done E or press the
touchpad to finish.
Rename a Favourites Channel List
Rename an existing favourites channels list.
111 Select the Virtual Remote panel's or the regular remote's TOOLS button to display the list. Select
Rename Favourites from the list.
222 Rename the list in the popup window. The new name can be up to 20 characters long.
Copy a Favourites Channels List
Copy channels from one favourites channels list to another.
111 Press b button to bring up a Favourites Channels List and select the channels you wish to copy.
222 Select the Virtual Remote panel's or the regular remote's TOOLS button to display the list. Select
Copy to Favourites from the list, and then select the Favourites Channels List(s) you wish to copy
to. This copies over the channels to the selected Favourites Channels List(s).
Network Configuration
Connecting the TV to a network gives you access to online services such as the Smart Hub and
AllShare Play, as well as software updates.
Wired Network
There are three ways to connect the TV to a Local Area Network (LAN).
●● External Modem
●● ① IP Router + ② External Modem
●● Wall-mounted LAN Outlet
Wireless Network
Connect the TV to the Internet using a standard router or modem.
LED 5300 series
Insert the Samsung wireless LAN adapter (WIS09ABGNX, WIS12ABGNX) into one of the TV’s USB
ports, referring to the illustration. Without this connection, the TV cannot connect to the Internet
wireless.
Using the wireless LAN adapter may cause image retention or radio interference on some TV channels.
In those cases, use one of the following methods.
●● Use a vertical-type wireless LAN adapter.
●● Connect the wireless LAN adapter to a USB extension cable, and insert the cable’s USB plug into
one of the TV’s USB ports. Install the wireless LAN adapter on the top of the TV’s back using an
adhesive tape.
Wireless Network Precautions
●● This TV supports the IEEE 802.11a/b/g/n communication protocols. Samsung recommends using
IEEE 802.11n. Otherwise when you play video over a network connection, the video may not play
smoothly.
●● To use a wireless network, the TV must be connected to a wireless router or modem. If the
wireless router supports DHCP, the TV can use a DHCP or static IP address to connect to the
wireless network.
●● Select a channel that is not currently in use for the wireless router. If the channel set for the
wireless router is currently being used by another device, the result is usually interference and/or
a communications failure.
●● Most wireless networks have an optional security system. To enable a wireless network's security
system, you need to create a security key using characters and numbers. This security key is then
needed to connect to the wireless network.
LED 5300 series
●● Samsung’s Wireless LAN adapter supports the IEEE 802.11a/b/g and n communication protocols.
Samsung recommends using IEEE 802.11n. When you play video over a network connection, the
video may not play smoothly.
●● To use a wireless network, the TV must be connected to a wireless router or modem. If the
wireless router supports DHCP, the TV can use a DHCP or static IP address to connect to the
wireless network.
●● Select a channel that is not currently in use for the wireless router. If the channel set for the
wireless router is currently being used by another device, the result is usually interference and/or
a communications failure.
●● Most wireless networks have an optional security system. To enable a wireless network's security
system, you need to create a security key using characters and numbers. This security key is then
needed to connect to the wireless network.
Network Security Protocols
The TV only supports the following wireless network security protocols and is unable to connect to
non-certified wireless routers:
●● Authentication Modes: WEP, WPAPSK, WPA2PSK
●● Encryption Types: WEP, TKIP, AES
If the wireless router has been set to Pure High-throughput (Greenfield) 802.11n mode and the
Encryption Type to WEP or TKIP, Samsung SMART TVs will not support the connection in compliance
with the new Wi-Fi certification specifications.
If the wireless router supports WPS (Wi-Fi Protected Setup), it is possible to connect to the network
using PBC (Push Button Configuration) or a PIN (Personal Identification Number). WPS automatically
configures the SSID and WPA key settings.
Wired Network Setup
Screen Menu > Network > Network Settings Try Now
Network
Network Status
Network Settings
Wi-Fi Direct
AllShare Settings
Device Name [TV]Samsung LE...
"" The displayed image may differ depending on the model.
Automatic Wired Network Setup
The TV's wired network connection is automatically configured when it is connected to a network that
supports DHCP.
111 Set Network Type to Wired and then select Connect.
222 The TV attempts to connect to the network. A confirmation message is then shown once a
connection is established. Select OK to proceed. If the attempt fails, try again or connect
manually.
Manual Wired Network Setup
If the network requires a static IP address, enter the IP address, subnet mask, gateway and DNS values
to connect to the network manually. To get the IP address, subnet mask, gateway and DNS values,
contact your Internet Service Provider (ISP). Refer to the "Dynamic versus Static IP Addresses" for
more information.
111 Set Network Type to Wired and then select Connect.
Network Settings
Select your network type.
Network Type Wired
Connect
Plug a network cable into
the back of your TV.
222 Select Stop when the TV attempts to connect to the network. Once the network connection has
been interrupted, select IP Settings.
Network Settings
Connection verification cancelled.
Wired network connection test stopped.
Change Network IP Settings Retry Close
333 From the IP Settings screen, set IP setting to Enter manually, enter IP Address, Subnet Mask,
Gateway, and the DNS Server values, and then select OK.
IP Settings
IP setting Enter manually
IP Address 0.0.0.0
Subnet Mask 0.0.0.0
Gateway 0.0.0.0
DNS setting Enter manually
DNS Server 0.0.0.0
OK Cancel
444 The TV attempts to connect to the network again using the specified settings. A confirmation
message is then shown once a connection is established. Select OK to proceed.
Failed Wired Connection
No network cable found Try Now Try Now
Make sure the network cable is plugged in. If it is connected, make sure the router is turned on. If it is
on, try turning if off and on again.
IP auto setting failed Try Now
Perform the following or set the IP address manually from IP Settings.
111 Ensure that the DHCP server is enabled on the router and reset the router.
222 If this does not work, contact your Internet Service Provider for more information.
Unable to connect to the network Try Now
Check the following:
111 Check the IP Settings.
222 Ensure that the DHCP server is enabled on the router and unplug and then plug the router back in.
333 If this does not work, contact your Internet Service Provider for more information.
Connected to a local network, but not to the Internet Try Now
111 Make sure that the Internet LAN cable is connected to the router's external LAN port.
222 Check the DNS settings under IP Settings.
333 If the problem persists, contact your Internet Service Provider.
Network setup complete, but unable to connect to the Internet Try Now
If the problem persists, contact your Internet Service Provider.
Wireless Network Setup
Screen Menu > Network > Network Settings
Network
Network Status
Network Settings
Wi-Fi Direct
AllShare Settings
Device Name [TV]Samsung LE...
"" The displayed image may differ depending on the model.
Automatic Wireless Network Setup
Connect the TV to the Internet via a wireless router. Check the wireless router's SSID and security
key settings before attempting to connect. The security key can be found on the wireless router's
configuration screen.
111 Setting Network Type to Wireless automatically displays a list of available wireless networks.
222 Select the network (SSID) you wish to connect to. If the desired wireless router doesn't appear in
the list, select Add Network and enter the network's SSID manually.
333 Enter the security key and select Done. If the selected network is not security-enabled, the TV will
attempt a connection right away.
444 The TV attempts to connect to the network. A confirmation message is then shown once a
connection is established. Select OK to proceed. If the attempt fails, try again or connect
manually.
Manual Wireless Network Setup
If the network requires a static IP address, enter the IP address, subnet mask, gateway and DNS values
to connect to the network manually. To get the IP address, subnet mask, gateway and DNS values,
contact your Internet Service Provider (ISP). Refer to the "Dynamic versus Static IP Addresses" for
more information.
111 Setting Network Type to Wireless automatically displays a list of available wireless networks.
Network Settings
Select your network type.
Network Type Wireless
Wireless network
AP0000
AP0001
Add Network You can connect your TV to the
internet. Please select which
wireless network to use.
Refresh WPS(PBC)
222 Select the network (SSID) you wish to connect to. If the desired wireless router doesn't appear in
the list, select Add Network and enter the network's SSID manually.
333 Enter the security key and select Done. If the selected network is not security-enabled, the TV will
attempt a connection right away.
444 Select Stop when the TV attempts to connect to the network. Once the network connection has
been interrupted, select IP Settings.
Network Settings
Connection verification cancelled.
Wireless network connection test stopped.
Change Network IP Settings Retry Close
555 From the IP Settings screen, set IP setting to Enter manually, enter IP Address, Subnet Mask,
Gateway, and the DNS Server values, and then select OK.
IP Settings
IP setting Enter manually
IP Address 0.0.0.0
Subnet Mask 0.0.0.0
Gateway 0.0.0.0
DNS setting Enter manually
DNS Server 0.0.0.0
OK Cancel
666 The TV attempts to connect to the network again using the specified settings. A confirmation
message is then shown once a connection is established. Select OK to proceed.
WPS Button
If the router has a WPS push button, you can use it to connect the TV to the router automatically. WPS
automatically configures the SSID and WPA key settings.
111 Setting Network Type to Wireless automatically displays a list of available wireless networks.
222 Select WPS(PBC) and then press the router's WPS button within two minutes.
333 The TV automatically acquires the SSID and security key settings and connects to the network. A
confirmation message is then shown once a connection is established. Select OK to proceed.
Failed Wireless Connection
Wireless network connection failed, or no wireless router selected. Try Now Try Now
Go to Network Settings and select the correct router.
Unable to connect to a wireless router Try Now Try Now
Check the following:
111 Check that the router is turned on, and if it is, turn it off and on again.
222 Enter the correct security key if required.
IP auto setting failed Try Now
Perform the following or set the IP address manually from IP Settings.
111 Make sure that the DHCP server is enabled on the router and unplug and plug the router back in.
222 Enter the correct security key if required.
333 If this does not work, contact your Internet Service Provider for more information.
Unable to connect to the network Try Now
Check the following:
111 Check the IP Settings.
222 Enter the correct security key if required.
333 If this does not work, contact your Internet Service Provider for more information.
Connected to a local network, but not to the Internet Try Now
111 Make sure that the Internet LAN cable is connected to the router's external LAN port.
222 Check the DNS settings under IP Settings.
333 If the problem persists, contact your Internet Service Provider.
Network setup complete, but unable to connect to the Internet Try Now
If the problem persists, contact your Internet Service Provider.
Dynamic versus Static IP Addresses
If the network requires a dynamic IP address, use an ADSL modem or router that supports the
Dynamic Host Configuration Protocol (DHCP). Modems and routers that support DHCP automatically
provide the IP address, subnet mask, gateway and DNS values the TV needs to access the Internet, so
they do not have to be entered manually. Most home networks use a dynamic IP address.
If the network requires a static IP address, enter the IP address, subnet mask, gateway, and DNS values
manually when setting up the network connection. To get the IP address, subnet mask, gateway and
DNS values, contact your Internet Service Provider (ISP).
If the network requires a static IP address, use an ADSL modem that supports DHCP. ADSL modems
that support DHCP also allow static IP addresses.
Checking the Network Status
Screen Menu > Network > Network Status Try Now
Network
Network Status
Network Settings
Wi-Fi Direct
AllShare Settings
Device Name [TV]Samsung LE...
"" The displayed image may differ depending on the model.
View the current network and Internet status.
Wi-Fi Direct
Screen Menu > Network > Wi-Fi Direct Try Now
Network
Network Status
Network Settings
Wi-Fi Direct
AllShare Settings
Device Name [TV]Samsung LE...
"" The displayed image may differ depending on the model.
Connect a mobile device that supports Wi-Fi Direct to the TV without using a wireless router.
111 Enable Wi-Fi Direct on the mobile device and then launch Wi-Fi Direct. The TV automatically
scans for and displays a list of available devices. The TV's name also appears on the mobile
device.
222 Select the device from the list to initiate a connection. If a connection request is made by the
TV, a permission message appears on the mobile device and vice versa. Accept the request to
connect the mobile device to the TV.
AllShare Settings
Screen Menu > Network > AllShare Settings
This TV can play media files from computers or other DLNA-enabled devices connected to the TV via
a network. Refer to the "Using Networked External Storage Devices" for more information.
In addition, this TV can be used as a display for mobile devices, including smartphones and tablets.
Refer to the "Screen Mirroring" for more information.
Rename the TV
Screen Menu > Network > Device Name Try Now
Assign a unique name for your TV. The assigned name appears on the external devices connected to
the TV via the network.
Smart Touch Control
The Smart Touch Control makes it easier and more convenient to use the TV. For example, you can
use the remote control's built-in touchpad to move the focus and make selections as you would on a
computer using a mouse. In addition, you can use the virtual remote panel displayed on the screen to
change channels, play media files, and access favourites.
"" Depending on the models.
"" This Smart Touch Control is supported for LED 6400 Series and above, PDP 5500 Series.
Inserting the Batteries (AAA X 2)
111 Slightly lift the battery cover by pulling the strap or using a plastic card. Next, pull on the cover’s
notch with a fingernail to remove the cover completely.
222 Insert 2 AAA batteries, making sure to align the positive and negative ends correctly.
333 Align the battery cover with the back of the remote control and press down along the edges until
it is cleanly attached to the remote control.
Connecting to the TV
In order to operate the TV using a Smart Touch Control, you must first pair it to the TV via Bluetooth.
However, the Smart Touch Control is only available for the paired Samsung TV.
111 When the TV is off, point the Smart Touch Control at the remote control receiver of the TV and
press the TV button for the first pairing. Only this buttons sends an IR signal. The remote control
receiver's location may vary depending on the model.
222 A Bluetooth icon will appear at the bottom left of the screen as shown below. The TV will then
attempt to connect to the Smart Touch Control automatically.

 Samsung Readers Hub Vidéo
 Samsung Game Hub Vidéo